[Avg. reading time: 0 minutes]
[Avg. reading time: 1 minute]
Disclaimer
This document serves as a supplementary reference for Rust programming, complementing the lectures presented in class. For official documentation, please refer to the Appendix section.
If you encounter any errors, kindly email me at chandr34 @ rowan.edu.

[Avg. reading time: 3 minutes]
Required Tools
Install these softwares before Week 2.
Windows
Mac
Common Tools (Windows & Mac)
-
Install this VS Code Extension
Remote Development

Configure Env using Dev Container
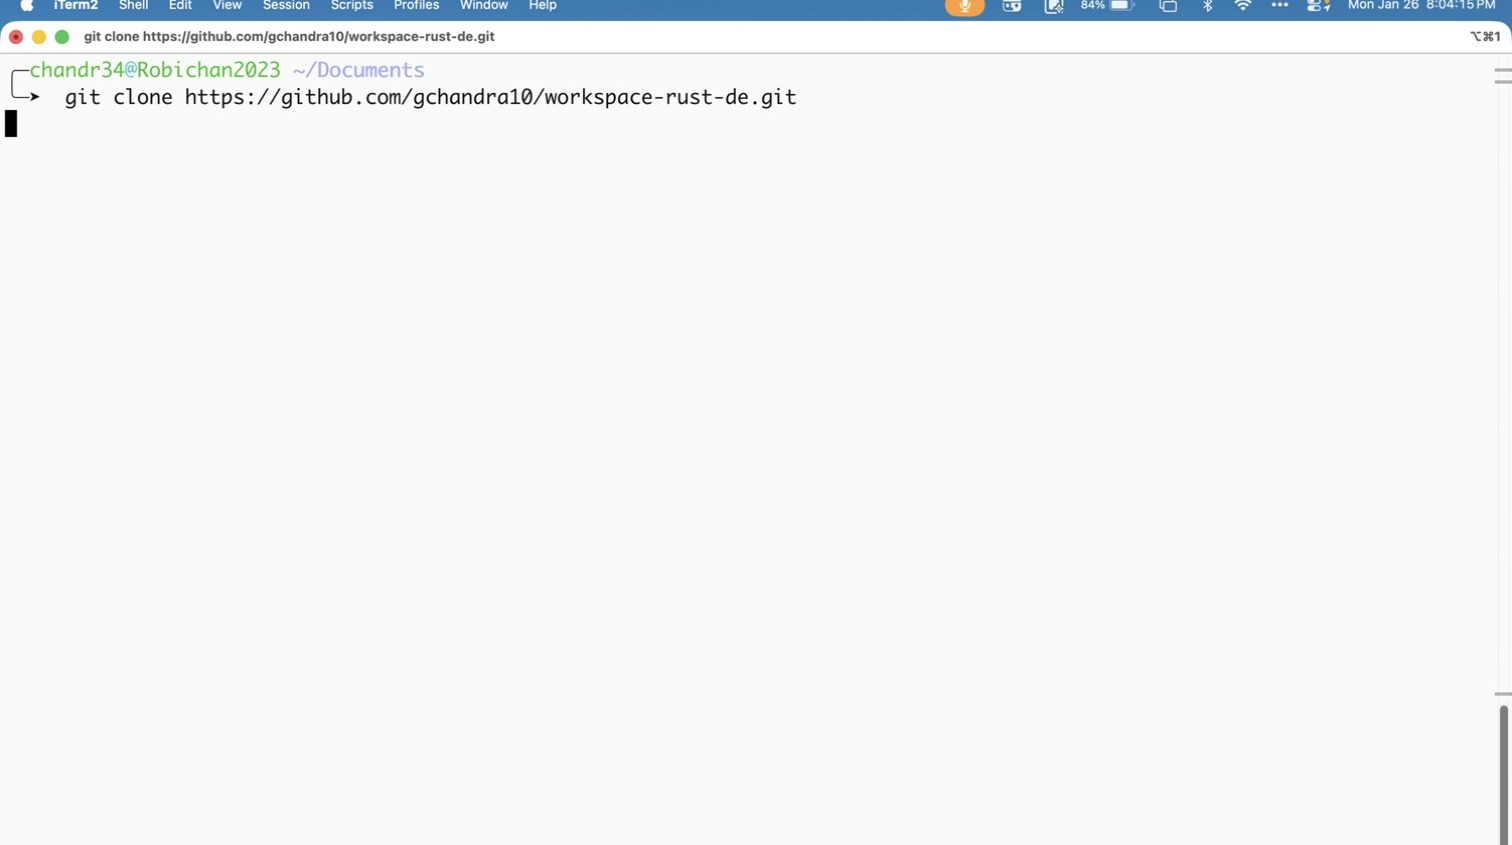
Goto Terminal / Command Prompt
git clone https://github.com/gchandra10/workspace-rust-de.git
- Open VSCode
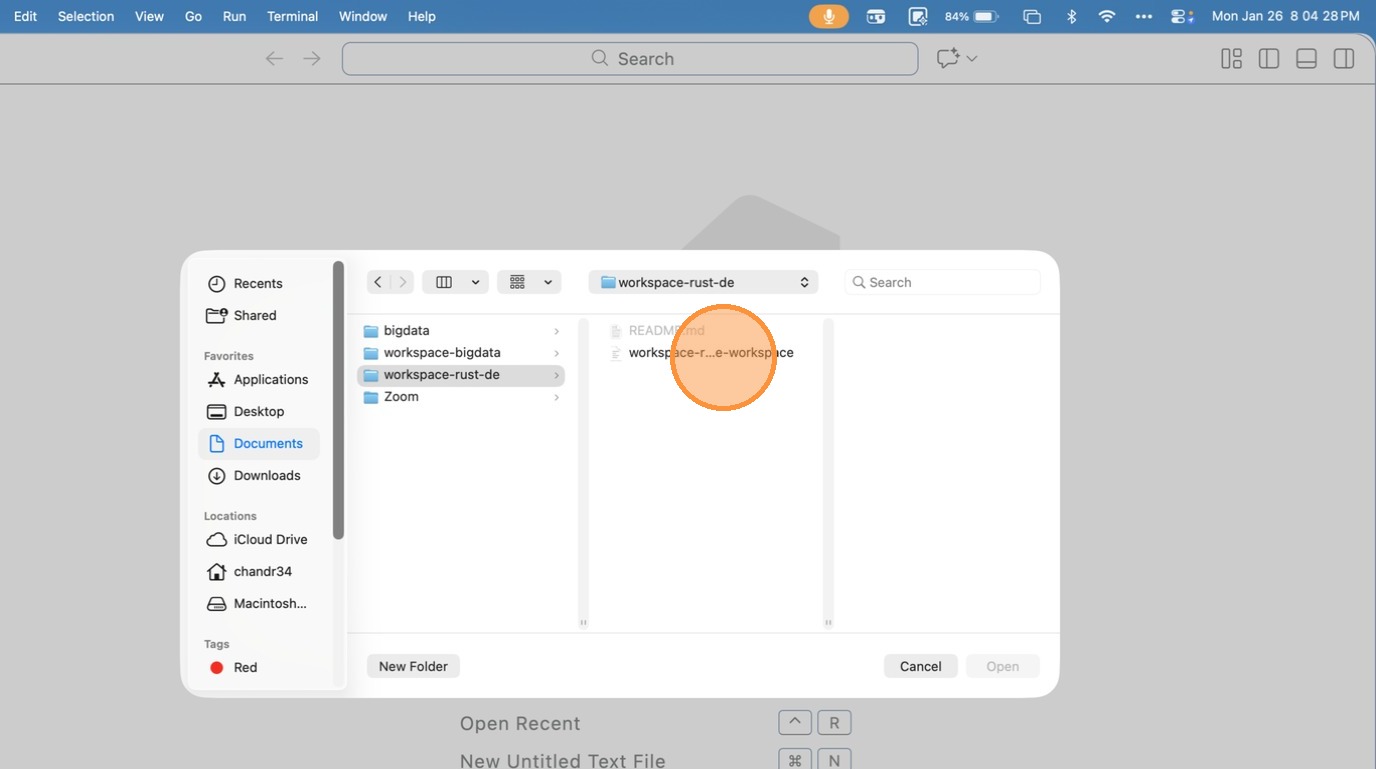
- Goto File > Open Workspace from File
- Goto workspace-rust-de folder and choose the workspace.
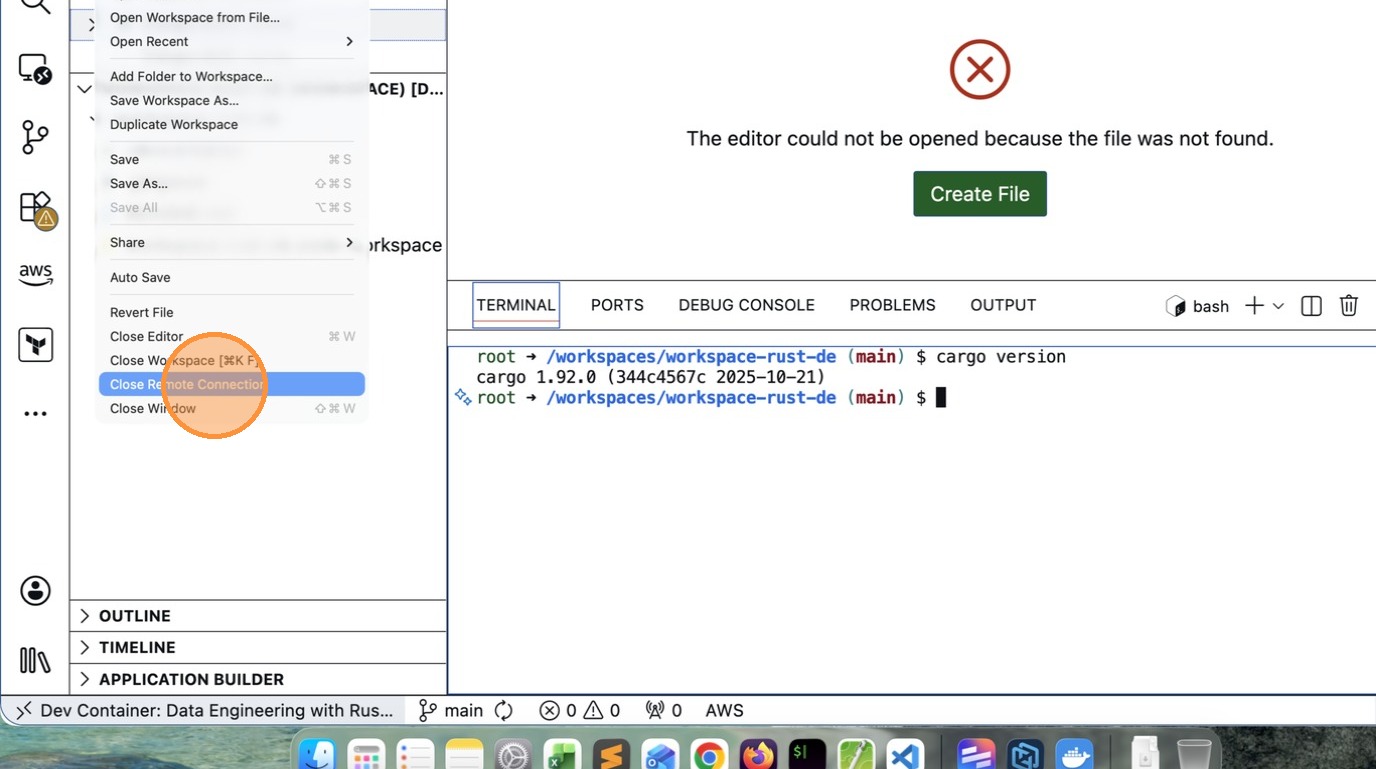
- When VS Code prompts to “Reopen in Container” click it.
If VSCode doesnt prompt, then click the “Remote Connection” button at the Left Bottom of the screen.

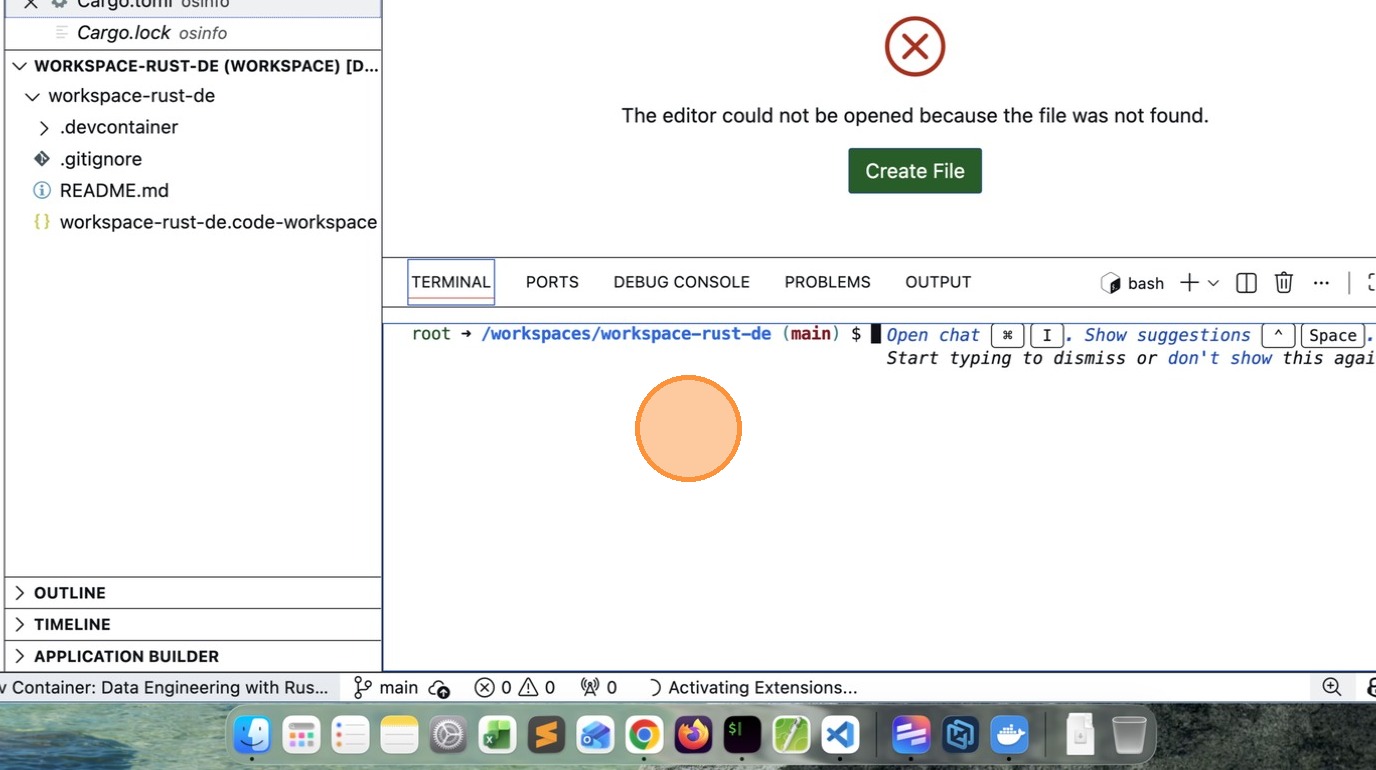
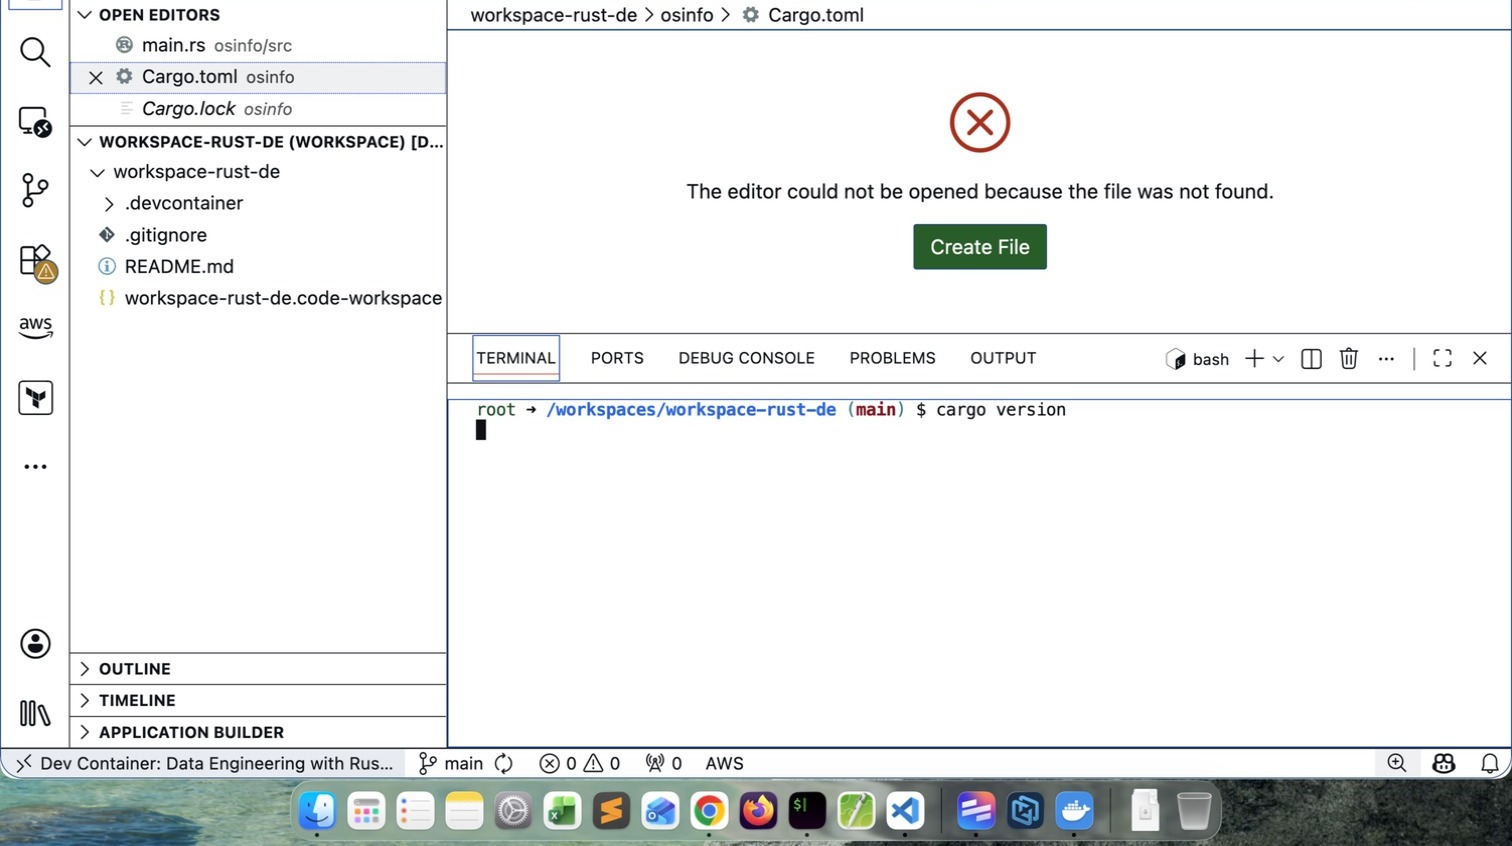
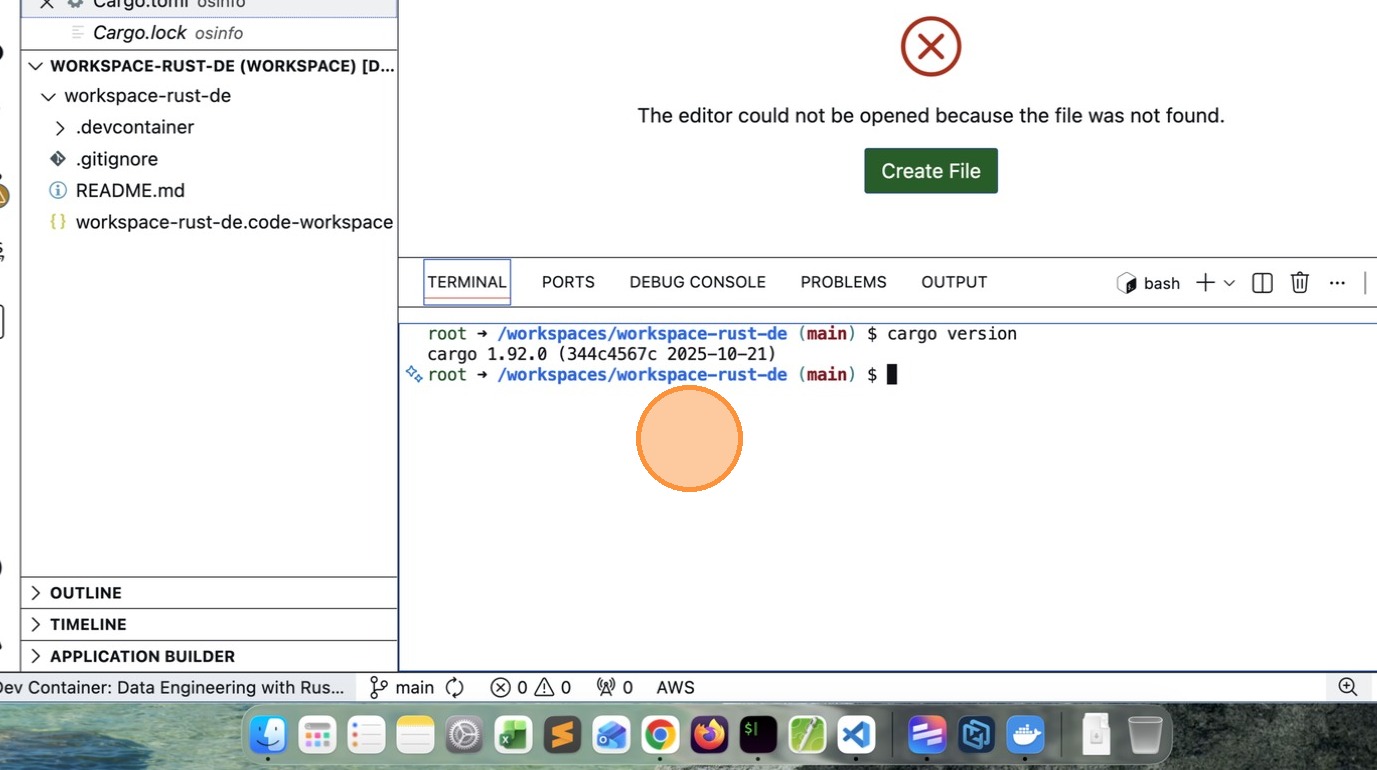
[Avg. reading time: 6 minutes]
Setup Worksace
Open Workspace in Visual Studio Code and Close Connections
- Click here
- Click “Copy URL to clipboard”

- Click “File”

- Click “Open Workspace from File…”

- Click “Documents”

- Click “text field”

- Click “text field”
- Click “menu bar”

-
Click Reload / Reopen in Container
-
Click “image”
- Press [[Return]]
- Click “image”
- Click “File”
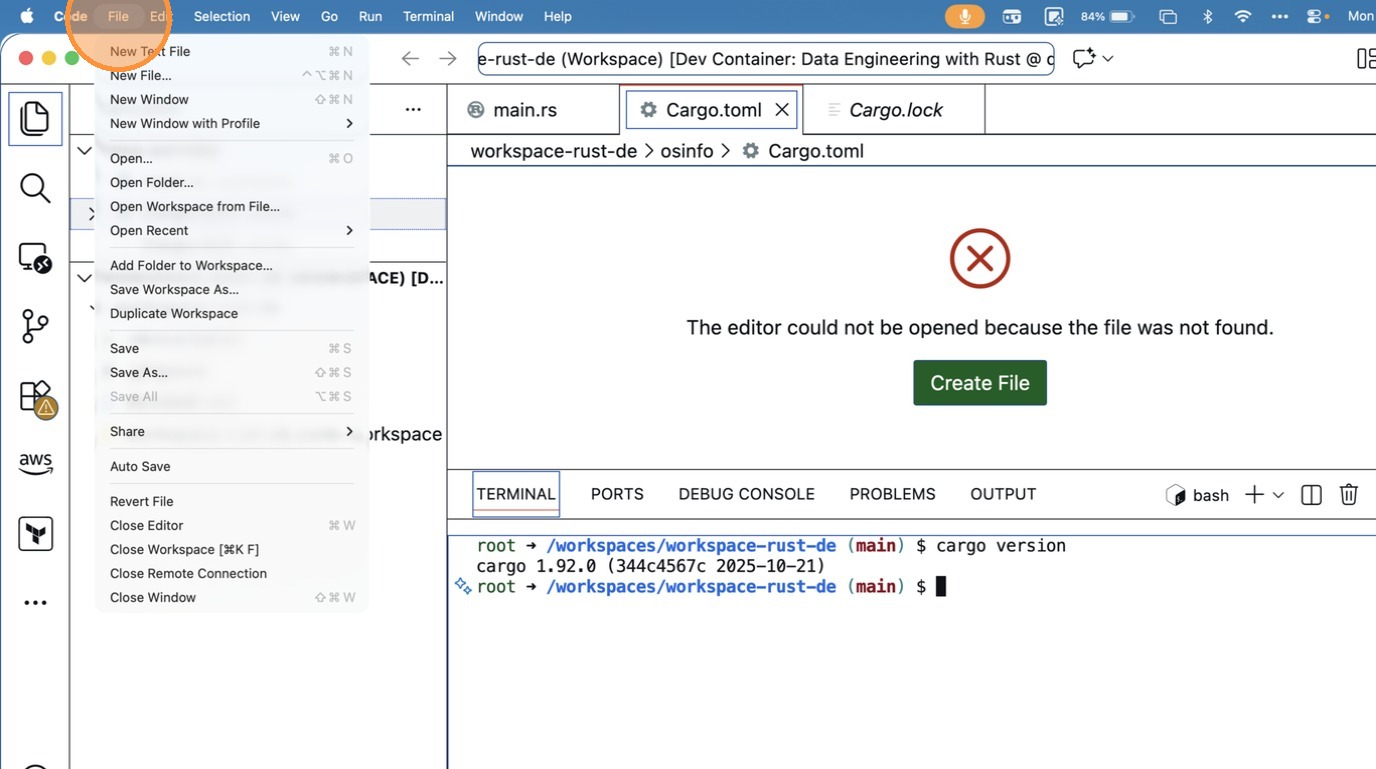
- Click “Close Remote Connection”
[Avg. reading time: 2 minutes]
Chapter 1
[Avg. reading time: 1 minute]
Programming
- Overview
- DSL
- GPL
- Programming Paradigms
- Compiler vs Interpreter
- Static vs Dynamic
- Strongly vs Weakly Typed
- Programming Matrix
[Avg. reading time: 3 minutes]
Overview
Why Learn Programming?
- Problem Solving
Break vague problems into precise, solvable steps.
- Automation
Stop repeating work. Make the machine do it once and correctly.
How does coding help you personally?
-
Improves Thinking and Communication Clear code forces clear thought. That spills into how you explain ideas to people.
-
Creativity with Constraints Coding is not typing syntax. It is designing solutions within limits.
-
Sense of Control You move from user to builder. That shift matters more than motivation videos.
Why learn more than one Language?
Mastering more than one language is often a watershed in the career of a professional programmer.
- Different languages teach different ways to think
- You stop confusing tools with fundamentals
- You learn to choose the right abstraction, not worship one language
- Multiple languages make you adaptable

[Avg. reading time: 6 minutes]
DSL
Domain-specific languages (DSLs) are super interesting because they’re tailor-made for specific tasks or industries, like SQL for databases or HTML for web pages.
DSLs can reduce code complexity and increase productivity for specific tasks.
A Domain Specific Language is a programming language with a higher level of abstraction optimized for a specific class of problems. (a.k.a) Specialized to a particular application domain.
Why DSL?
- Express intent directly instead of implementation details
- Reduce code size and complexity for domain-heavy tasks
- Enable non-traditional programmers to work productively
- Standardize how a domain is modeled and reasoned about
Common and Widely Used DSLs
- HTML – Structure and semantics of web documents
- CSS – Presentation and layout rules for the web
- SQL – Declarative querying and data manipulation
- Markdown – Lightweight documentation and content authoring
- Mermaid – Diagramming using text-based syntax
- Sed – Stream-based text transformation
- XML – Structured data representation and interchange
- UML – Visual modeling of system design
- Terraform – Declarative infrastructure and cloud resource management
https://www.chatdb.ai/tools/markdown-formatter
DSL Types
Declarative DSL
- SQL
- HTML
- CSS
- Terraform
- Mermaid
- UML
- XML
- YAML
Use when
- Desired state matters more than execution steps
- Systems should decide how to reach the goal
- Idempotency is important
Imperative DSLs
describe how to do things step by step.
- Sed
- Awk
- Bash
- Makefiles
- Jenkinsfile
Use when
- Order of execution matters
- You need fine-grained control
- Declarative abstractions leak
Configuration DSLs
- Application.yml
- Github Actions
- Docker Compose
Use when
- These are programming languages
- They have control flow, dependency graphs, and failure modes
- Treat them with the same discipline as code
[Avg. reading time: 2 minutes]
GPL
- General Purpose Languages are programming languages designed to solve a wide range of problems.
- They are not tied to a single domain or industry.
- One language, many use cases.
Commonly Used GPLs
- Python
- Java
- C++
- Rust and others
Why They Matter
- Build web apps, APIs, data systems, CLIs, and services
- Reuse the same language across different problem spaces
- Learn fundamentals that transfer across tools and stacks
Reality Check
- GPLs give you flexibility, not shortcuts
- Mastery takes time because the surface area is large
- This is where you learn real engineering, not just syntax
Bottom line
- DSLs make you fast in one lane
- GPLs make you employable across lanes
- Serious engineers know both
[Avg. reading time: 4 minutes]
Programming Paradigms
Procedural
- Code as step by step instructions
- Functions + state + control flow
- Easy to learn, hard to scale
- Examples: C, early Pascal
Object Oriented
- Code organized around objects and state
- Encapsulation, inheritance, polymorphism
- Examples: Java, C++, C#
Functional
- Computation as function evaluation
- Immutability, pure functions, no side effects
- Scales well, forces discipline
- Examples: Haskell, Elixir, F#, functional Rust
Declarative
- You describe what you want, not how
- Execution strategy is hidden
- Powerful but abstract
- Examples: SQL, HTML, Terraform
Rust is multi-paradigm. It supports multiple styles. Rust borrows proven ideas from multiple paradigms. It rejects bad ideas, even if they are popular.
Popular concepts Borrowed by Rust
From procedural
- Explicit control flow
- Predictable execution
From functional
- Immutability by default
- Pattern matching
- Algebraic data types
From systems programming
- Zero-cost abstractions (high level code is compiled as fast as machine code)
- No garbage collector
- Deterministic performance
From concurrency models
- Message passing
- Compile-time safety
Popular concepts rejected by Rust
- Inheritance hides complexity
- it hides behavior and creates fragile, tightly coupled hierarchies
- Nulls hide absence
- absence causes runtime failures instead of compile-time checks.
- Shared mutation hides bugs
- it makes concurrency unpredictable and correctness unverifiable.
[Avg. reading time: 4 minutes]
Compiler vs Interpreter
Compiler
-
A compiler translates the entire source code into machine code (or an intermediate native format) before execution
-
This translation phase is called compile time
-
The generated executable runs later during runtime
-
Errors are mostly caught early, before the program runs
Languages that primarily use compilation
- C
- C++
- Rust
- Haskell
- Erlang
Implications
- Faster execution
- Stronger type and safety guarantees
- Slower edit–compile–run loop
Interpreter
- An interpreter translates and executes one statement at a time
- Translation happens during runtime
- No separate executable is produced
- Errors often appear only when the problematic line is executed
Languages that primarily use interpretation
- Python
- PHP
- Perl
- Ruby
Implications
- Faster development and experimentation
- Slower execution compared to native binaries
- More runtime flexibility
What about JAVA?
Java uses both compilation and interpretation
How it works
- Java source code is compiled into bytecode
- Bytecode runs on the Java Virtual Machine (JVM)
- The JVM interprets bytecode and may JIT-compile hot paths into native machine code
Result
- Portable across platforms
- Performance close to compiled languages for long-running applications
#java #rust #compiler #interpreter #bytecode
[Avg. reading time: 4 minutes]
Static vs Dynamic
Statically Typed
- Type checking happens at compile time
- The compiler verifies whether operations on variables are valid before execution
- Many errors are caught early, during development
- Types are usually explicit, sometimes inferred
int a = "Hello";
- This fails at compile time
- The program never runs
The above statement will result in an error during compile time itself.
Common statically typed languages
C / C++ / Go / Haskell / Java / Scala / Rust
Trade-offs
- Safer refactoring
- Better tooling and IDE support
- More upfront thinking required
Dynamically Typed
- Type checking happens at runtime
- Variables do not have fixed types
- The same variable can reference different types over time
- Faster to write, easier to prototype
a = "Hello"
a = 10
- This is valid
- Errors appear only if invalid operations are executed
Common dynamically typed languages
Python / Ruby / Erlang / JavaScript / PHP / Perl
Trade-offs
- Faster iteration
- More runtime flexibility
- Requires strong testing discipline
Simple Python example
Sum Up
- Static does not mean bug-free
- Dynamic does not mean unsafe
- Most modern languages blur the line
- Type inference
- Optional typing
- Runtime checks plus static analysis
#static #dynamic #python #rust
[Avg. reading time: 3 minutes]
Strongly Typed vs Weakly Typed
Strongly Typed
-
Strongly typed languages do not allow implicit conversion between unrelated types
-
Operations on incompatible types require explicit conversion
-
Strong typing is about type safety, not when types are checked
-
Strong vs weak typing is independent of static vs dynamic typing
-
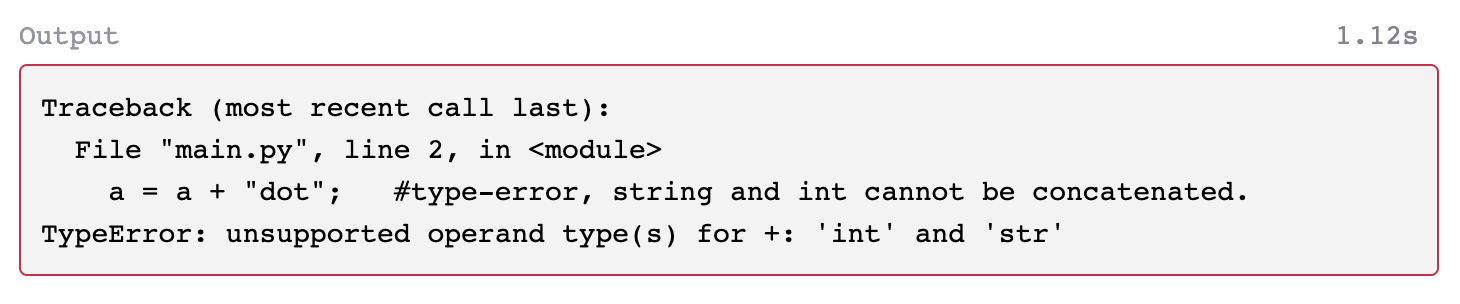
A language can be dynamically typed and still strongly typed Example: Python is strongly typed
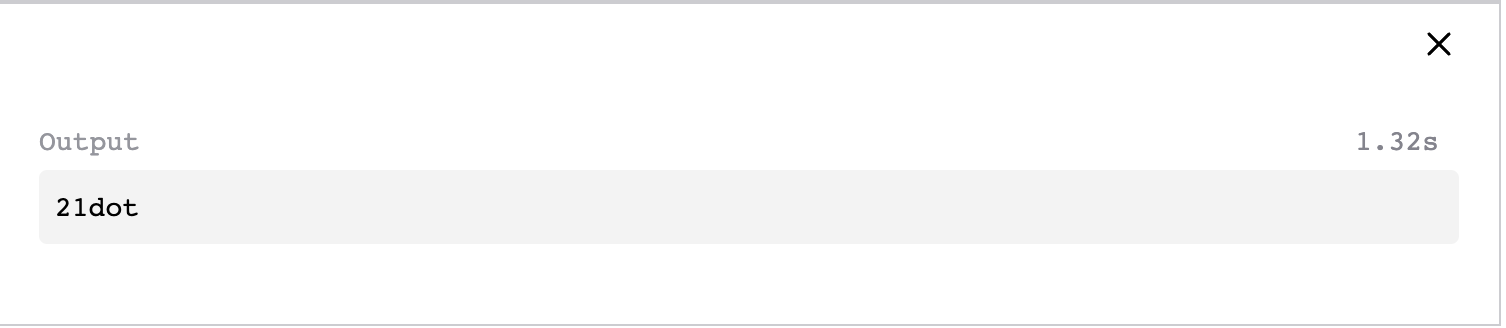
#Python

a = 21;            #type assigned as int at runtime.
a = a + "dot";   #type-error, string and int cannot be concatenated.
print(a);
Weakly Typed
- Weakly typed languages allow implicit conversions between unrelated types
- The runtime guesses what you meant and proceeds
- This can be convenient and dangerous
Example: JavaScript is weakly typed
/*
As Javascript is a weakly-typed language, it allows implicit conversion
between unrelated types.
*/

a = 21;
a = a + "dot";
console.log(a);
- JavaScript silently converts 21 to “21”
- Result is “21dot”
- No error, no warning
#strongly #weakly #python #javascript
[Avg. reading time: 1 minute]
Programming Matrix

Rust is both strongly typed and statically typed.
Strongly Typed
- No implicit conversion between incompatible types
- Operations must be type-correct by design
- The compiler never guesses intent
Statically Typed
- Every variable’s type is known at compile time
- Errors are caught before the program runs
- Runtime surprises are aggressively eliminated
let num = 5;
let text = "hello";

// The next line won't compile
// let result = num + text; // Error
#programmingmatrix #static #dynamic
[Avg. reading time: 0 minutes]
Rust Overview
[Avg. reading time: 9 minutes]
Rust Overview
Rust deals with low-level details of memory management, data representation, and concurrency.
What Is Rust?
- Rust began as a personal project by an engineer at Mozilla.
- Mozilla later sponsored the project in 2009 and publicly announced it in 2010.
- The first stable release shipped on May 15, 2015.
Rust is a systems programming language designed for safety, concurrency, and performance.
It draws inspiration from:
- Systems languages such as C and C++
- Functional languages such as Haskell and Erlang
Why Rust?
-
Open Source
Backed by a large, active community with rapid iteration through nightly builds and strong industry adoption. -
Reliability
Eliminates entire classes of memory bugs at compile time through its ownership model. -
Type Safety
The compiler guarantees that operations are only performed on valid types. -
Memory Safety
References always point to valid memory, preventing null and dangling pointer errors. -
Data Race Freedom
The borrow checker enforces safe concurrency by preventing simultaneous mutable access. -
Performance
Zero-cost abstractions, no garbage collector, and minimal runtime overhead enable C and C++-level performance. -
Bare-Metal Support
Suitable for embedded systems, device drivers, and operating system kernels. -
Security
Memory safety is enforced at compile time, dramatically reducing common vulnerability classes. -
Efficiency
Enables high-performance code without sacrificing safety or expressiveness. -
Developer Productivity
Strong compile-time guarantees reduce debugging and production failures. -
Ownership-Based Safety
Achieves memory safety without garbage collection using ownership and borrowing. -
Cargo Package Manager
Built-in dependency and build management, comparable to npm or pip. -
Excellent Error Messages
Compiler diagnostics are precise, actionable, and educational. -
Efficient C Interoperability
Native foreign function interface enables safe integration with C libraries.
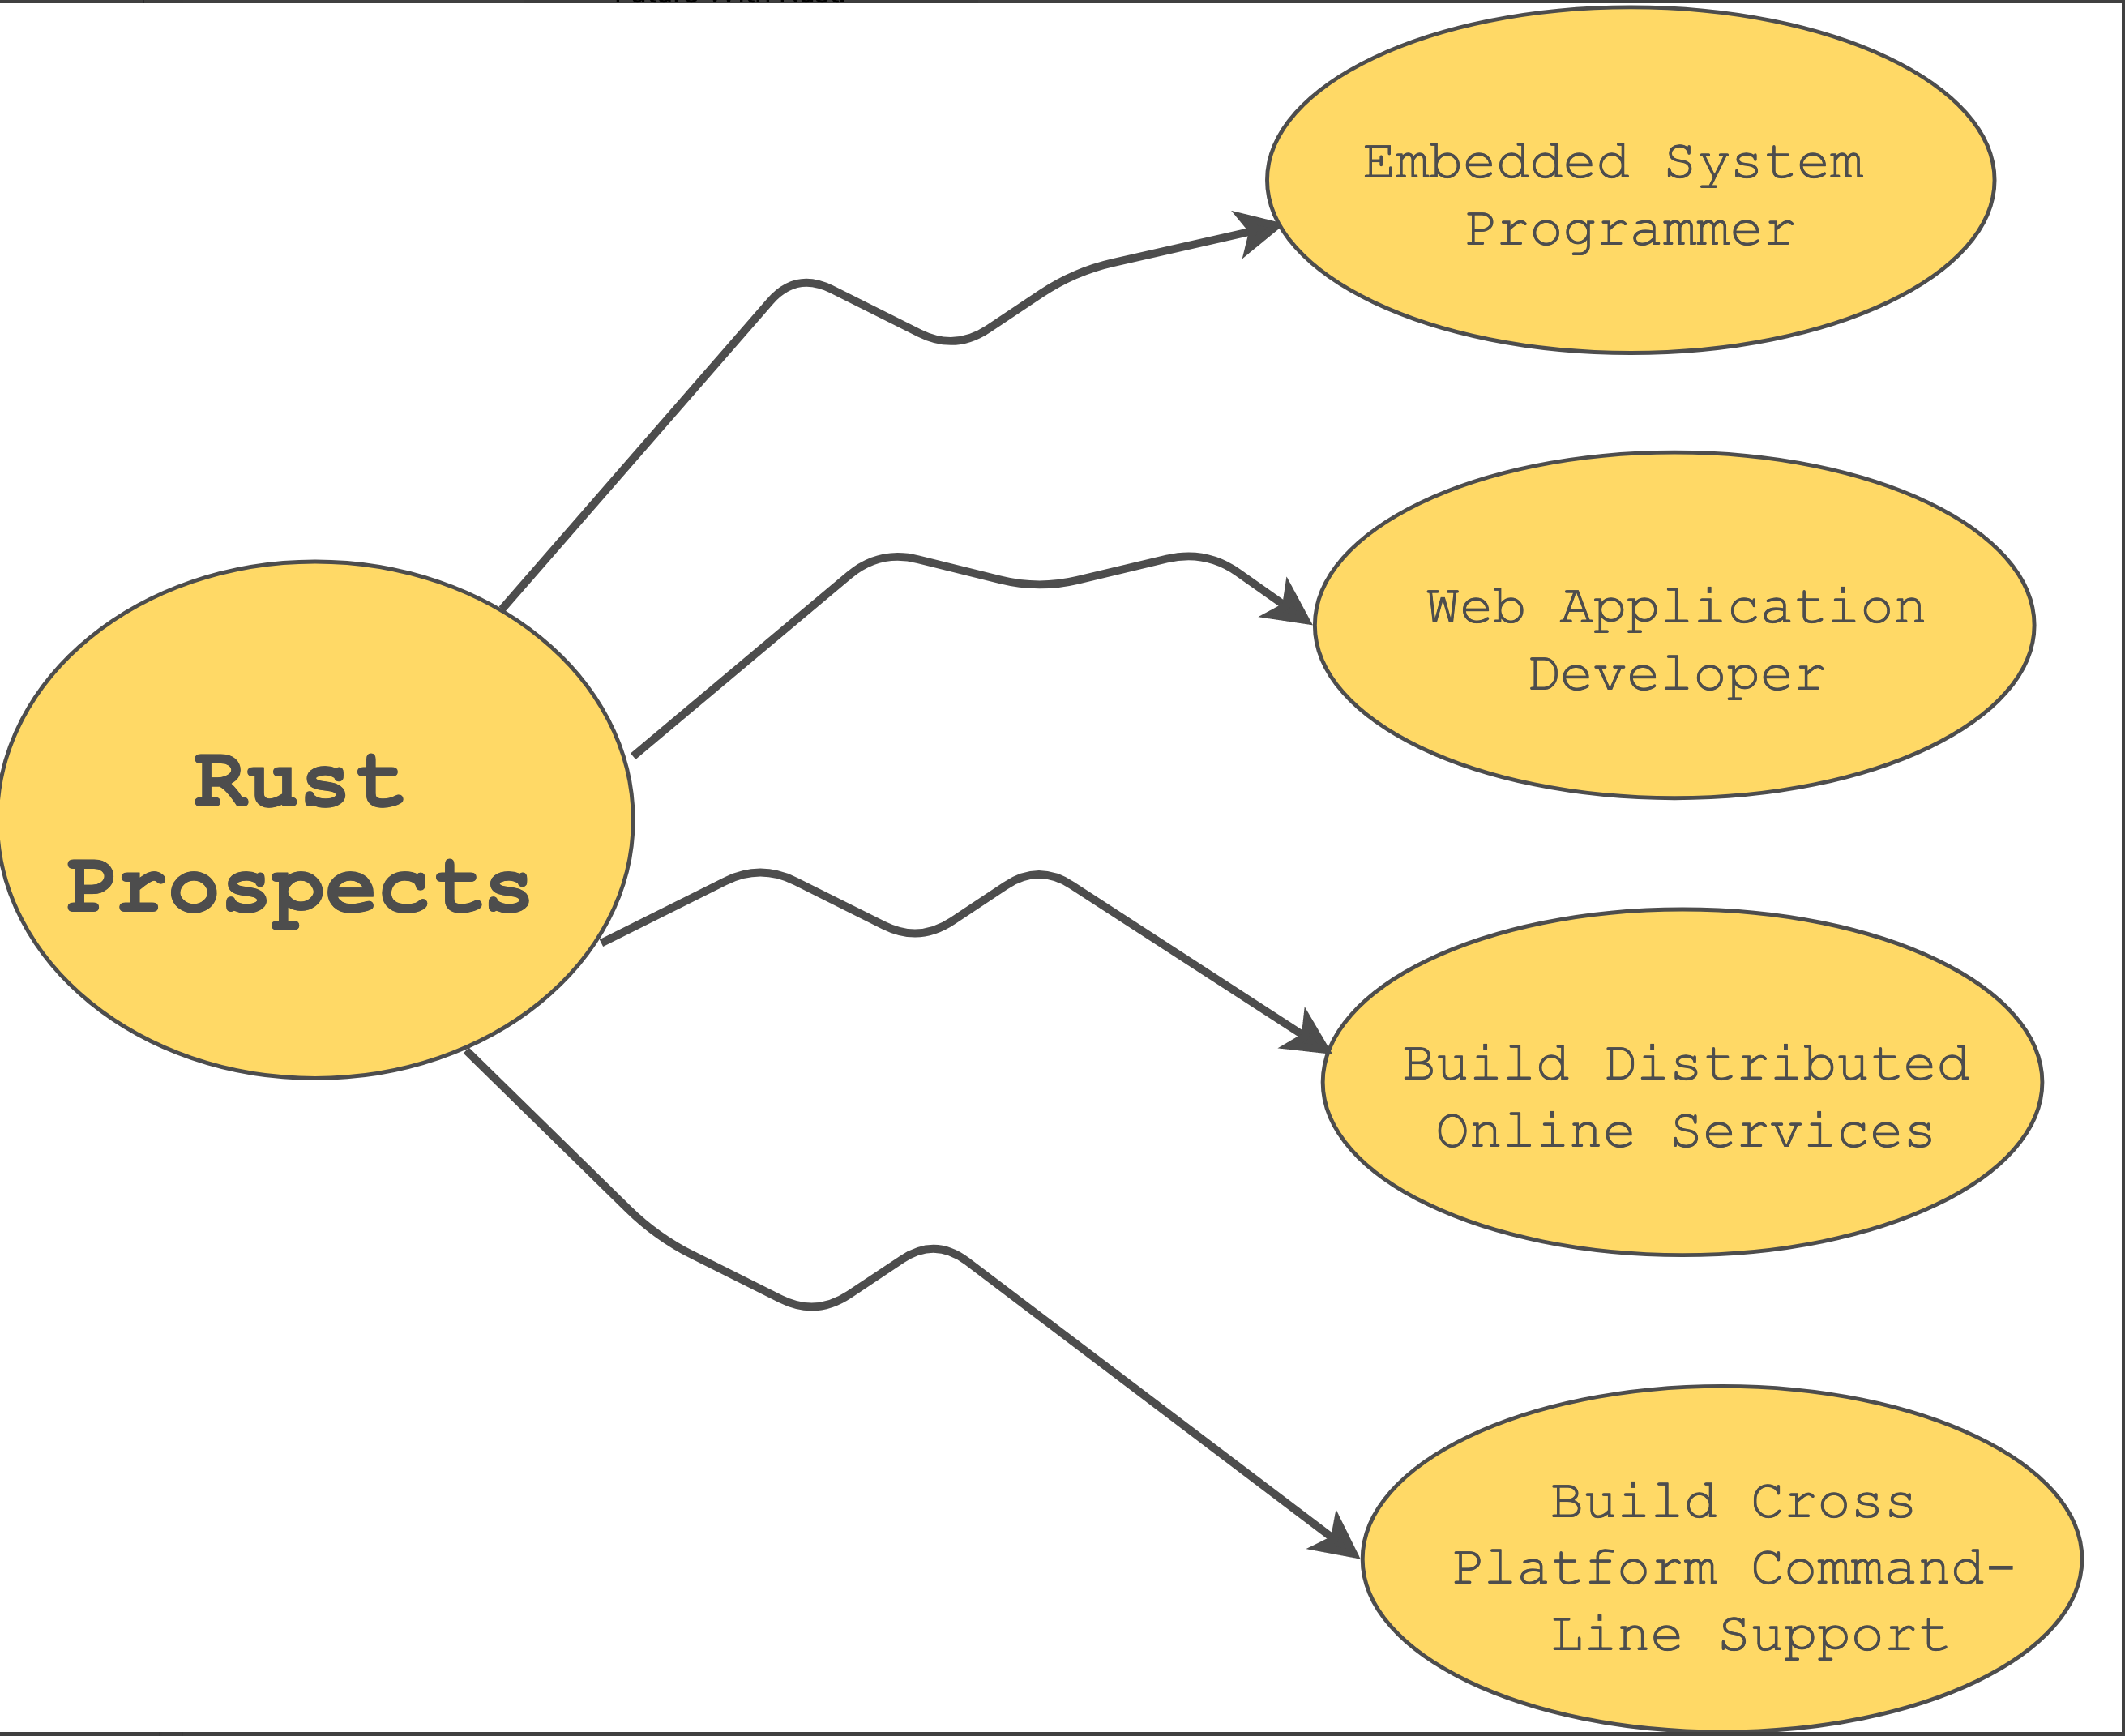
What Is Rust Used For?
Rust is well-suited for:
- High-performance web services
- Embedded and IoT systems
- Distributed and concurrent systems
- Cross-platform command-line tools
Terms to know
Crate
- a compiled Rust package or crate is a compilation unit in Rust.
- It can be a single program or a reusable library.
- Every Rust project produces at least one crate.
crates.io
- crates.io is Rust’s official package registry.
- It hosts open source Rust libraries called crates.
- Rust projects download dependencies from here by default.
rustc
- rustc is the Rust compiler.
- It converts Rust source code into machine code.
- It performs parsing, type checking, safety checks, and optimization.
This is similar to gcc, g++, javac in other languages
Who Uses Rust?
Some of the top companies listed here
- Drop Box
- Microsoft
- Discord
- Cloudflare
- Coursera
- Firefox
- Atlassian
- Amazon’s Firecracker
- Databricks
Additional Notes
- Rust is self-hosted — the Rust compiler itself is written in Rust.
- Early versions of the compiler were implemented in OCaml before the language matured.
[Avg. reading time: 3 minutes]
Core idea
Rust is chosen when performance, memory safety, and concurrency all matter at the same time.
Systems and Infrastructure
- Operating systems and device drivers
- Embedded and bare-metal programming
- Cloud infrastructure tools and CLIs
Backend and Distributed Systems
- High-performance backend services
- Distributed databases and systems
- Networking and async services
Performance-Critical Applications
- Audio processing and DSP
- Computer graphics and game engines
- Simulations, HPC, scientific computing
Security-Sensitive Software
- Security tools and sandboxes
- Cryptography and secure runtimes
- Safe replacements for C and C++ components
Data and Machine Learning (Emerging)
- Data processing and analytics engines
- DataFrame libraries and query engines
- ML runtimes and system-level ML tooling
Frontend via WebAssembly
- Web application frontends using WebAssembly
- Shared logic across web, desktop, and mobile
- High-performance browser applications
Summarize
- Python when productivity matters more than speed
- C or C++ when speed matters more than safety
- Rust when you need both
[Avg. reading time: 4 minutes]
Playground
Trying Rust Without Setup
If you want to quickly try Rust code, check syntax, or share a small example with others, use the Rust Playground.
What the Rust Playground is good for
• Experimenting with Rust syntax
• Testing small code snippets
• Sharing runnable examples via links
• Exploring unfamiliar APIs quickly
What you get
• Full access to the Rust standard library (std)
• Many of the top crates from crates.io, including their dependencies
• Multiple compiler channels: stable, beta, nightly
• Output, formatting, and compiler error messages in one place
What it is not
• Not a replacement for a local Rust setup
• Not suitable for large projects or serious performance testing
How to think about it
Use the playground like a scratchpad: • Learn • Experiment • Share • Move on to local setup later
Demo
Let’s try with a simple example.
fn main(){println!(Welcome to Rust!);}
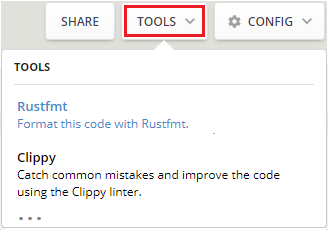
The tool adjusts the code to follow official Rust styles:

Select Tools > Clippy to check for mistakes in the code. The results are displayed under the editor:

To fix the sample code, add quote marks around the text “Welcome to Rust!”:

[Avg. reading time: 7 minutes]
Cargo
Cargo is a Rust’s official build system and package manager.
Cargo handles
- Dependency management
- Building code
- Running tests
- Running benchmarks
- Publishing libraries
- Version resolution
Cargo understands
- targets
- platforms
- architectures
- features
Sample file structure
.
├── Cargo.lock
├── Cargo.toml
├── src/
│   ├── lib.rs
│   ├── main.rs
│   └── bin/
│       ├── named-executable.rs
│       ├── another-executable.rs
│       └── multi-file-executable/
│           ├── main.rs
│           └── some_module.rs
├── examples/
│   ├── simple.rs
│   └── multi-file-example/
│       ├── main.rs
│       └── ex_module.rs
└── tests/
    ├── some-integration-tests.rs
    └── multi-file-test/
        ├── main.rs
        └── test_module.rs
- Cargo.toml and Cargo.lock are stored in the root of your package (package root).
- Source code goes in the src directory.
- The default library file is src/lib.rs.
- The default executable file is src/main.rs.
- Other executables can be placed in src/bin/.
- Benchmarks go in the benches directory.
- Examples go in the examples directory.
- Integration tests go in the tests directory.
Key files in to remember
Cargo.toml is about describing your dependencies in a broad sense, and is managed by you.
toml : Tom’s Obvious Minimal Language
TOML is Open Source, and case sensitive.
TOML aims to be a minimal configuration file format that’s easy to read due to precise semantics. TOML should be easy to parse into data structures in various languages.
- TOML is case-sensitive.
- A TOML file must contain only UTF-8 encoded Unicode characters.
- Whitespace means tab (0x09) or space (0x20).
- Newline means LF (0x0A) or CRLF (0x0D0A).
Lock file
Cargo.lockcontains exact information about your dependencies. It is maintained by Cargo and should not be manually edited.
Cargo Subcommands
cargo --help
cargo --version
Creates project under new sub folder
cargo new projectname
Creates project under existing folder
cargo init projectname
Compile the current package
cargo build
Run the current package
cargo run
Compile the current package for Production
* cargo build --release
Check the current package for dependency errors
cargo check
Fetch dependencies of a package from the network
cargo fetch
Execute unit and integration tests of a package
cargo test
Remove generated artifacts
cargo clean
Update dependencies as recorded in the local lock file
cargo update
Build package’s documentation
cargo doc
Format the code
cargo fmt
Refer more Cargo commands in Cargo Book
[Avg. reading time: 2 minutes]
Cargo Example
cargo new osinfo

cd osinfo
Replace the main.rs code with the code given below
// Rust sample for displaying OS Info

fn main() {
    println!("Hello, world!");

    let info = os_info::get();

    // Print full information:
    println!("OS information: {}", info);

    // Print information separately:
    println!("Type: {}", info.os_type());
    println!("Version: {}", info.version());
    println!("Bitness: {}", info.bitness());
}
cargo build
Script will fail to build.
Find out the correct crate from crates.io and add it.
Run the following statements
cargo check

cargo fetch

cargo build
check the executable under target/debug
cargo build --release
check the executable under target/release
The release executable will be smaller in size than debug executable.
Because, debug contains symbols & backtraces
[Avg. reading time: 4 minutes]
Cargo dependency versions
Cargo follows Semantic Versioning: MAJOR.MINOR.PATCH.
- MAJOR changes can break your code
- MINOR adds features but stays compatible
- PATCH is bug fixes only
While specifying the dependency version, you can either specify the exact one or mention the bottom range number.
Here are some more examples of version requirements and the versions that would be allowed with them:
For stable crates (1.x and above)
• 1.2.3 means ≥ 1.2.3 and < 2.0.0
• 1.2 means ≥ 1.2.0 and < 2.0.0
• 1 means ≥ 1.0.0 and < 2.0.0
For pre-1.0 crates (0.x)
Cargo is stricter because breaking changes are expected.
• 0.2.3 means ≥ 0.2.3 and < 0.3.0
• 0.2 means ≥ 0.2.0 and < 0.3.0
• 0.0.3 means ≥ 0.0.3 and < 0.0.4
• 0.0 means ≥ 0.0.0 and < 0.1.0
• 0 means ≥ 0.0.0 and < 1.0.0
Rule of thumb
- For 0.x crates, MINOR is treated like MAJOR
- Expect breakage even on small bumps
Wildcards
- ‘*’ means anything, including breaking garbage
- 1.* means ≥ 1.0.0 and < 2.0.0
- 1.2.* means ≥ 1.2.0 and < 1.3.0
Note: Don’t use wildcards in Production.
Using git repositories
[dependencies]
regex = { git = "https://github.com/rust-lang/regex" }
- The risk of bypassing crates.io versioning.
- hard to reproduce as git versioning is not controlled by Cargo.
- Use it on (internal) projects where you have control.
[Avg. reading time: 0 minutes]
Starter Crates
[Avg. reading time: 4 minutes]
The Basic Program
- Rust code is always put in a file with
.rsextension. - Every executable Rust program starts execution from the main function.
fn main() {
    println!("Hello World!");
}
println! prints text to standard output and automatically adds a newline at the end.
- println! is a macro not a function.
- Macros are evaluated at compile time.
Example 2:
Rust does not use string interpolation like Python or JavaScript. Instead, it uses format placeholders inside the string.
fn main() {
    println!("Number: {}", 1);
}
{} is a placeholder.
Printing variables
fn main() {
    let age = 25;
    println!("Age: {}", age);
}
Positional Arguments
Arguments are filled in same order.
fn main() {
    println!("{} last name is {}", "Rachel", "Green");
}
Named Arguments
Helps in code readability.
fn main() {
    println!("{fname} last name is {lname}", fname="Rachel", lname="Green");
}
This is different from string interpolation in python.
Using Expressions
fn main() {
    println!("{} * {} = {}", 15, 15, 15 * 15);
}
Number Formatting
Rust supports multiple number representations using format specifiers
fn main() {
    println!(
        "Decimal: {}\nBinary: {:b}\nHex: {:x}\nOctal: {:o}",
        20, 20, 20, 20
    );
}
Debug Printing {:?}
fn main() {
    println!("{:?}", (100, "Rachel Green"));
}
fn main() {
    println!("{}{:?}", "Rachel Green", "Rachel Green"));
}
Debug printing it for debugging, not for user facing outputs.
We will discuss about Debug Trait in later weeks.
#println #macro #trait #debug #placeholder
[Avg. reading time: 3 minutes]
Comments
Line Comments //
Block Comments /* */
Doc Comments
Outer Doc Comments ///
Inner Doc Comments //!
// Writing a Rust program
fn main() {
    //The line comment is the recommended comment style
    println!("This is a line comment!"); // print hello World to the screen
}
/* Writing a Rust program */

/* comments can be /* nested */ too */

fn main() {
    println!("This is a line comment!");
}
Doc Comments are used to generate Documentation and they support markdown notations
/// This is a Doc comment outside the function
/// Generate docs for the following item.
/// This shows my code outside a module or a function
fn main() {
    //! This a doc comment that is inside the function
    //! This comment shows my code inside a module or a function
    //! Generate docs for the enclosing item
    println!("{} can support {} notation","Doc comment","markdown");
}
[Avg. reading time: 13 minutes]
Variables
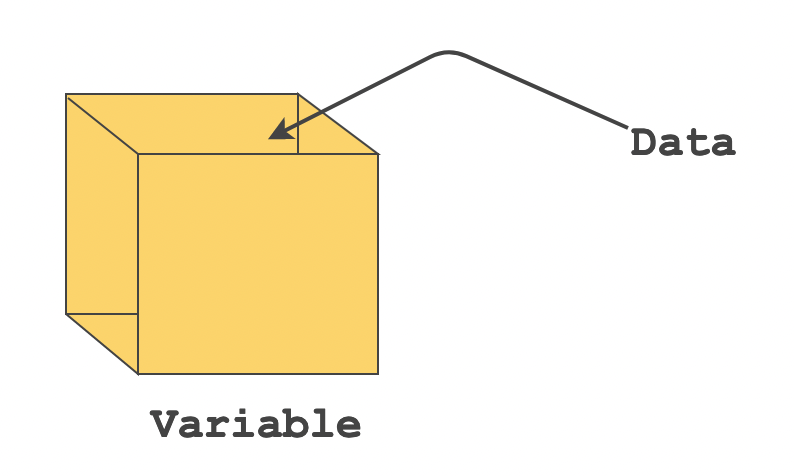
A variable is like a storage box paired with an associated name which contains data. The associated name is the identifier and the data that goes inside the variable is the value. They are immutable by default, meaning, you cannot reassign value to them.
To create a variable, use the let binding followed by the variable name
What is binding?
Rust refers to declarations as bindings as they bind a name at the time of creation.
letis a kind of declaration statement.
Naming Convention: By convention, you would write a variable name in a snake_case i.e.,
- All letters should be lower case.
- All words should be separated using an underscore ( _ )
Initialize a variable
A variable can be initialized by assigning a value to it when it is declared. The value is said to be bound to that variable.
Note: It’s possible to declare the variable first and assign it a value later. However, it is not recommended to do this as it may lead to the use of uninitialized variables.
fn main() {
    let language = "Rust"; // define a variable
    println!("Language: {}", language); // print the variable
}
Note: it is not possible to directly print a variable within a println!(). You need a placeholder.
How to create a Mutable Variable
let mut variable = "value"
fn main() {
    let mut language = "Rust"; // define a mutable variable
    println!("Language: {}", language); // print the variable
    language = "Java"; // update the variable
    println!("Language: {}", language); // print the updated value of variable
}
Assigning Multiple Values
let (variable1,variable2) = ("value1", value2);
fn main() {
    let (fname,lname) =("Rachel","Green"); // assign multiple values
    println!(" Student Name is {} {}.", fname,lname); // print the value
}
If variables are unassigned or unused compiler will generate warning. (Try this in Rust Playground)
#[allow(unused_variables, unused_mut)]
fn main() {
    let (fname,lname,mi) =("Rachel","Green",""); // assign multiple values
    println!(" Student Name is {} {}.", fname,lname); // print the value
}
Variable Scope
The scope of a variable refers to the visibility of a variable, or, which parts of a program can access that variable.
It all depends on where this variable is being declared. If it is declared inside any curly braces {}, i.e., a block of code, its scope is restricted within the braces, otherwise the scope is global.
Local Variable
A variable that is within a block of code, { }, that cannot be accessed outside that block is a local variable. After the closing curly brace, } , the variable is freed and memory for the variable is deallocated.
Global Variable
The variables that are declared outside any block of code and can be accessed within any subsequent blocks are known as global variables.
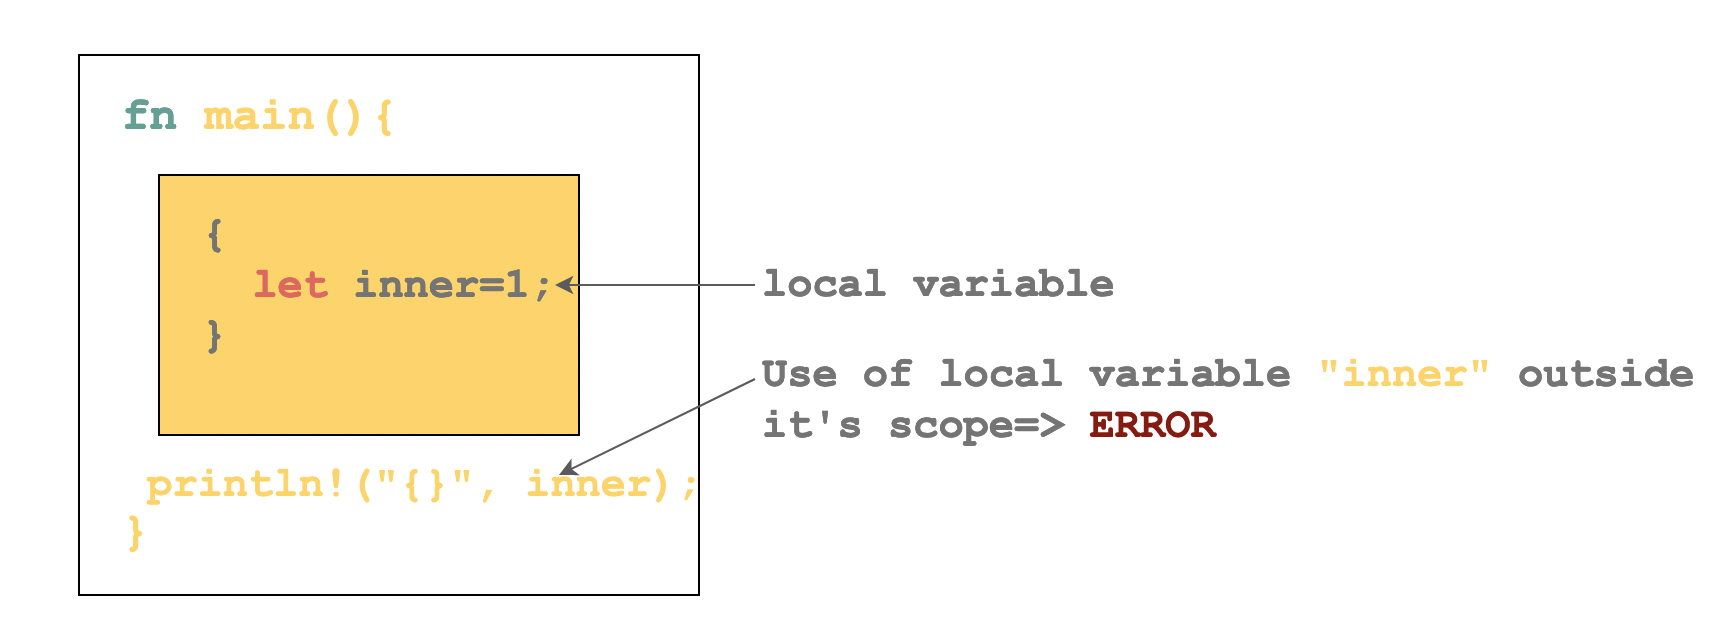
fn main() {
  let outer_variable = 112;
  { // start of code block
        let inner_variable = 213;
        println!("block variable inner: {}", inner_variable);
        println!("block variable outer: {}", outer_variable);
  } // end of code block
    println!("inner variable: {}", inner_variable); // use of inner_variable outside scope
}
How to fix this error?
fn main() {
  let outer_variable = 112;
  let inner_variable = 213;
  { // start of code block
        println!("block variable inner: {}", inner_variable);
        println!("block variable outer: {}", outer_variable);
  } // end of code block
    println!("inner variable: {}", inner_variable);
  }
Shadowing
Variable shadowing is a technique in which a variable declared within a certain scope has the same name as a variable declared in an outer scope. This is also known as masking. This outer variable is shadowed by the inner variable, while the inner variable is said to mask the outer variable.
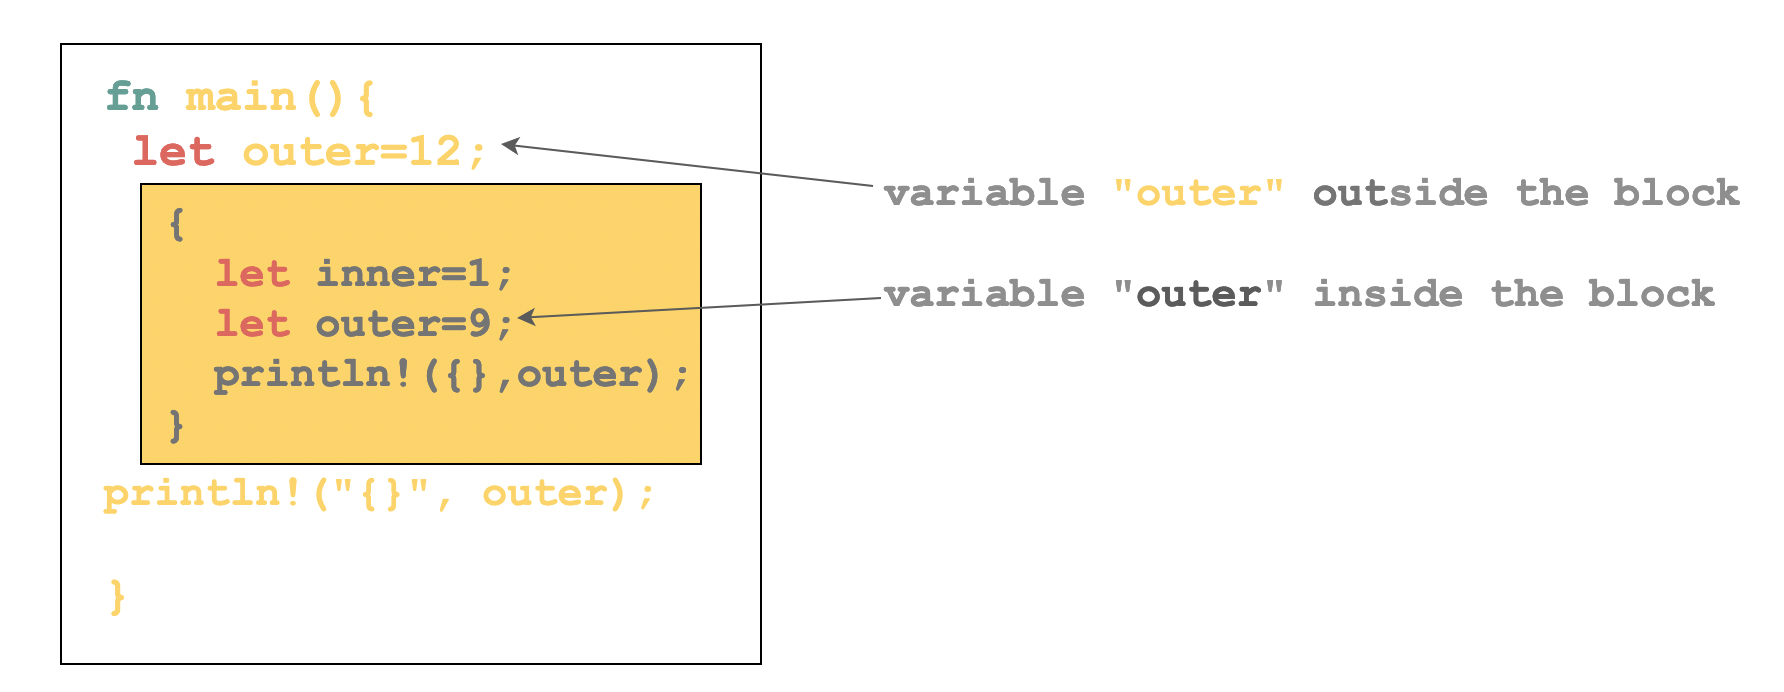
Use Cases
- No accidental mutation
- Each step is explicit
- Scoped overrides within a block
fn main() {
  let outer_variable = 112;
  { // start of code block
        let inner_variable = 213;
        println!("block inner variable: {}", inner_variable);
        let outer_variable = 117;
        println!("block outer variable: {}", outer_variable);
  } // end of code block
    println!("outer variable: {}", outer_variable);
  }
Standard Usecase
// Shadowing

fn main() {
   let file_path = "name.csv";
   println!("{:?}",file_path);
   let file_path = format!("/tmp/{}", file_path);
   println!("{:?}",file_path);
}
Bad Pattern - Variable reused in same scope with different datatypes
// Shadowing

fn main() {
   let some_input = "Testing";
   println!("{:?}",some_input);
   let some_input = 7;
   println!("{:?}",some_input);
}
#variables #shadowing #masking
[Avg. reading time: 3 minutes]
Simple Rust Programs
Using Variables
fn main() {
    let name = "Rachel";
    let age=30;
    println!("Hello {},{}", name,age);

    //change the value of variable

    let name = "Rachel Green";
    println!("Hello {},{}", name,age);

}
Using Multiple Variables
#[allow(unused_variables, unused_mut)]

fn main() {
    let (fname,lname,mi) =("Rachel","Green",""); // assign multiple values
    println!(" Student Name is {} {}.", fname,lname); // print the value
}
FOR Loops
// non inclusive on right side

fn main() {
    for i in 0..5 {
        println!("Hello {}", i);
    }
}
ODD / EVEN
fn main() {
    for i in 0..5 {
        if i % 2 == 0 {
            println!("even {}", i);
        } else {
            println!("odd {}", i);
        }
    }
}
Alternate Method
// Expression assigned as Value

fn main() {
    for i in 0..5 {
        let even_odd = if i % 2 == 0 {"even"} else {"odd"};
        println!("{} {}", even_odd, i);
    }
}
[Avg. reading time: 3 minutes]
Advanced Printing
Pretty Debug Print
Pretty debug print {:#?} prints debug output in an indented, human-readable format for easier inspection of complex data structures.
// Print

fn main() {
    let doesnt_print = ();
    println!("This will not print: {}", doesnt_print);
}
Pretty Print
// Pretty Print

fn main() {
    let doesnt_print = ();
    println!("This will print: {:#?}", doesnt_print);
}
What is the output of this?
// Print Space

fn main() {
    let doesnt_print = ' ';
    println!("This will not print: {}", doesnt_print);
}
// Pretty Print Space

fn main() {
    let doesnt_print = ' ';
    println!("This will print: {:#?}", doesnt_print);
}
Debug Print vs Pretty Debug Print
fn main() {
    let data = vec![
        ("Rachel", 30),
        ("Monica", 29),
        ("Phoebe", 31),
    ];

    println!("Regular debug:");
    println!("{:?}", data);

    println!("\nPretty debug:");
    println!("{:#?}", data);
}
dbg!
fn main() {
    let x = 10;
    let y = x + 5;

    dbg!(x);
    dbg!(y);
}
- Prints file name and line number
- Uses Debug formatting automatically
- Returns the value, so it doesn’t break code flow
- dont use dbg in Production.
[Avg. reading time: 4 minutes]
Escape Printing
Rust supports standard escape sequences similar to other languages. Similar to other programming languages \t and \n are used for Tab and Newlines
Common Escape Characters
- \n → New line
- \t → Tab
- \ → Backslash
- " → Double quote
// \t \n

fn main() {
    print!("\t first line is tabbed \nand second line is on a new line");
}
Printing Escape Characters Literally
// Escape Characters

fn main() {
    println!("Here are two escape characters: \\n and \\t");
}
Print multiple escape characters
// Print multiple \\ , "

fn main() {
    println!("File \"folder location is at c:\\users\\ganesh\\Documents\\01.rs.\" ")
}
Too many \ there is a good chance one might forget to \, is there an easy way?
// r#  and  #

fn main() {
    println!(r#"File "folder location is at c:\users\ganesh\Documents\01.rs." "#)
}
If you need to print #, then use ##
Raw Identifiers (r#)
// # & ##

fn main() {
    let hashtag_string = r##"The hashtag #niceToSeeYou had become very popular."##; // Has one # so we need at least ##
    let many_hashtags = r####""You don't have to type ### to use a hashtag. You can just use #.""####; // Has three ### so we need at least ####

    println!("{}\n{}\n", hashtag_string, many_hashtags);
}
Alternate Use
Not a good programming practice to use keywords as variables
// Using reserved words

fn main() {
    let let=4;
    println!("{}", let);
}
// r#

fn main() {
    let r#let=4;
    println!("{}", r#let);
}
[Avg. reading time: 2 minutes]
Chapter 2
[Avg. reading time: 0 minutes]
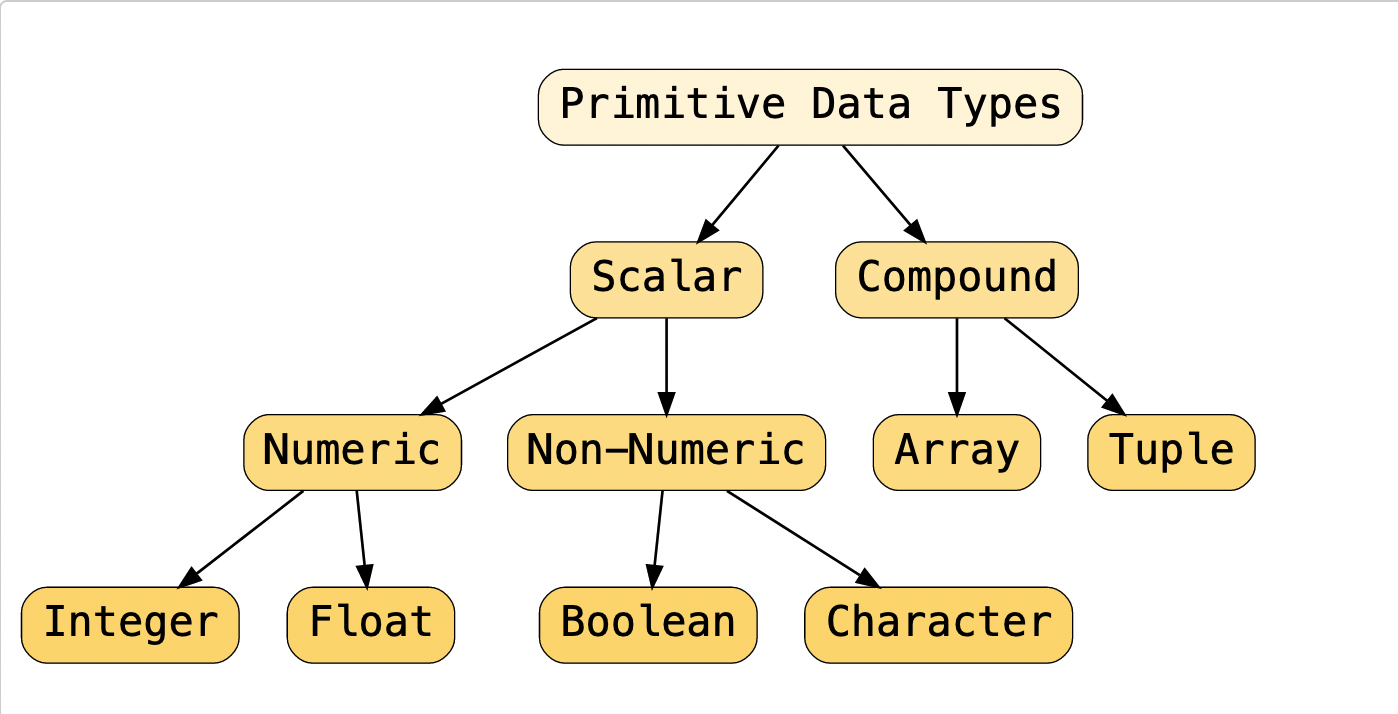
Data Types
- Overview
- Integer
- Floating-point
- Boolean
- Char & Strings
- String based crates
- Arrays
- Tuples
- Constants
- Unit-type
[Avg. reading time: 1 minute]
Data Types
Rust is a statically typed language, meaning, it must know the type of all variables at compile time.
Variable Definition
Implicit Definition
Unlike other languages like C++ and Java, Rust can infer the type from the type of value assigned to a variable.
let variablename = value
Explicit Definition
let variablename:datatype = value
#datatypes #implicit #explicit
[Avg. reading time: 8 minutes]
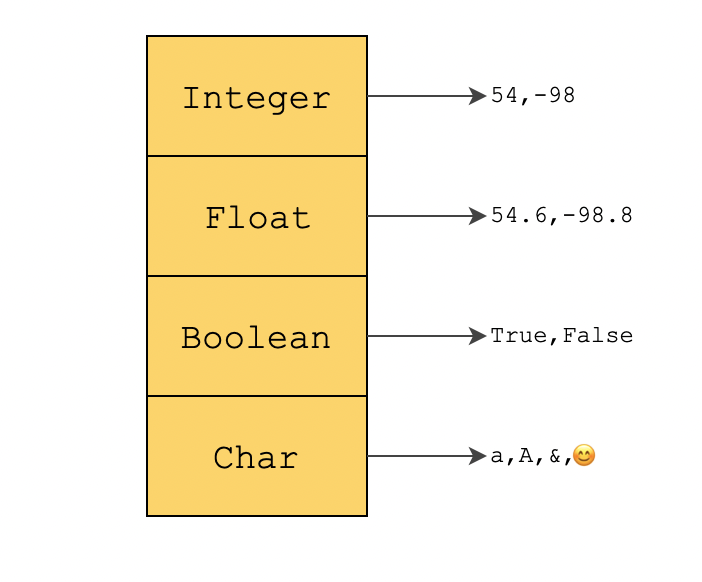
Integer
Fixed Size Integers
i8: The 8-bit signed integer type.i16: The 16-bit signed integer type.i32: The 32-bit signed integer type.i64: The 64-bit signed integer type.u8: The 8-bit unsigned integer type.u16: The 16-bit unsigned integer type.u32: The 32-bit unsigned integer type.u64: The 64-bit unsigned integer type.
Variable Size Integers
The integer type in which the particular size depends on the underlying machine architecture.
isize: The pointer-sized signed integer type.usize: The pointer-sized unsigned integer type.
// see the smallest and biggest numbers,you can use MIN and MAX
// after the name of the type

fn main() {
    println!("The smallest i8 is {} and the biggest i8 is {}.", i8::MIN, i8::MAX); // hint: printing std::i8::MIN means "print MIN inside of the i8 section in the standard library"
    println!("The smallest u8 is {} and the biggest u8 is {}.", u8::MIN, u8::MAX);
    println!("The smallest i16 is {} and the biggest i16 is {}.", i16::MIN, i16::MAX);
    println!("The smallest u16 is {} and the biggest u16 is {}.", u16::MIN, u16::MAX);
    println!("The smallest i32 is {} and the biggest i32 is {}.", i32::MIN, i32::MAX);
    println!("The smallest u32 is {} and the biggest u32 is {}.", u32::MIN, u32::MAX);
    println!("The smallest i64 is {} and the biggest i64 is {}.", i64::MIN, i64::MAX);
    println!("The smallest u64 is {} and the biggest u64 is {}.", u64::MIN, u64::MAX);
    println!("The smallest i128 is {} and the biggest i128 is {}.", i128::MIN, i128::MAX);
    println!("The smallest u128 is {} and the biggest u128 is {}.", u128::MIN, u128::MAX);

}
Explicit Declaration
fn main() {
    //explicitly define an integer
    let a:i32 = 24;
    let b:u64 = 23;
    let c:u8 = 26;
    let d:i8 = 29;
    //print the values
    println!("a: {}", a);
    println!("b: {}", b);
    println!("c: {}", c);
    println!("d: {}", d);

}
Alternate Way to Declare
// Alternate Way

fn main() {
    let small_number: u8 = 10;
    let small_number1 = 10u8; // 10u8 = 10 of type u8 (no space inbetween 10 and u8)
    let big_number = 100000000i32;
    let big_number1 = 100_000_000i32; // adds clarity to numbers
     let big_number2 = 100_____000________000i32;  //to demonstrate multiple ___
}
Type Inference
fn main() {
    //implicitly define an integer
    let a = 21;
    let b = 1;
    let c = 54;
    let d = 343434;
    //print the variable
    println!("a: {}", a);
    println!("b: {}", b);
    println!("c: {}", c);
    println!("d: {}", d);

}
When not declared, the Default integer type inferred by Rust is i32
//
fn print_type_of<T>(_: &T) {
    println!("{}", std::any::type_name::<T>())
}

fn main() {
    let a = 5;
    let b = 3.14;
    print_type_of(&a);
    print_type_of(&b);
}
[Avg. reading time: 4 minutes]
Floating Point
Floats are numbers with decimal points.
f32: The 32-bit floating point type.f64: The 64-bit floating point type.
It doesn’t support 16 or 128
 fn main() {
    //explicitly define a float type
    let f1:f32 = 32.9;
    let f2:f64 = 6789.89;
    let f3:fsize = 3.141414141414;
    println!("f1: {}", f1);
    println!("f2: {}", f2);
    println!("f3: {}", f3);

    //implicitly define a float type
    let pi = 3.14;
    let e = 2.17828;
    println!("pi: {}", pi);
    println!("e: {}", e);
}
Values are the same, but they are not equal.
// Adding f32 + f64

fn main() {
    let my_float: f64 = 5.0; // This is an f64
    let my_float2: f32 = 5.0; // This is an f32

    let my_float3 = my_float + my_float2;️
    println!("{}",my_float3);
}
So how to fix it?
// Adding f32 + f64 the right way

fn main() {
    let my_float: f64 = 5.0; // This is an f64
    let my_float2: f32 = 5.0; // This is an f32

    let my_float3 = my_float + my_float2 as f64;
    println!("{}",my_float3);
}
If not declared, the Default type is f64
// What is size of my_other_float variable?
// Adding f32 with f64 will it work or fail?
// Rust is smart,
// since it is doing addition with f32, it will default it to f32 instead of f64

fn main() {
    let my_float: f32 = 5.0;
    let my_other_float = 8.5;

    let third_float = my_float + my_other_float;
}
[Avg. reading time: 1 minute]
Boolean
true
false
fn main() {
    //explicitly define a bool
    let is_bool:bool = true;
    println!("explicitly_defined: {}", is_bool);

    // implicit
    let a = true;
    let b = false;
    println!("a: {}", a);
    println!("b: {}", b);

}
Expression result
fn main() {
    // get a value from an expression
    let c = 10 > 2;
    println!("c: {}", c);
}
[Avg. reading time: 7 minutes]
Char & Strings
The value assigned to a char variable is enclosed in a single quote('') .
Unlike some other languages, a character in Rust takes up 4 bytes rather than a single byte. It does so because it can store a lot more than just an ASCII value like emojis, Korean, Chinese, and Japanese characters.
fn main() {
    // implicitly & explicitly define
    let char_2:char = 'a';
    let char_3 = 'b';
    println!("character2: {}", char_2);
    println!("character3: {}", char_3);
}
String Literal
Used when the value of the string is known at compile time. Literals are set of characters that are hardcoded to a variable at compile time. String literals are found in the module std::str
String literals are stored in the Stack portion of the memory so retrieval is fast.
fn main() {
    // explicitly define
    let str_1:&str = "Rust Programming";
    println!("String 1: {}", str_1);

    // implicitly define
    let str_2 = "Rust Programming";
    println!("String 2: {}", str_2);
}
String Object
String objects are dynamic and can be changed during runtime.
A String object is allocated in the heap memory. Its slower but has more features.
String::new() - Creates an empty string.
String::from() - Default value passed as parameter.
fn main(){
   let empty_string = String::new();
   println!("length is {}",empty_string.len());

   let content_string = String::from("Rachel Green");
   println!("length is {}",content_string.len());
}
String Operations
variable.push() - to push a single character
// Push Single Character

fn main(){
   let mut name1 = String::from("Hello");
   println!("{}",name1);
   name1.push('!');
   println!("{}",name1);
}
variable.push_str() - to push a set of characters
// Push a string

fn main(){
   let mut name1 = String::from("Hello");
   println!("{}",name1);
   name1.push_str("World");
   println!("{}",name1);
}
variable.replace(“”,“”)
fn main(){
   let name1 = String::from("Hello!");
   let name2 = name1.replace("Hello","Howdy");    //find and replace
   println!("{}",name2);
}
Convert String Literal to String Object (to_string())
fn main(){
   let name1 = "Hello!".to_string();              //String object
   let name2 = name1.replace("Hello","Howdy");    //find and replace
   println!("{}",name2);
}
Convert String Object to String Literal (as_str())
fn main() {
    let name1 = String::from("hello");
    let name2 = name1.as_str();
    println!("{},{}", name1, name2);
}
Script to find the data type
fn print_type_of<T>(_: &T) {
    println!("{}", std::any::type_name::<T>())
}

fn main() {
    let name = "StringSample";
    let name1 = String::from("Hello");
    print_type_of(&name);
    print_type_of(&name1);
}
[Avg. reading time: 2 minutes]
String based programs
Assignment - Explain the logic behind these working examples.
For example, you need to explain why &str2 ? why not str2.
what is the use of collect()
Concatenation
// concatenation

fn main() {
  let str1 = "Hello".to_string();
  let str2 = " world".to_string();
  let string = str1 + &str2;
  println!("{}", string);
}
String Reverse
// Reverse String

fn main() {
    let s = "Hello World";
    let t: String = s.chars().rev().collect();
    println!("{}", t);
}
Check Palindrome
// Palindrome

fn main() {
    let s = "rotator";
    let t: String = s.chars().rev().collect();

    if s == t {
        println!("Palindrome")
    }
    else{
        println!("Not Palindrome")
    }
}
String Padding
 // String Padding

fn main() {
    let s = "pizza";

    println!("{s:-^30}");
    println!("{s:*<30}");
    println!("{s:#>30}");
}
[Avg. reading time: 8 minutes]
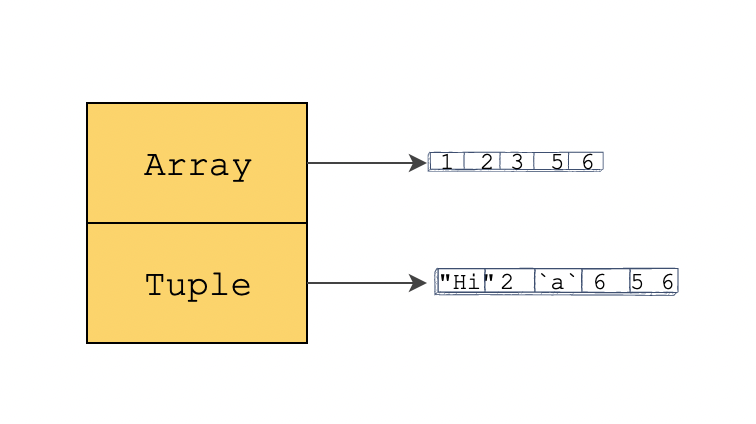
Arrays
An array is a homogenous sequence of elements.
A Collection of values of the same type is to be stored in a single variable.
Fixed length & Length known at compile time.
By default, the first element is always at index 0.

By default, arrays are immutable.
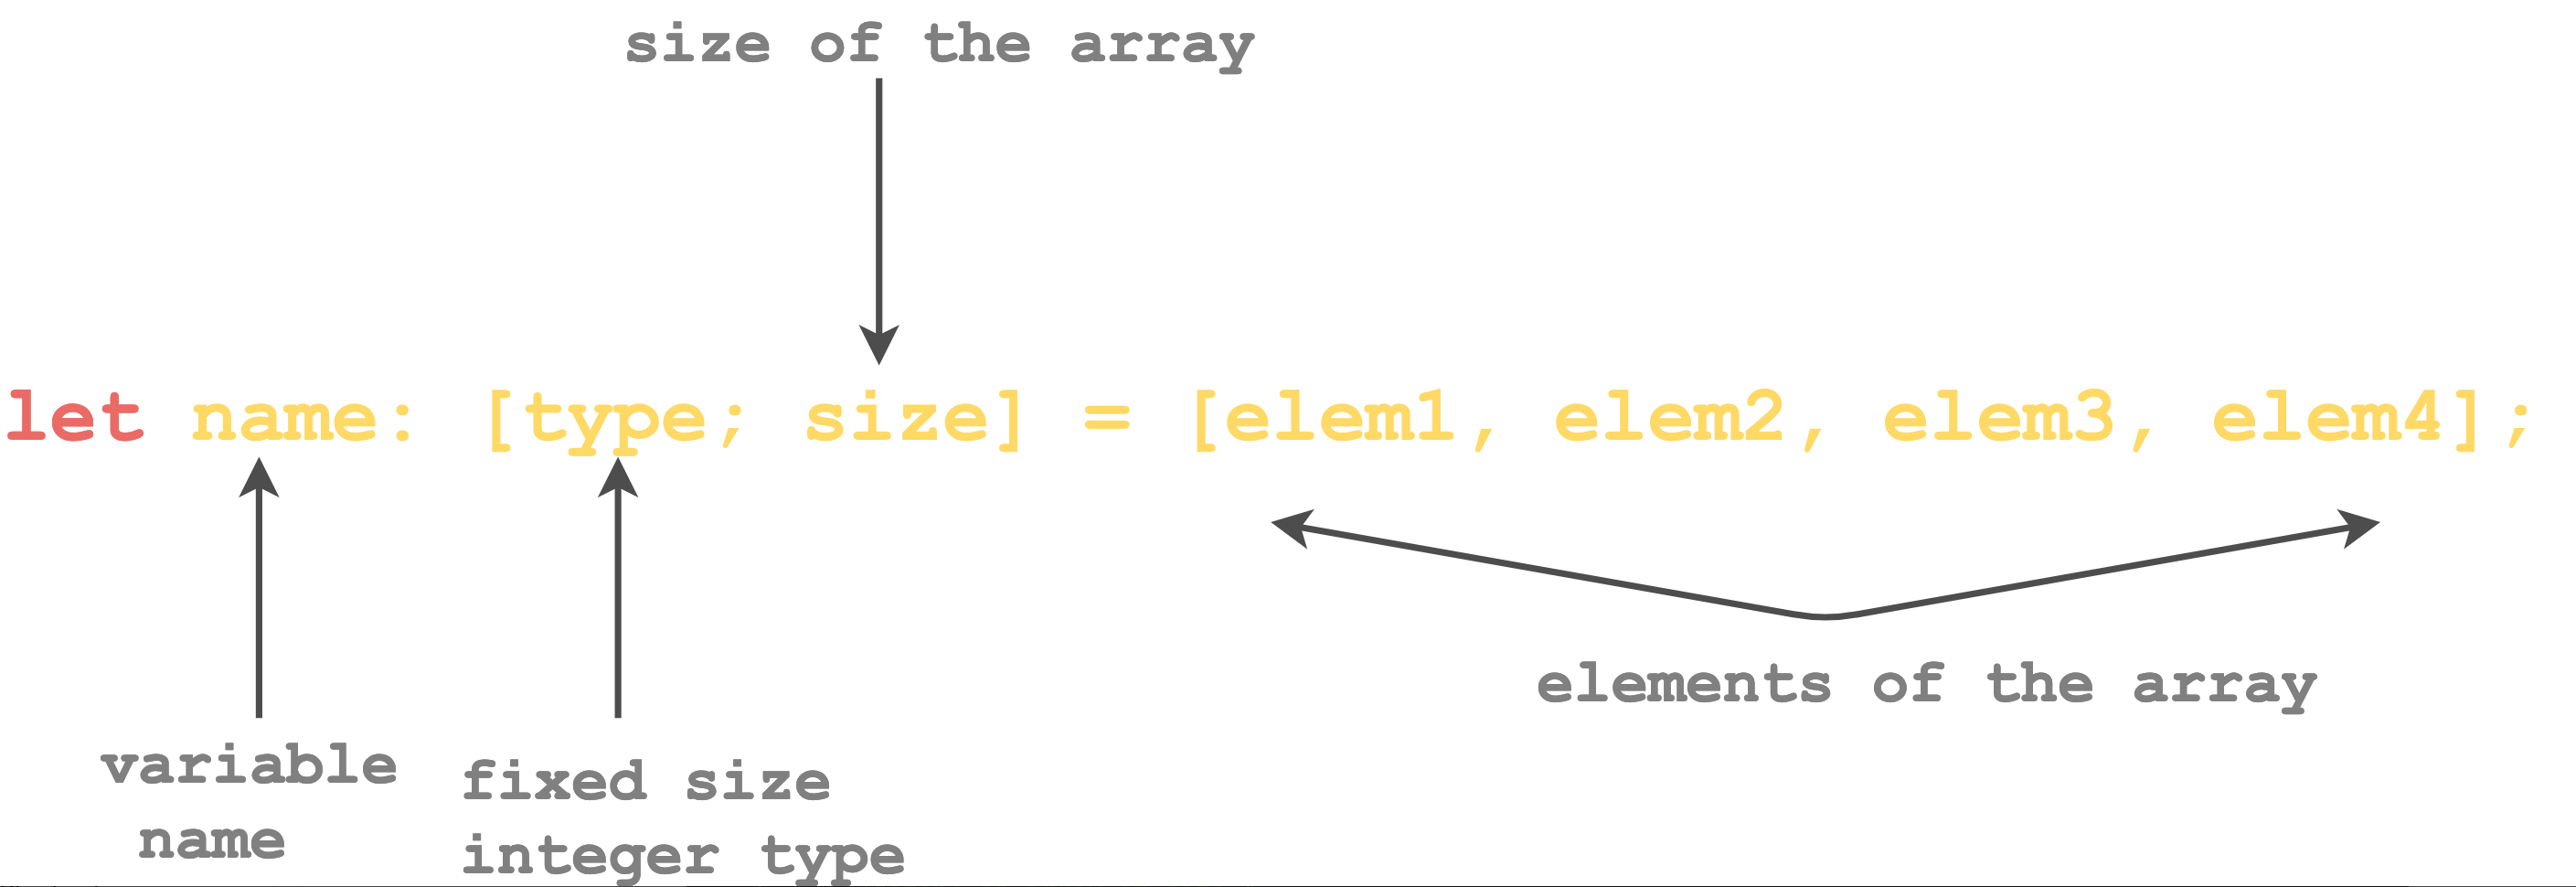
Define an Array
#[allow(unused_variables, unused_mut)]
fn main() {
   //define an array of size 4
   let arr:[i32;4] = [1, 2, 3, 4];
   // initialize an array of size 4 with 0
   let arr1 = [0 ; 4];
}
Access Array element
fn main() {
   //define an array of size 4
   let arr:[i32;4] = [1, 2, 3, 4];
   //print the first element of array
   println!("The first value of array is {}", arr[0]);
   // initialize an array of size 4 with 0
   let arr1 = [10; 14];
   //print the first element of array
   println!("The first value of array is {}", arr1[0]);
}
Mutable Arrays
fn main() {
    //define a mutable array of size 4
    let mut arr:[i32;4] = [1, 2, 3, 4];
    println!("The value of array at index 1: {}", arr[1]);
    arr[1] = 9;
    println!("The value of array at index 1: {}", arr[1]);
}
Print Array
Using Loop or using debug trait
fn main() {
    //define an array of size 4
    let arr:[i32;4] = [1, 2, 3, 4];
    //Using debug trait
    println!("\nPrint using a debug trait");
    println!("Array: {:?}", arr);
}
Get Array Length
fn main() {
    //define an array of size 4
    let arr:[i32;4] = [1, 2, 3, 4];
    // print the length of array
    println!("Length of array: {}", arr.len());
}
Slice
Slice is basically a portion of an array. It lets you refer to a subset of a contiguous memory location. But unlike an array, the size of the slice is not known at compile time.
A slice is a two-word object, the first word is a data pointer and the second word is a slice length.
Data pointer is a programming language object that points to the memory location of the data, i.e., it stores the memory address of the data.
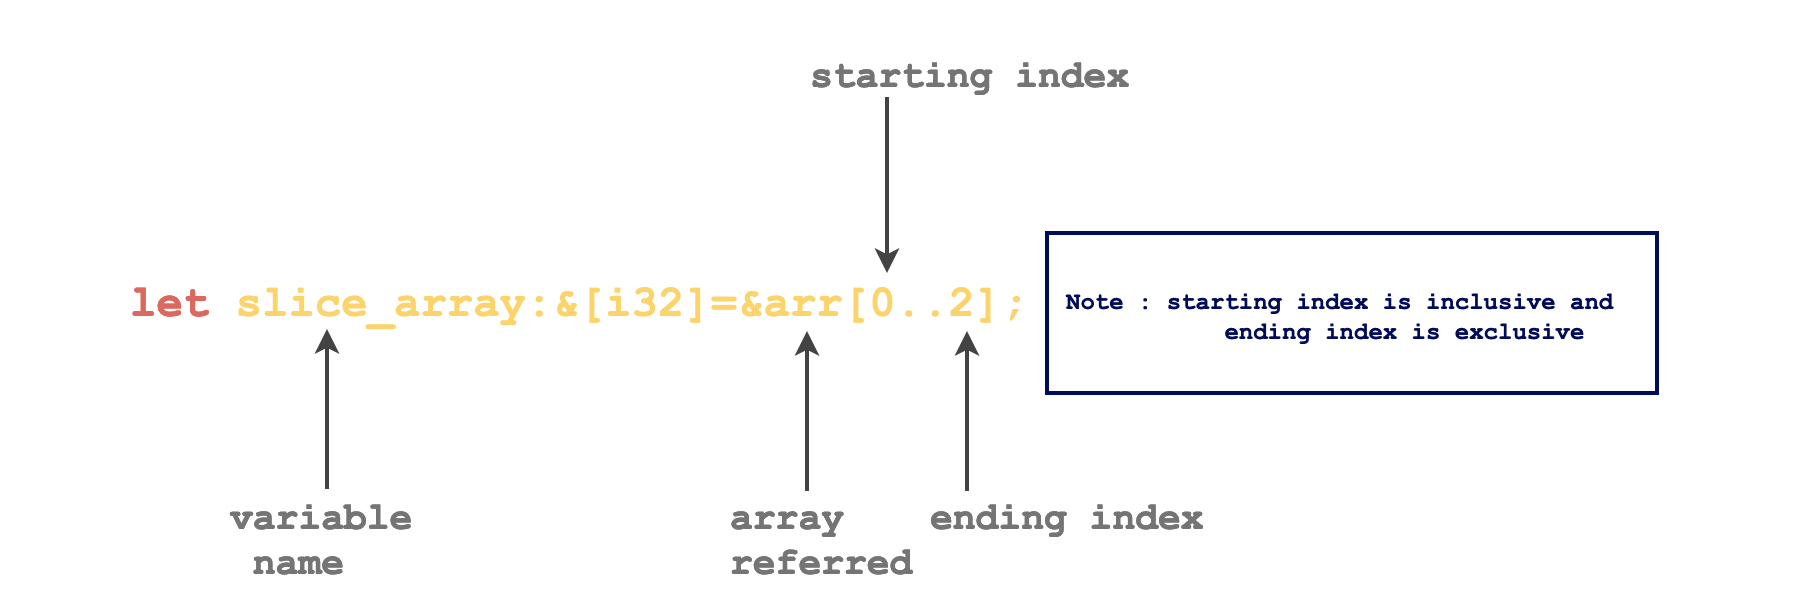
fn main() {
    //define an array of size 4
    let arr:[i32;4] = [1, 2, 3, 4];
    //define the slice
    let slice_array1:&[i32] = &arr;
    let slice_array2:&[i32] = &arr[0..2];
    let slice_array2:&[i32] = &arr[0..];
    // print the slice of an array
    println!("Slice of an array: {:?}", slice_array1);
    println!("Slice of an array: {:?}", slice_array2);
}
[Avg. reading time: 5 minutes]
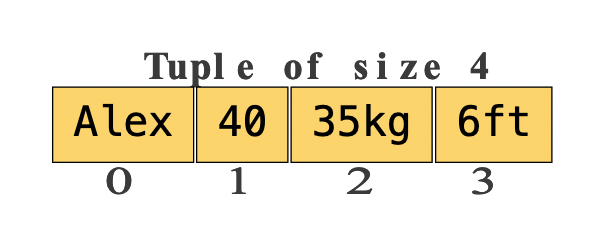
Tuples
Tuples are heterogeneous sequences of elements, meaning, each element in a tuple can have a different data type. Just like arrays, tuples are of a fixed length.
Define a Tuple
A tuple can be defined by writing let followed by the name of the tuple and then enclosing the values within the parenthesis.
Implicit Inference
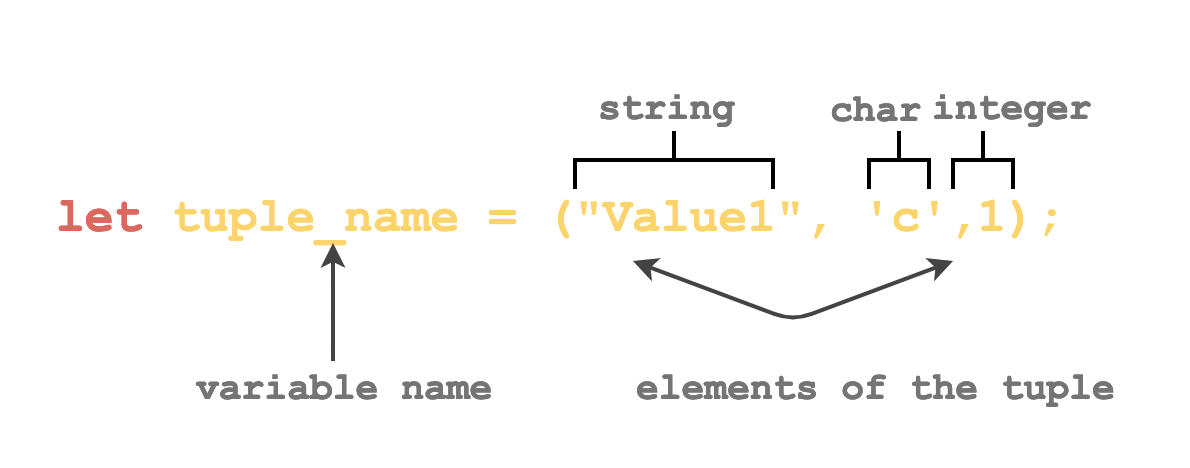
Explicit Inference
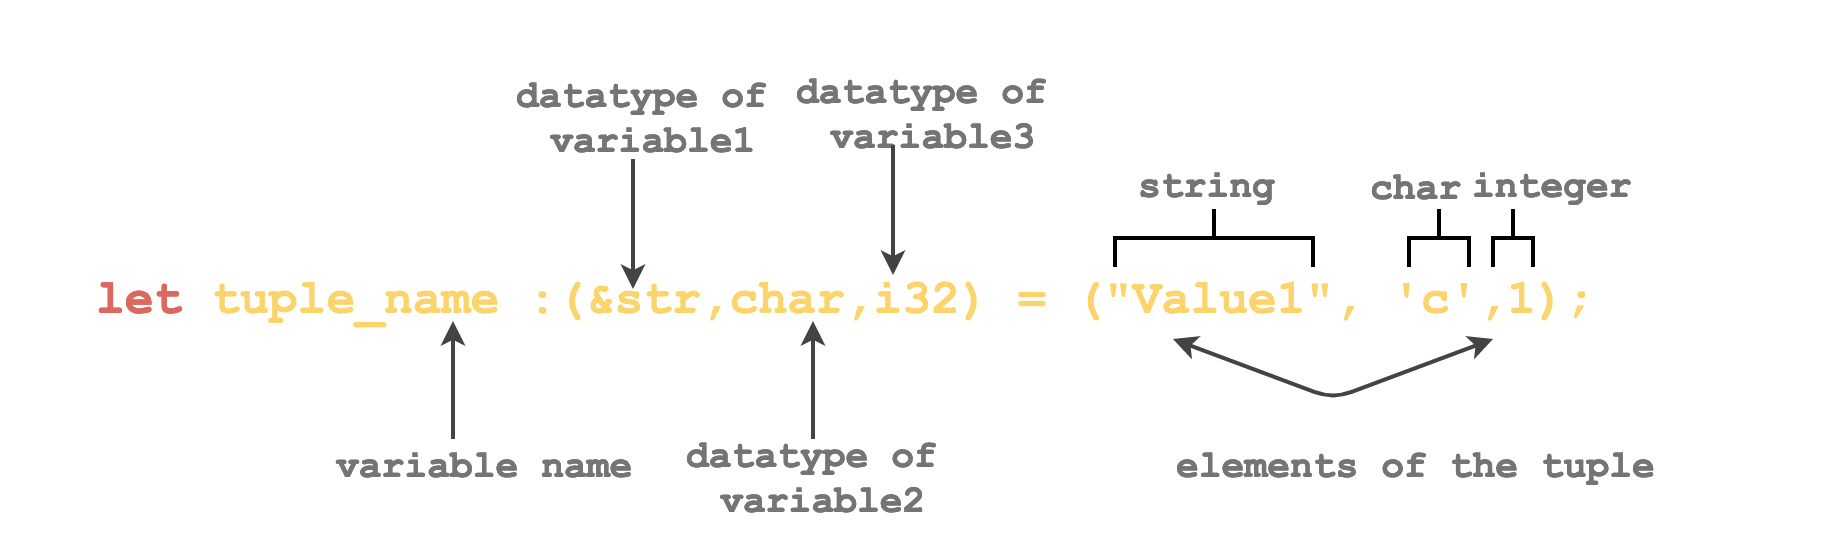
#[allow(unused_variables, unused_mut)]
fn main() {
    //define a tuple
    let person_data = ("Rachel", 30, "50kg", "5.4ft");
    // define a tuple with type annotated
    let person_data2 : (&str, i32, &str, &str) = ("Ross", 31, "55kg", "5.8ft");

    println!("{}",person_data.0);
    println!("{}",person_data.1);
    println!("{}",person_data2.0);
}
Assign Tuple value to individual variables
#[allow(unused_variables, unused_mut)]
fn main() {
    //define a tuple
    let person_data = ("Rachel", 30, "50kg", "5.4ft");

    let (name,age,wt,ht) = person_data;

    println!("{}",name);
    println!("{}",age);
    println!("{}",wt);
    println!("{}",ht);
}
Mutable Tuples
fn main() {
    //define a tuple
    let mut person_data = ("Rachel", 30, "50kg", "5.4ft");
    //print the value of tuple
    println!("The value of the tuple at index 0 and index 1 are {} {}", person_data.0, person_data.1);
    //modify the value at index 0
    person_data.0 = "Monica";
    //print the modified value
    println!("The value of the tuple at index 0 and index 1 are {} {}", person_data.0, person_data.1);
}
Print using Debug Trait
fn main() {
    //define a tuple
    let mut person_data = ("Rachel", 30, "50kg", "5.4ft");
    //print the value of tuple
    println!("Tuple - Person Data : {:?}", person_data);
}
[Avg. reading time: 3 minutes]
Constants
Constant variables are ones that are declared constant throughout the program scope, meaning, their value cannot be modified. They can be defined in the global and local scope.
All letters should be UPPER CASE and words separated by underscore (_)
Example:
ID_1
ID_2
const ID_1: i32 = 4; // define a global constant variable

fn main() {
    const ID_2: u32 = 3; // define a local constant variable
    println!("ID:{}", ID_1); // print the global constant variable
    println!("ID:{}", ID_2); // print the local constant variable
}
How is it different from let immutable variables
| Const | Immutable Let |
|---|---|
| declared using const | declaured using let |
| mandatory to define the data type | data type declaration is optional |
| The Value of const is set before running the program | Variable can store the result at runtime |
| Const cannot be shadowed | let can be shadowed |
[Avg. reading time: 2 minutes]
Unit Type
The () type, also called “unit”. The () type has exactly one value () , and is used when there is no other meaningful value that could be returned.
The empty tuple type, () , is called “unit”, and serves as Rust’s void type (unlike void , () has exactly one value, also named () , which is zero-sized).
Example 1
fn main() {
    let my_tuple = (42, "hello", ());
    println!("Tuple: {:?}", my_tuple);
}
In this example, the tuple my_tuple contains an integer, a string, and a unit type (). When you run the code, it will print:
Tuple: (42, "hello", ())
Example 2
fn main() {
    let result = do_nothing();
    println!("Result of do_nothing: {:?}", result);
}

fn do_nothing() -> () {
    // This function does nothing and returns unit type
}
[Avg. reading time: 3 minutes]
Reference and Deference operators
In Rust, values live in memory. Sometimes you want to use a value without copying it. That is where references come in.
& - creates a reference
* - accessess the value through a reference
// Reference and Dereference

fn main() {
    let a = 10;        // a owns the value 10
    let b = &a;        // b is a reference to a

    // value of a and address of a
    println!("a value: {} | a address: {:p}", a, &a);

    // dereferenced value from b and address stored in b
    println!("b value: {} | b address: {:p}", *b, b);

    // same value and same address, written explicitly
    println!("value via & then *: {} | address via * then &: {:p}", *(&a), &(*b));
}
For Example
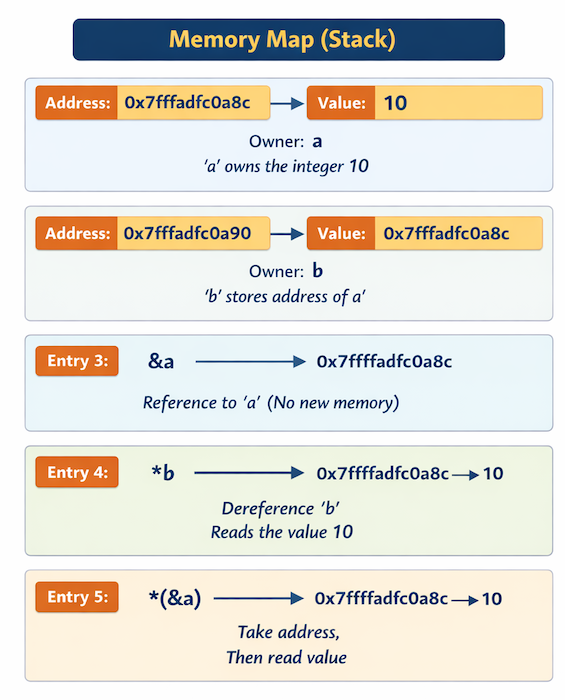
Why its useful?
- Avoids unnecessary copying of data.
- Allows functions to read large values efficiently.
- Makes ownership rules explicit. (Will discuss this in next chapter)
[Avg. reading time: 2 minutes]
Expression
In Rust, almost everything is an expression. An expression evaluates to a value.
A key rule to remember
- An expression without a semicolon returns a value
- Adding a semicolon turns it into a statement and discards the value
 // Expressions and Semicolons

fn main() {
    let x = 5u32;

    let y = {
        // intermediate expressions
        let x_squared = x * x;
        let x_cube = x_squared * x;

        // last expression, no semicolon
        // this value is assigned to y
        x_cube + x_squared + x
    };

    let z = {
        // simple block expression
        2 * x
    };

    let zz = {
        // semicolon suppresses the value
        // this block evaluates to ()
        2 * x;
    };

    println!("x is {:?}", x);
    println!("y is {:?}", y);
    println!("z is {:?}", z);
    println!("zz is {:?}", zz);
}
[Avg. reading time: 0 minutes]
Operators
[Avg. reading time: 1 minute]
Operators
Binary Operators
Operators that deal with two operands
- Arithmetic Operators
- Logical Operators
- Comparison Operators
- Assignment Operator
- Compound Assignment Operator
- Bitwise Operators
- Typecast Operators
Unary Operators
The Operators that act upon a single operand, for example, Negation Operator.
[Avg. reading time: 8 minutes]
Binary Operators in Rust
Binary operators operate on two operands and produce a result.
Rust groups them into arithmetic, logical, comparison, and bitwise operators.
Arithmetic Operators
Used for numeric calculations.
- Addition
+ - Subtraction
- - Multiplication
* - Division
/ - Modulus
%
Important rule
- Integer division truncates, it does not round
fn main() {
    let a = 4;
    let b = 3;

    println!("Operand 1:{}, Operand 2:{}", a, b);
    println!("Addition:{}", a + b);
    println!("Subtraction:{}", a - b);
    println!("Multiplication:{}", a * b);
    println!("Division:{}", a / b);
    println!("Modulus:{}", a % b);
}
Logical Operators
Logical operators work on boolean values.
- AND &&
- OR ||
- NOT !
AND and OR are lazy (short-circuiting) operators.
Evaluation rules
- Left-hand side is evaluated first
- Right-hand side may never execute
fn main() {
    let a = true;
    let b = false;

    println!("AND:{}", a && b);
    println!("OR:{}", a || b);
    println!("NOT:{}", !a);
}
Lazy AND Evaluation
fn expensive_check() -> bool {
    println!("expensive_check executed");
    false
}

fn main() {
    let result = false && expensive_check();
    println!("Result: {}", result);
}
- false && expensive_check()
- LHS is false
- RHS is never evaluated
Lazy OR Evaluation
fn expensive_check() -> bool {
    println!("expensive_check executed");
    true
}

fn main() {
    let result = true || expensive_check();
    println!("Result: {}", result);
}
- RHS is skipped because LHS is already True.
Comparison Operators
fn main() {
    let a = 2;
    let b = 3;

    println!("a > b:{}", a > b);
    println!("a < b:{}", a < b);
    println!("a >= b:{}", a >= b);
    println!("a <= b:{}", a <= b);
    println!("a == b:{}", a == b);
    println!("a != b:{}", a != b);
}
- Operand types must match
- No implicit type conversions
- Type errors fail at compile time
Bitwise Operators
Bitwise operators work on the binary representation of integers. Instead of using many variables, each bit represents a flag or state.
- Bitwise AND - &
- Bitwise OR - |
- Bitwise NOT - !
- Left Shift Operator - <<
- Right Shift Operator - >>
Common use cases
- Bit flags
- Masking
- Low-level systems programming
- Hardware interaction
| Bit Position | 7 | 6 | 5 | 4 | 3 | 2 | 1 | 0 |
|---|---|---|---|---|---|---|---|---|
| Component | Pin 7 | Pin 6 | Pin 5 | Pin 4 | Pin 3 | Pin 2 | Pin 1 | Pin 0 |
Example: Need to find out Pin 1 and 3 are On
Bit: 7 6 5 4 3 2 1 0
Pin: 1 0 1 0 1 0 1 0
Pin 1 is ON
Pin 3 is ON
fn main() {
    let pin: u8 = 0b1010_1110;
    const MASK: u8 = 0b0000_1010;
    let result = pin & MASK;
    println!("masked (binary): {:08b}", result);
    println!("masked (decimal): {}", result);

    if pin & (1 << 1) != 0 {
        println!("Pin 1 is ON");
    } else {
        println!("Pin 1 is OFF");
    }

    if pin & (1 << 3) != 0 {
        println!("Pin 3 is ON");
    } else {
        println!("Pin 3 is OFF");
    }

}
#operators #binary #unary #bitwise
[Avg. reading time: 5 minutes]
Unary Operators in Rust
Unary operators operate on a single operand.
In Rust, unary operators are used for:
- Negation
- Boolean inversion
- Pointer dereferencing
- Borrowing (references)
Common Unary Operators
| Operator | Name | Purpose |
|---|---|---|
- | Negation | Negates a numeric value |
! | NOT | Inverts a boolean value |
* | Dereference | Accesses the value behind a reference |
& | Borrow | Creates an immutable reference |
&mut | Mutable Borrow | Creates a mutable reference |
Negation Operator (-)
Used to negate numeric values.
fn main() {
    let x = 5;
    let y = -x;
    println!("y: {}", y);
}
- Works only on numeric types
- Does not mutate the original value
Logical NOT (!):
Inverts a boolean value.
fn main(){
    let a = true;
    let b = !a;
    println!("b: {}", b);
}
Borrow (&):
Creates an immutable reference to a value.
fn main(){
    let s = String::from("hello");
    let r = &s;
    println!("r: {}", r);
}
- Ownership is not transferred
- Multiple immutable borrows are allowed
- The value cannot be mutated through r
Mutable Borrow (&mut):
fn main(){
    let mut s = String::from("hello");
    {
        let r = &mut s;
        r.push_str(", world");
    }
    println!("s: {}", s);
}
- Only one mutable borrow at a time
- No immutable borrows while mutable borrow exists
- Enforced at compile time
Dereference Operator (*)
Accesses the value behind a reference.
fn main() {
    let x = 10;
    let y = &x;
    let z = *y;

    println!("z: {}", z);
}
- y holds the address of x
- *y reads the value at that address
#unary #reference #dereference #borrow
[Avg. reading time: 0 minutes]
Flow of Control
[Avg. reading time: 8 minutes]
if..elseif..else construct
- Conditions must be bool
ifis an expression, so it can return a value also.
fn main() {
      //define a variable
      let learn_language="Rust";

      // if..elseif..else construct

      if learn_language == "Rust" {
         println!("You are learning Rust language!");
      }
      else if learn_language == "Java" {
         println!("You are learning Java language!");
      }
      else {
         println!("You are learning some other language!");
      }
}
Nested IF
// Nested If Block

fn main() {
    //define a variable
    let learn_language1 = "Rust";
    let learn_language2 = "Java";
    // outer if statement
    if learn_language1 == "Rust" {  // inner if statement
        if learn_language2 == "Java"{
              println!("You are learning Rust and Java language!");
        }
    }
    else {
      println!("You are learning some other language!");
    }
}
If Expression
// If Expression

fn main() {
    //define a variable
    let learn_language = "Rust";
    // short hand construct
    let res= if learn_language == "Rust" {"You are learning Rust language!"} else {"You are learning some other language!"};
    println!("{}", res);
}
Q & A
Q1: What is the output of the following?
// Qn 1

fn main() {
   let age=23;
   if age >=21{
      println!("Age is greater than 21");
   }
    else if age <21{
       println!("Age is less than 21");
    }
    println!("Value Printed");
}
Q2: Which If block is executed?
fn main() {
   let age=23;
   let play=true;
   let activity="Tennis" ;
   if age >=21 && play==false && activity=="Tennis"{
     println!("Age is greater than 21");
     println!("You are not allowed to play");
     println!("The sport is {}",activity);
   }
   else if  age >=21 && play==true && activity=="Tennis"{
     println!("Age is greater than 21");
     println!("You are allowed to play");
     println!("The sport is {}",activity);
   }
   else if age <21 && play==false && activity=="Tennis"{
     println!("Age is less than 21");
     println!("You are allowed to play");
     println!("The sport is {}",activity);
   }
   else {
     println!("Value Printed");
   }
}
Q3: What is the output of the following code?
fn main() {
  let age = 23;
  let play = true;
  let activity="Baseball" ;
  if age >= 21 && play==true || activity == "Tennis" {
    println!("Age is greater than 21");
    println!("You are allowed to play");
    println!("The sport is {}",activity);
  }
  else if  age >= 21 && play == true && activity == "Tennis"{
    println!("Age is greater than 21");
    println!("You are allowed to play");
    println!("The sport is {}",activity);
  }
  else if age <21 && play == false && activity == "Tennis"{
    println!("Age is less than 21");
    println!("You are allowed to play");
    println!("The sport is {}",activity);
  }
  else{
    println!("Value Printed");
  }
 }
[Avg. reading time: 5 minutes]
Match
match is Rust’s pattern matching construct. Superficially it looks like switch, but semantically it is stricter and more powerful.
Exhaustive by default, all possible cases must be handled.
Pattern based, not just value based. An expression, so it can return a value
fn main() {
    let number = 34;
    println!("Tell me about {number}");

    match number {
        1 => println!("One"),
        2 | 3 | 5 | 7 | 11 => println!("This is a prime"),
        13..=19 => println!("A teen"),
        matched @ 10..=100 => {
            println!("Found {matched} between 10 and 100");
        }
        _ => println!("Not special"),
    }
}
- | matches multiple values
- ..= matches inclusive ranges
- @ binds the matched value
- _ is the catch-all and is mandatory
    if all cases are not explicitly covered
fn main() {
    let boolean = true;

    let binary = match boolean {
        false => 0,
        true => 1,
    };

    println!("{boolean} -> {binary}");
}
- Every arm (section) must return the same type.
Tuples with Match
fn main() {
    let triple = (0, -2, 3);
    println!("Tell me about {:?}", triple);
    // Match can be used to destructure a tuple
    match triple {
        // Destructure the second and third elements
        (0, y, z) => println!("First is `0`, `y` is {:?}, and `z` is {:?}", y, z),
        (1, ..)  => println!("First is `1` and the rest doesn't matter"),
        (.., 2)  => println!("last is `2` and the rest doesn't matter"),
        (3, .., 4)  => println!("First is `3`, last is `4`, and the rest doesn't matter"),
        // `..` can be used to ignore the rest of the tuple
        _      => println!("It doesn't matter what they are"),
        // `_` means don't bind the value to a variable
    }
}
[Avg. reading time: 3 minutes]
Iterations a.k.a Loops
There are 3 types of loops in Rust
While Loop
Loops as long as the condition is True, exit when the condition if False.
fn main() {
    let mut i = 0;
    while i != 6 {
        i += 1;
        println!("inside loop value of i : {i}")
    }
    println!("finally i is {}", i);
}
For Loop
// Left side Inclusive, Right side exclusive

fn main() {
    for x in 0..5 {
        println!("{}", x);
    }

// By adding =, both sides are inclusive

    for x in 0..=5 {
        println!("{}", x);
    }
}
Loop
- Infinite loop by default.
- Exit explicitly using break.
- Can return a value.
fn main() {
    let mut x = 0;
    loop {
        x += 1;
        if x == 5 {
            break;
        }
    }
    println!("{}", x);
}
// Break with message

fn main() {
    let mut x = 0;
    let v = loop {
        x += 1;
        if x == 5 {
            break "found the 5";
        }
    };
    println!("from loop: {}", v);
}
[Avg. reading time: 6 minutes]
Functions
Functions are the primary building blocks for readable, reusable, and maintainable code.
Rust functions are flexible in placement:
-
They can be defined before or after
main -
Order does not matter as long as they are in scope
-
Function names use snake_case
-
Parameters and return types are explicit
Simple Function
// Simple Function

fn main(){
   //calling a function
   hello();
}

fn hello(){
   println!("Hi");
}
Return a Value
// Return Value
// Demonstrate the same with the return value (35000.00*5.0*6.4/100.00)

fn main(){
   println!("Hi {}",calc_si());
}

fn calc_si()->f32 {
   35000.00*5.0*6.4/100.00
}
- Return type is specified using ->
- No semicolon on the return expression
- All return paths must match the declared type
Call By Value
// Call by Value

fn main(){
   let no:i32 = 5;
   changeme(no);
   println!("Main Function:{}",no);
}

fn changeme(mut param_no: i32) {
   param_no = param_no * 0;
   println!("Inside the Function :{}",param_no);
}
- i32 is copied into the function
- Changes inside the function do not affect the caller
- This is safe and predictable
Call By Reference
// Call by Reference

fn main() {
    let mut no: i32 = 5;
    println!("Main fucntion initial value :{} -> {:p}", no,&no);
    changeme(&mut no);
    println!("Main function final value  is:{} -> {:p}", no,&no);
}

fn changeme(param_no: &mut i32) {
    println!("Changeme function initial value :{} -> {:p}", *param_no,&(*param_no));
    *param_no = 0; //de reference
    println!("Changeme function final value :{} -> {:p}", *param_no,&(*param_no));
}
- &mut creates a mutable reference
- * dereferences the reference
- Only one mutable reference is allowed at a time
Summary
- Functions are defined using fn
- Rust returns the last expression implicitly
- Values are passed by copy by default
- Use references to allow mutation without copying
- Borrowing rules are enforced at compile time
#functions #callbyvalue #callbyreference
[Avg. reading time: 0 minutes]
Automated Tests
[Avg. reading time: 5 minutes]
Unit Testing in Rust
Unit testing is the practice of testing small, isolated pieces of code, usually individual functions, to ensure they behave correctly.
In Rust, unit testing is not an afterthought. It is built into the language and the tooling from day one.
Why unit tests are important
Rust emphasizes correctness, safety, and refactoring without fear. Unit tests directly support these goals.
- Catch logic errors early
- Validate behavior at function boundaries
- Enable safe refactoring
- Document intended behavior
- Prevent regressions as the codebase grows
In Rust, if the compiler guarantees memory safety, tests guarantee behavioral safety.
Rust-first advantages of unit testing
Rust makes unit testing easier and more reliable than many languages.
Built-in test framework
- No external libraries required
- Tests live alongside production code
- Run using a single command:
cargo test
Strong type system + tests = fewer bugs
- Many bugs never compile
- Tests focus on logic, not defensive checks
- Less mocking, more real code execution
Fearless refactoring
- Borrow checker guarantees safety
- Tests guarantee correctness
- You can change internals without changing behavior
How Rust structures unit tests
Unit tests are typically placed in the same file as the code being tested.
- Test internal logic
- Live next to the code
- Can access private functions
Integration tests are placed under tests/ folder.
We will discuss about integration tests when we learn about Library & Modules.
#testing #unittest #rust-testing
[Avg. reading time: 5 minutes]
Calculator with Unit Tests (Rust)
This example shows:
- functions (
add,sub,mul,div) - using
panic!for invalid input - unit tests with
#[test] #[should_panic]and#[ignore]
Copy this to VSCode
fn add(a: f32, b: f32) -> f32 {
    a + b
}

fn sub(a: f32, b: f32) -> f32 {
    if a < b {
        panic!("first value cannot be less than the second value");
    } else {
        a - b
    }
}

#[allow(dead_code)]
fn mul(a: f32, b: f32) -> f32 {
    a * b
}

#[allow(dead_code)]
fn div(a: f32, b: f32) -> f32 {
    a / b
}

fn main() {
    let a: f32 = 17.0;
    let b: f32 = 33.0;
    let op = "-";

    let result = if op == "+" {
        add(a, b)
    } else if op == "-" {
        sub(a, b)
    } else if op == "*" {
        mul(a, b)
    } else if op == "/" {
        div(a, b)
    } else {
        panic!("unsupported operator: {op}");
    };

    println!("{result}");
}


#[cfg(test)]
mod tests {
    use super::*;

    #[test]
    fn test_add() {
        assert_eq!(add(20.0, 10.0), 30.0);
        assert_eq!(add(10.0, 20.0), 30.0);
        result = add(1.0,2.0);
        assert_eq!(result,4,"Expected 3; returned result is {}", result);
    }

    #[test]
    #[should_panic(expected = "cannot be less")]
    fn test_sub_panics_when_a_less_than_b() {
        sub(10.0, 20.0);
    }

    #[test]
    fn test_sub_ok() {
        assert_eq!(sub(20.0, 10.0), 10.0);
    }

    #[test]
    #[ignore]
    fn test_sub_ignored_example() {
        assert_eq!(sub(20.0, 10.0), 10.0);
    }
}
Other variations of asserts
- assert!
- assert_eq!
- assert_ne!
Run the script
cargo run
Run all tests
cargo test
Run ignored tests too
cargo test -- --ignored
Run specific test
cargo run sub
Show println output during tests
cargo test -- --nocapture
Run tests in specific thread
By default Rust uses multiple threads for speed.
cargo test -- --test-threads=1
Additional Links:
- Rust book testing chapter: https://doc.rust-lang.org/book/ch11-01-writing-tests.html
cargo testoptions: https://doc.rust-lang.org/cargo/commands/cargo-test.html
[Avg. reading time: 1 minute]
Chapter 3
- Memory Management
- Iterator
- Enumerator
- Slices
[Avg. reading time: 0 minutes]
Memory Management
- Stack & Heap
- Memory Layout
- Ownership
- Borrowers
- Owner Borrower Stack Hheap
- Borrowing References
- Dangling References
[Avg. reading time: 15 minutes]
Stack - Heap
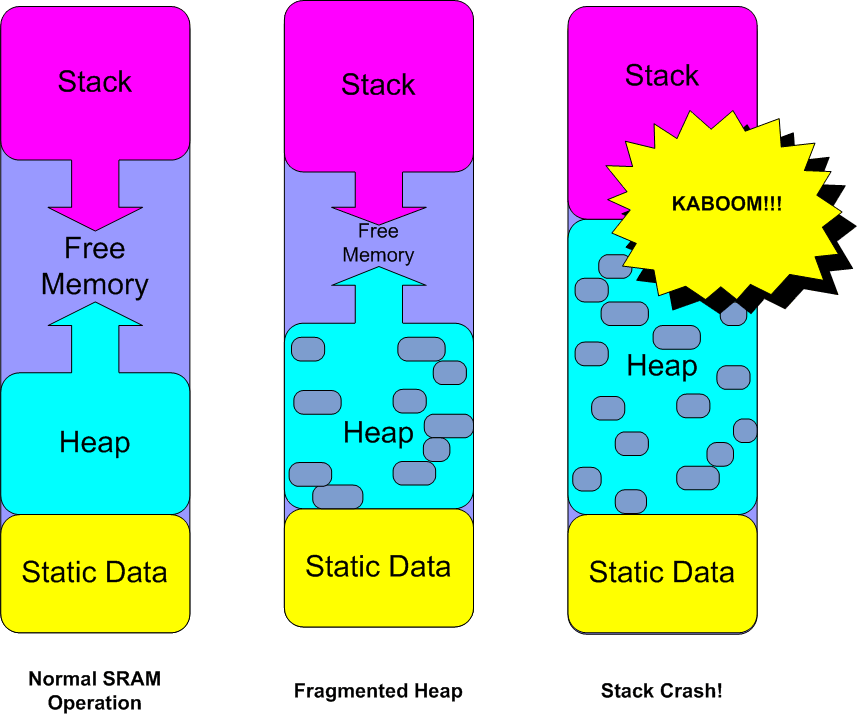
Rust guarantees memory safety without a garbage collector by enforcing rules about ownership, borrowing, and lifetimes at compile time.
Most Rust programs use these memory regions:
- Static (Data) memory: values that exist for the entire program run
- Stack: per-function call frames, fast, fixed-size data
- Heap: dynamic, resizable data allocated at runtime
Static/Data Memory
This region holds data that is available for the entire lifetime of the program.
Typical residents:
- Program code (binary / text segment)
- Static variables (static)
- String literals (read-only bytes baked into the binary)
Example
fn main() {
    println!("Hello");
}
The bytes for “Hello” live in static memory. The program just references them.
A typical 64bit Windows
High Address
|---------------------|
|        Stack        |  ~1 MB default (for each thread)
|---------------------|
|                     |
|         Heap        |  grows dynamically
|                     |
|---------------------|
|   Static / Data     |  fixed at compile time
|---------------------|
|   Program Code      |
|---------------------|
Low Address
Stack
Stack is LIFO (Last In First Out).
The stack stores stack frames created when functions are called. Each frame typically contains:
- Function arguments
- Local variables
- Bookkeeping info (return address, saved registers)
Stack data is usually:
- Known size at compile time
- Fast to allocate and free
- Automatically cleaned up when the function returns
Mac/Linux
8 MB default stack space.
ulimit -s
- Each process may have many threads. Ex: Google Chrome uses several threads.
- Each thread has its own stack.
- Stack memory is reserved not used immediately.
- Heap and Static are shared per process.
Process 1 (Chrome)
 ├── Thread 1 → Stack 1
 ├── Thread 2 → Stack 2
 ├── Thread 3 → Stack 3
 ├── Shared Heap 1
 └── Shared Static/Data 1
Process 2 (VSCode)
 ├── Thread 1 → Stack 1
 ├── Thread 2 → Stack 2
 ├── Thread 3 → Stack 3
 ├── Shared Heap 2
 └── Shared Static/Data 2
fn foo() {
    let y = 5;
    let z = 100;
}

fn main() {
    let x = 42;

    foo();
}
| Address | Name | Value |
|---|---|---|
| 0 | x | 42 |
After calling the function foo()
| Address | Name | Value |
|---|---|---|
| 2 | z | 100 |
| 1 | y | 5 |
| 0 | x | 42 |
Note: Memory address is taking into account DATA TYPE SIZE. It’s just a representation.
After foo() gets executed, control transfers to main, and the values are deallocated automatically.
| Address | Name | Value |
|---|---|---|
| 0 | x | 42 |
stateDiagram-v2
    [*] --> Main
    state Main {
        [*] --> PushMainFrame
        PushMainFrame: Push frame for main()
        PushMainFrame --> AllocateX: x = 42
        AllocateX --> CallFoo: Call foo()
        CallFoo --> PushFooFrame: Push frame for foo()
        state PushFooFrame {
            [*] --> AllocateY: y = 5
            AllocateY --> AllocateZ: z = 100
        }
        PushFooFrame --> PopFooFrame: Pop frame for foo()
        PopFooFrame --> ReturnFoo: foo() returns
        ReturnFoo --> PopMainFrame: Pop frame for main()
        PopMainFrame --> [*]
    }
    Main --> [*]
Copy Trait
Types like i32, bool, char, and many small fixed-size structs implement Copy. Assignment duplicates bits.
    fn main() {
    // i32 is a simple type and are normally stored on the stack.
    // copy trait

    let x = 42;
    let y = x;

    // The value bound to x is Copy, so no error will be raised.
    println!("{:?}", (x, y));

    // The value bound to x is Copy, so no error will be raised.
    println!("{:p},{:p}", &x, &y);
}
Heap
The heap stores data that is:
- Allocated at runtime
- Often resizable or variable-sized
- Accessed via a pointer stored on the stack
Common heap-backed types:
- String
- Vec
- Box
- HashMap<K, V>
fn main(){
    let s1=String::from("hello");
    println!("{}",s1)
}
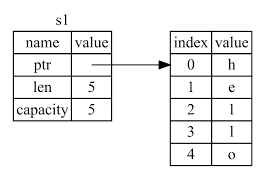
fn main() {
    let s = String::from("rust");

    println!("Value        : {}", s);
    println!("Length (bytes): {}", s.len());
    println!("Capacity     : {}", s.capacity());
    println!("Stack addr   : {:p}", &s);
    println!("Heap ptr     : {:p}", s.as_ptr());
}
// English and international characters

fn main() {
    let s = String::from("rust-ரஸ்ட்");

    println!("Value        : {}", s);
    println!("Length (bytes): {}", s.len());
    println!("Capacity     : {}", s.capacity());
    println!("Stack addr   : {:p}", &s);
    println!("Heap ptr     : {:p}", s.as_ptr());
}
Move Trait
Heap-backed values are usually moved, not copied, because duplicating them would require duplicating heap allocations.
// Move Trait (Heap)

fn main() {
    let mut name = String::from("Hello World");
    println!("Memory address of name: {},{:p} \n", name,&name);

    //moving
    let name1 = name;
    println!("Memory address of name1: {},{:p} \n", name1,&name1);
    //println!("Memory address of name: {},{:p} \n", name,&name);
    // Setting up another Value for the variable name
    name = String::from("Dear World");
    println!("Memory address of name: {},{:p}\n", name,&name);
}
Example: pdf (stack) - printed book (heap)
// Copy Trait (Stack - because of using String Literal)

fn main() {
    let name = "Hello World";
    println!("Memory address of name: {},{:p} \n", name,&name);

    //Copying

    let name1 = name;
    println!("Memory address of name1: {},{:p} \n", name1,&name1);

    println!("Memory address of name: {},{:p} \n", name,&name);
}
1: adafruit.com
[Avg. reading time: 11 minutes]
Memory Layout
How many bytes does a type actually occupy?
The std::mem::size_of::
use std::mem;

fn main() {
    println!("i32    : {}", mem::size_of::<i32>());
    println!("u32    : {}", mem::size_of::<u32>());
    println!("f64    : {}", mem::size_of::<f64>());
    println!("char   : {}", mem::size_of::<char>());
    println!("&str   : {}", mem::size_of::<&str>());
    println!("String : {}", mem::size_of::<String>());
}
| Type | Size (bytes) | Why |
|---|---|---|
i32 | 4 | 32 bits = 4 bytes |
u32 | 4 | 32 bits unsigned |
f64 | 8 | 64-bit float |
char | 4 | Unicode scalar value |
&str | 16 | pointer (8) + length (8) |
String | 24 | pointer (8) + length (8) + capacity (8) |
| Type | Stack Size | Heap Usage |
|---|---|---|
i32 | 4 | None |
f64 | 8 | None |
char | 4 | None |
&str | 16 | No Ownership |
String | 24 | Yes, for text |
- Primitive numeric types store values directly.
- &str is a pointer containing a memory address and length.
- String stores metadata on the stack but allocates its text on the heap.
String Literal points to location where Literal values are stored (Static Memory).
fn main(){
    let s = "Rachel";
    println!("{},{:p}", s, s.as_ptr())
}
Memory Alignment

CPUs generally do not read memory one byte at a time. Instead, they read in “words” (e.g., 8 bytes on a 64-bit system). If a multi-byte value is “misaligned”—meaning it straddles the boundary between two words—the CPU might have to perform two memory accesses instead of one, or in some architectures, it may trigger a hardware exception and crash.
use std::mem;

fn main() {
    let a: i32 = 42;
    let b: char = 'R';
    let c: String = String::from("Rachel");

    println!("Sizes and Alignments");
    println!("i32    -> size: {}, align: {}", mem::size_of::<i32>(), mem::align_of::<i32>());
    println!("char   -> size: {}, align: {}", mem::size_of::<char>(), mem::align_of::<char>());
    println!("String -> size: {}, align: {}", mem::size_of::<String>(), mem::align_of::<String>());

    println!("\nStack Addresses");
    println!("a (i32)    at {:p}", &a);
    println!("b (char)   at {:p}", &b);
    println!("c (String) at {:p}", &c);

    println!("\nHeap Address (String data)");
    println!("c text buffer at {:p}", c.as_ptr());
}
Padding & Memory Alignment
Padding: If you have a 1-byte variable followed by an 8-byte variable, the CPU can’t fit the big one into the remaining 7 bytes of its current “gulp” without splitting it. To avoid this, the computer leaves those 7 bytes empty. That empty space is padding.
Alignment: This is the rule that says data must be placed exactly where the CPU’s “gulp” starts. If you want an 8-byte integer, it needs to be perfectly lined up with the straw.
- A value must start at a memory address that is a multiple of its alignment.
- Alignment is determined by the type.
On a 64-bit system:
-
i32 Size = 4 bytes | Alignment = 4 bytes
-
u64, usize, String, pointers Size = 8 bytes (or more for String) | Alignment = 8 bytes
Example:
- Bikes (1-byte) can park in any 1-foot slot.
- Cars (4-bytes) must park in slots that are multiples of 4 (Slot 0, 4, 8…).
- Buses (8-bytes) must park in slots that are multiples of 8 (Slot 0, 8, 16…).
Memory App Analyzer
Sometimes it takes time to start the app, please wait.
[Avg. reading time: 6 minutes]
Ownership
Ownership is the core feature that makes Rust memory-safe without a garbage collector.
- It is not just a memory rule.
- It is the foundation of Rust’s design.
Memory Management Landscape
C / C++
- No garbage collector
- Very fast and predictable
- Developers must manually free memory
- Risk of leaks, double free, dangling pointers
Example: malloc() and free()
Python, Java, Go
- Use a garbage collector
- Memory automatically reclaimed
- Easier developer experience
- Runtime overhead and unpredictability
Garbage Collector runs during program execution.
Rust
- Combines C-like performance with automatic memory safety
- Uses compile-time ownership rules instead of a garbage collector
- Determines at compile time where values are dropped
- Enforces strict coding rules through the borrow checker
Rust Ownership System
-
Every value in Rust has an owner.
-
There can only be one owner at a time.
-
When the owner goes out of scope, the value is dropped.
-
Memory cleanup is deterministic and predictable.
-
Ownership is enforced at compile time.
-
Drop occurs automatically at the end of scope.
fn main(){
    let x = 5;
    let y = 5;
    println!("owner x {}->{:p}", x,&x);
    println!("owner y {}->{:p}", y,&y);
}
Example to show how variables goes out of scope and frees memory.
fn main() {
    {
        let s = String::from("Hello");
        println!("{}", s);
    } // s goes out of scope here and is dropped
    println!("{}", s);
}
No GC involved.
Printing Memory Addresses
{:p} is the pointer formatting specifier.
It prints the memory address of a reference.
Example:
fn main() {
    let x = String::from("Rachel");
    println!("Stack address of x: {:p}", &x);

    let x = 5; // shadowing
    println!("Stack address of new x: {:p}", &x);
}
- Shadowing creates a new binding
- The second x lives at a different stack address
- The first x is dropped before the new x becomes active
// Demonstrate Heap Pointer

fn main() {
    let s = String::from("Rachel");
    println!("Stack address: {:p}", &s);
    println!("Heap pointer : {:p}", s.as_ptr());
}
[Avg. reading time: 4 minutes]
Borrowing
Borrowing allows you to access data without taking ownership.
Instead of moving a value, you pass a reference using &.
This prevents ownership transfer and keeps the original value usable.
Problem: Ownership Transfer
// This will fail

fn printname(p_name: String) {
    println!("{p_name}");
}

fn main() {
    let name = String::from("Rachel");
    printname(name);
    printname(name); // error: value moved
}
Why this fails?
- String does not implement Copy
- Ownership moves into printname
- name becomes invalid after first call
How to fix it?
Borrowing Concept
// Instead of passing the actual value, passing the Reference / Borrow operator

fn printname(p_name:&String){
    println!("{p_name}-Stack {:p}-> Heap {:p}",&p_name,p_name.as_ptr())
}

// by default len() returns usize.

fn get_length(p_name: &String) -> i8 {
    let name_length:i8 = p_name.len() as i8;
    name_length
}

fn main() {
    let name:String = String::from("Rachel");
    printname(&name);
    printname(&name);
    let name_length = get_length(&name);
    println!("Length is {name_length}");
}
What changed:
- &String means “borrow”
- Ownership stays in main
- Multiple immutable borrows are allowed
- No data is copied
- No heap reallocation happens
Using String.clone()
// String.clone()

fn printname(name:String){
    println!("{},{:p},{:p}",name,&name,name.as_ptr())
}

fn main() {
    let name:String = String::from("Rachel");
    printname(name.clone());
    printname(name.clone());
    printname(name);
}
What clone() does:
- Allocates new heap memory
- Copies the bytes
- Creates a completely independent value
Important:
- clone() is explicit and potentially expensive
- Borrowing is usually preferred
- Clone only when you need separate ownership
[Avg. reading time: 3 minutes]
Owner Borrower Stack Heap
fn main() {
    let o = String::from("Rachel Green");

    println!("o (String owner): {o}");
    println!("o.len (bytes): {}", o.len());
    println!("o.capacity (bytes): {}", o.capacity());

    // stack vs heap
    println!("\nstack addr of o (String struct): {:p}", &o);
    println!("heap ptr held by o:            {:p}", o.as_ptr());

    // slice: &str borrows part of o (points into the same heap buffer)
    let s: &str = &o[7..]; // "Green" for ASCII input
    println!("\ns (&str slice): {s}");
    println!("stack addr of s (&str ref):    {:p}", &s);
    println!("ptr of s (into o's buffer):    {:p}", s.as_ptr());

    // borrow: &String (borrow the whole String)
    let b: &String = &o;
    println!("\nb (&String borrow): {b}");
    println!("stack addr of b (&String ref): {:p}", &b);
    println!("b points to String struct o:    {:p}", b as *const String);
    println!("b -> heap ptr:                 {:p}", b.as_ptr());

    // Key takeaway
    println!("\nCheck: o.as_ptr == s.as_ptr ?  {}", o.as_ptr() == s.as_ptr());
    println!("Check: o.as_ptr == b.as_ptr ?  {}", o.as_ptr() == b.as_ptr());

    let moved = o;
    // println!("{}", o); // error: moved
    println!("{}", moved);

}
[Avg. reading time: 14 minutes]
Borrowing References
Borrowing allows you to use a value without taking ownership.
Rust enforces strict rules to prevent:
- Data races
- Dangling references
- Undefined behavior
These rules are checked at compile time by the borrow checker.
Borrowing Immutable References
An immutable reference allows read-only access.
// Cannot modify through immutable reference

fn changeme(param_msg: &String) {
    // param_msg.push_str(" Green"); // ❌ not allowed
    println!("{param_msg}");
}

fn main() {
    let msg = String::from("Rachel");
    changeme(&msg);
}
Why this fails if uncommented:
- &String is immutable
Example: Borrow a book from the library; you cannot write anything. Just read from it.
Borrowing Mutable References
A mutable reference allows read and write access.
// Mutable reference

fn changeme(param_msg: &mut String) {
    param_msg.push_str(" Green")
}

fn main() {
    let mut msg = String::from("Rachel");
    changeme(&mut msg);
    println!("{}", msg);
}
Requirements:
- The original variable must be mut
- The reference must be &mut
Example: Borrow a book from a friend with permission to highlight or underline important items.
Immutable Borrow
- Allows read-only access to a value.
- Multiple immutable borrows are allowed.
- No mutation allowed through immutable reference.
// Immutable Borrow

fn main() {
    let x = 5;

    // Immutable borrow
    let y = &x;
    *y += 1;
    println!("Value of y: {}", y);
}
Mutable Borrow
Grants read-write access to a value. Only one mutable borrow is allowed at a time, and no immutable borrows can coexist.
// Mutable Borrow - Stack

fn main() {
    let mut x = 5;
    println!("Value of x: {}", x);

    // Mutable borrow
    let z = &mut x;
    *z += 1;
    println!("Value of x: {}", x);
}
Rule:
- You cannot have an active mutable borrow and immutable borrow at the same time.
- After the mutable borrow goes out of scope, immutable borrows are allowed.
That’s why they always use immutable borrows after mutable borrows.
fn main() {
    let mut x = 5;

    // Mutable borrow
    let z = &mut x;
    *z += 1;

    println!("Value of z: {}->{:p}", z, &z);

    println!("Value of x: {}->{:p}", x, &x);

    // immutable borrows
    let y1 = &x;
    println!("Value of y1: {}->{:p}", y1, &y1);

    // Flip the immutable and mutable and print the Immutable value after Mutable
}
Use this website to sort the Memory locations to understand how values are stored in Stack. You can sort them by ASC or DESC order.
https://www.rajeshvu.com/storage/emc/utils/general/sorthexnumbers
Borrow Checker
// Borrow Checker - String - Heap

fn main() {
    let mut a = String::from("Rachel");

    let b = &mut a;

    println!("variable 'b' initial value is {} stored at this {:p}", b,b.as_ptr());

    b.push_str(" Green");

    //println!("variable 'a' {}{:p}", a,a.as_ptr());

    println!("variable 'b' {} {:p}", b,b.as_ptr());

    // println!("variable 'a' {}{:p}", a,a.as_ptr());

    b.push_str(" !");

    println!("variable 'b' after update {},{:p}", b,b.as_ptr());

    println!("variable 'a' after update {} {:p}", a,a.as_ptr());
}
Why a cannot be used while b exists:
- b has exclusive access
Rust prevents simultaneous access to avoid data races
Example: The book owner can use the book only after the borrowed person has completed the work.
Multiple Mutable Borrowers (not allowed)
// Not allowed to have multiple Mutable Borrowers at the same time/scope

fn main() {
    let mut a = String::from("Rachel");

    let b = &mut a;
    let c = &mut a;

    println!("{}", b);
    println!("{}", c);

}
Example: Two friends borrow the same book to highlight the important items.
// Multiple Mutable Borrowers (different scope)

fn main() {
    let mut a = String::from("Rachel");

    let b = &mut a;
    println!("{}", b);

    let c = &mut a;
    println!("{}", c);
}
- Only one mutable reference exists at a time
- Scopes do not overlap
Example: 2 friends borrow the book one after another for writing.
For clarity’s sake, the above code can be written this way, too.
// Multiple Mutable Borrowers (different scope)

fn main() {
    let mut a = String::from("Rachel");

    {
       let b = &mut a;
        println!("{}", b);
    }

    let c = &mut a;
    println!("{}", c);
}
Immutable and Mutable
Mutable first, followed by Immutable
// Immutable and Mutable

fn main() {
    let mut a = String::from("Rachel");

    let c = &mut a;
    c.push_str("!");
    println!("c = {}", c);

    let b = &a;
    println!("b = {}", b);
Borrowing is what allows Rust to provide:
- Memory safety
- Data race prevention
- No garbage collector
- Zero runtime overhead
Rules:
- Multiple immutable references are allowed.
- Only one mutable reference is allowed at a time.
- Mutable and immutable references cannot coexist simultaneously.
- References must always be valid (no dangling references).
[Avg. reading time: 6 minutes]
Dangling References
A dangling reference occurs when a reference points to memory that is no longer valid.
This typically happens when:
- The referenced data goes out of scope
- The memory is deallocated
- The value is moved elsewhere
In languages like C and C++, this can lead to undefined behavior, crashes, or security vulnerabilities.
Rust prevents this entirely in safe code.
Why Rust Prevents Dangling References
Rust’s borrow checker ensures:
- References cannot outlive the data they point to
- Memory is never accessed after being dropped
This guarantee is enforced at compile time.
Example 1: Reference Outliving Its Data
fn main() {
    let r;

    {
        let x = 42;
        r = &x; // r borrows x
    } // x goes out of scope here

    println!("r: {}", r); // this wont compile
}
The above code results in an error.
- x is dropped at the end of the inner block
- r would point to invalid memory
- Rust refuses to compile the program
// Dangling Reference

fn get_name() -> &String{
    let name = String::from("Rachel");
    &name
}

fn main() {
    let name:String = get_name();
    println!("new name is {name}");
}
Why it fails:
- name is created inside get_name
- When the function ends, name is dropped
- Returning &name would create a dangling reference
This is allowed in other languages like C++, leading to memory issues.
How to solve it?
Remove the & from the return value and get_name() definition and return the variable.
fn get_name() -> String{
    let name = String::from("Rachel");
    name
}

fn main() {
    let name:String = get_name();
    println!("new name is {name}");
}
- The String is moved to the caller
- No reference to freed memory exists
- Memory safety is preserved
Summary
- Rust eliminates dangling references by enforcing:
- Strict ownership rules
- Lifetime validation
- Compile-time borrow checking
[Avg. reading time: 1 minute]
Chapter 4
- Complex Datatypes
- User Input
- Vector Struct Input
- Commandline Args
- Modules
- Overview
- Standard Modules
- Userdefined Modules
- Module Multiple files
- Module Sub Folders
- Creating a Library
[Avg. reading time: 0 minutes]
Complex Datatypes
[Avg. reading time: 3 minutes]
Type Alias
A type alias defines a new name for an existing type. Type aliases are declared with the keyword type.
1. Improving Readability
Type aliases can make complex types easier to read and understand.
2. Enhancing Maintainability
Type aliases can help centralize the definition of a type, making it easier to update the type across the codebase.
Point to remember
The first letter of the type should be in upper case and follow UpperCamelCase.
// type alias

type Bannertype = u32;

fn main() {
    let mut id: Bannertype = 91615214;
    println!("{id}");
    id = 91615200;
    println!("{id}");
}
Example 2: Adding Semantic Meaning
type Kilometers = i32;
type Meters = i32;

fn calculate_distance(distance: Kilometers) -> Meters {
    distance * 1000
}

fn main() {
    let distance: Kilometers = 5;
    let distance_in_meters: Meters = calculate_distance(distance);
    println!("Distance in meters: {}", distance_in_meters);
}
Type aliases do not create distinct types.
The following is valid because both are i32:
let x: Kilometers = 5;
let y: Meters = x;
[Avg. reading time: 16 minutes]
Vector Datatype
A Vector (Vec
- Size can grow or shrink at runtime
- Stores elements of the same type
- Allocated on the heap
- Very commonly used in real-world Rust programs
Dynamic Arrays
Unlike fixed-size arrays [T; N], a Vec
// Vector

fn main(){
    let mut my_vec = Vec::new();
    my_vec.push("Rachel");
    my_vec.push("Monica");
    my_vec.push("Phoebe");

    println!("{:?}",my_vec);
}
Capacity() vs Len()
capacity() number of elements the vector can hold (without reallocating memory). This is usually larger than or equal to the number of elements currently in the vector.
len() number of elements.
Inspecting Memory
use std::mem;

fn main(){
    let mut my_vec = Vec::new();
    my_vec.push("Rachel");
    my_vec.push("Monica");
    my_vec.push("Phoebe");

    println!("Vector Value {:?}", my_vec);
    println!("Address of Vec struct: {:p}", &my_vec);
    println!("Heap data pointer: {:p}", my_vec.as_ptr());
    println!("Length: {}", my_vec.len());
    println!("Capacity: {}", my_vec.capacity());
    println!("Heap bytes allocated: {}", my_vec.capacity() * mem::size_of::<String>());

    my_vec.push("Ross");
    my_vec.push("Chandler");
    my_vec.push("Joey");

    println!("Vector Value {:?}", my_vec);
    println!("Address of Vec struct: {:p}", &my_vec);
    println!("Heap data pointer: {:p}", my_vec.as_ptr());
    println!("Length: {}", my_vec.len());
    println!("Capacity: {}", my_vec.capacity());
    println!("Heap bytes allocated: {}", my_vec.capacity() * mem::size_of::<String>());
}
Len vs Allocated Capacity
["Rachel", "Monica", "Phoebe", _empty_]

["Rachel", "Monica", "Phoebe", "Ross", "Chandler", "Joey", _empty, _empty_]
Capacity common growth pattern
0 → 4 → 8 → 16 → 32 → ...
Room 126 - Classroom Capacity vs Number of students*
The vector structure itself lives on the stack, but its elements live on the heap.
A Vec internally stores:
+-------------------------+
| v (Vec<String>)         |
|-------------------------|
| ptr  ----+--------------|----+
| len  = 3 |              |    |
| cap  = 4 |              |    |
+-------------------------+    |
                               |
                               v
                              HEAP
with_capacity()
The with_capacity() method in Rust is used to create a new, empty growable collection (like Vec or String) that pre-allocates a specific amount of memory on the heap.
This allows the collection to hold at least the specified number of elements without needing to reallocate memory as you add items, which can improve performance.
fn main() {
    let mut friends_default: Vec<String> = Vec::new();
    let mut friends_withcapacity: Vec<String> = Vec::with_capacity(5);

    println!("friends_default Initial len: {}", friends_default.len());
    println!("friends_default Initial cap: {}", friends_default.capacity());

    println!("friends_withcapacity Initial len: {}", friends_withcapacity.len());
    println!("friends_withcapacity Initial cap: {}", friends_withcapacity.capacity());

    friends_default.push("Rachel".to_string());
    friends_default.push("Monica".to_string());
    friends_default.push("Phoebe".to_string());

    friends_withcapacity.push("Rachel".to_string());
    friends_withcapacity.push("Monica".to_string());
    friends_withcapacity.push("Phoebe".to_string());

    println!("friends_default Final len: {}", friends_default.len());
    println!("friends_default Final cap: {}", friends_default.capacity());

    println!("friends_withcapacity Final len: {}", friends_withcapacity.len());
    println!("friends_withcapacity Final cap: {}", friends_withcapacity.capacity());
}
reserve()
Increases capacity after creation.
fn main(){
    let mut friends = Vec::new();
    friends.push("Rachel".to_string());
    friends.push("Monica".to_string());

    println!("friends before len: {}", friends.len());
    println!("friends before cap: {}", friends.capacity());

    friends.reserve(10);

    println!("friends after len: {}", friends.len());
    println!("friends after cap: {}", friends.capacity());

}
Vector with Datatypes
String Literal
fn main(){
    let mut my_vec: Vec<&str> = Vec::new();
    my_vec.push("Rachel");
    my_vec.push("Monica");
    my_vec.push("Phoebe");

    println!("{:?}",my_vec);

}
String Object
fn main(){
    let mut my_vec: Vec<String> = Vec::new();
    my_vec.push("Rachel".to_string());
    my_vec.push("Monica".to_string());
    my_vec.push("Phoebe".to_string());

    println!("{:?}",my_vec);
}
Storing String literal on i32 (Error)
fn main(){
    let mut my_vec: Vec<i32> = Vec::new();

    my_vec.push("Rachel");
    my_vec.push("Monica");
    my_vec.push("Phoebe");

    println!("{:?}",my_vec);

}
Storing String Literal on String Object (Error)
fn main(){
    let mut my_vec: Vec<String> = Vec::new();
    my_vec.push("Rachel");
    my_vec.push("Monica");
    my_vec.push("Phoebe");

    println!("{:?}",my_vec);
}
Vec Macro
- Allocates a Vec
- Infers the type
- Inserts elements
- Sets capacity efficiently
Without vec!
let mut friends = Vec::new();
friends.push("Rachel");
friends.push("Monica");
friends.push("Phoebe");
Using vec!
fn main(){
    let friends = vec!["Rachel", "Monica", "Phoebe"];
    println!("{:?}", friends);
}
Variables created using vector macro are also dynamic, stored in heap and reserved with more capacity.
fn main() {
    // Create a vector using the vec! macro
    let numbers = vec![2, 4, 6, 8, 10, 12, 14, 16];

    // Borrow different slices from the vector
    let slice_one   = &numbers[2..6];  // Index 2 up to (but not including) 6
    let slice_two   = &numbers[2..];   // Index 2 to end
    let slice_three = &numbers[..6];   // Start to index 6 (exclusive)
    let slice_four  = &numbers[..];    // Entire vector as a slice

    println!("Original Vector : {:?}", numbers);
    println!("Slice [2..6]    : {:?}", slice_one);
    println!("Slice [2..]     : {:?}", slice_two);
    println!("Slice [..6]     : {:?}", slice_three);
    println!("Slice [..]      : {:?}", slice_four);
}
[2, 4, 6, 8, 10, 12, 14, 16]
 0  1  2  3   4   5   6   7
[start..end] : start is inclusive - end is exclusive
Convert Array to Vector
This example demonstrates
- Fixed-size array [T; N]
- Converting array into Vec
- Type inference using Vec<_>
- Inspecting types at runtime
use std::any::type_name;

fn main() {
    // Fixed-size array (stack allocated)
    let arr = [1_i8, 2, 3, 4];

    // Explicit type conversion
    let vec_explicit: Vec<i8> = arr.into();

    // Type inference
    let vec_inferred: Vec<_> = arr.into();

    println!("Array       : {:?}", arr);
    println!("Vec explicit: {:?}", vec_explicit);
    println!("Vec inferred: {:?}", vec_inferred);

    println!("\nType Information:");
    print_type(&arr);
    print_type(&vec_explicit);
    print_type(&vec_inferred);
}

fn print_type<T>(_: &T) {
    println!("{}", type_name::<T>());
}
Sort the Vector
fn main() {
    let mut vec = vec![14, 33, 12, 3223, 2211, 9122, 3, 67];
    vec.sort();
    println!("Sorted: {:?}", vec)
}
[Avg. reading time: 24 minutes]
Structs
A struct is a custom data type used to group related values.
Like a tuple, it can hold mixed data types. Unlike a tuple, each field has a name, making code more readable and maintainable.
Accessing Data
- Tuple : Access using .0, .1
- Struct : Access using meaningful names like student.id
Tuple Recap
fn main() {
    let person_data = ("Rachel", 10, "DB");
    println!("{}",person_data.0);
    println!("{}",person_data.1);
    println!("{}",person_data.2);
}
Classic Struct
- Most commonly used
- Each field has a name and a type
- Struct name follows PascalCase convention
struct Student {
    id: i32,
    name: String,
    course: String,
}

fn main() {
    let s = Student {
        id: 10,
        name: String::from("Rachel"),
        course: String::from("DB"),
    };

    println!("{},{},{}", s.id, s.name, s.course);
}
Structs are typically declared outside main, unless their scope is strictly local.
Where the data is store Stack or Heap?
It depends on the fields inside the struct.
Lets find out where the objects inside Struct are created.
struct Students {
    id: i32,
    name: String,
    course: String,
    age: i32
}

fn main() {
    let s: Students = Students {
        id: 10,
        name: String::from("Rachel"),
        course: String::from("DB"),
        age: 22
    };

    println!(
        "Stack Address of s -> {:p} \
        \nid value -> {} \
        \nStack address of s.id -> {:p} \
        \nStack Address of s.name -> {:p} \
        \nStack Address of s.course -> {:p} \
        \nStack address of s.age -> {:p} \
        \ns.name pointing to Heap -> {:p} \
        \ns.course pointing to Heap -> {:p}",
        &s,
        s.id,
        &s.id,
        &s.name,
        &s.course,
        &s.age,
        s.name.as_ptr(),
        s.course.as_ptr()
    );
    println!("\n");
    println!("Offset of id: {}", (&s.id as *const _ as usize) - (&s as *const _ as usize));
    println!("Offset of name: {}", (&s.name as *const _ as usize) - (&s as *const _ as usize));
    println!("Offset of course: {}", (&s.course as *const _ as usize) - (&s as *const _ as usize));
    println!("Offset of age: {}", (&s.age as *const _ as usize) - (&s as *const _ as usize));
}
Using ‘C’ Representation
#[repr(C)]
struct Students {
    id: i32,
    name: String,
    course: String,
    age: i32
}

fn main() {
    let s: Students = Students {
        id: 10,
        name: String::from("Rachel"),
        course: String::from("DB"),
        age: 22
    };

    println!(
        "Stack Address of s -> {:p} \
        \nid value -> {} \
        \nStack address of s.id -> {:p} \
        \nStack Address of s.name -> {:p} \
        \nStack Address of s.course -> {:p} \
        \nStack address of s.age -> {:p} \
        \ns.name pointing to Heap -> {:p} \
        \ns.course pointing to Heap -> {:p}",
        &s,
        s.id,
        &s.id,
        &s.name,
        &s.course,
        &s.age,
        s.name.as_ptr(),
        s.course.as_ptr()
    );

    println!("\n");
    println!("Offset of id: {}", (&s.id as *const _ as usize) - (&s as *const _ as usize));
    println!("Offset of name: {}", (&s.name as *const _ as usize) - (&s as *const _ as usize));
    println!("Offset of course: {}", (&s.course as *const _ as usize) - (&s as *const _ as usize));
    println!("Offset of age: {}", (&s.age as *const _ as usize) - (&s as *const _ as usize));
}
- C style representation forces Rust to follow C-style layout.
- Doesn’t give the compiler to reorder based on availability.
Memory App Analyzer
Sometimes it takes time to start the app, please wait.
Stack:
---------
| id |
---------
| name (pointer, length, capacity) |
---------
| course (pointer, length, capacity) |
---------
| age |
---------

Heap:
--------------------------------
| "Rachel" (string data)        |
--------------------------------
| "DB" (string data)            |
--------------------------------
- The struct itself lives on the stack.
- Heap-allocated fields (like String, Vec) store their actual data on the heap.
- The struct stores only metadata (pointer, length, capacity).
Struct - Traits
Printing the Struct value using Debug Trait
struct Students {
    id: i32
}

fn main() {
    let stu: Students = Students {
        id: 10
    };

    println!("{:d}",stu)

}
Assigning Struct to another variable
struct Students {
    id: i32
}

fn main() {
    let stu: Students = Students {
        id: 10
    };

    let new_student = stu;
    println!("{}",stu.id)

}
Error? Bcoz Ownership of stu move to new_student.
Cloning Struct to another variable
struct Students {
    id: i32
}

fn main() {
    let stu: Students = Students {
        id: 10
    };

    let new_student = stu.clone();
    println!("{}",stu.id)

}
What do we see now?
method `clone` not found for this struct
As Student is a user defined Datatype, we need to add the necessary traits.
Putting together all of the above
// Struct Stack or Heap

#[derive(Copy, Clone,Debug)]
struct Students {
    id: i32
}

fn main() {
    let stu: Students = Students {
        id: 10
    };

    let new_student = stu.clone();
    let new_student1 = stu;

    println!("Debug output {:?}", new_student);
    println!("Cloned Value {}",new_student.id);
    println!("Moved Value {}",new_student1.id);
}
Struct inside Vector
As this Struct has String Copy trait cannot be implemented.
#[derive(Debug, Clone)]
struct Student {
    id: i32,
    name: String,
    course: String,
}

fn main() {
    let mut students: Vec<Student> = Vec::new();

    students.push(Student {
        id: 10,
        name: String::from("Rachel"),
        course: String::from("DB"),
    });

    students.push(Student {
        id: 11,
        name: String::from("Monica"),
        course: String::from("DB"),
    });

    for s in students.iter() {
        println!("{},{},{}", s.id, s.name, s.course);
    }
}
Struct implementation
Implementation blocks use impl. Uses the same name as Struct.
- Methods
- Associated functions
Let’s see an example
#[derive(Debug, Clone)]
struct Students {
    id: i32,
    name: String,
    course: String,
}

impl Students {

    // This one takes Ownership
    fn get_student_details(self){
        println!("{}", self.id);
        println!("{}", self.name);
        println!("{}", self.course);
    }

    // This one uses Immutable Borrow
    fn get_student_details1(self: &Self){
        println!("{}", self.id);
        println!("{}", self.name);
        println!("{}", self.course);
    }

}

fn main() {
    let s: Students = Students {
        id: 10,
        name: String::from("Rachel"),
        course: String::from("DB"),
    };

    let s1: Students = Students {
        id: 11,
        name: String::from("Monica"),
        course: String::from("DB"),
    };

    s.get_student_details();
    s1.get_student_details1();
}
Using Associated Function
Functions inside the impl block that do not take “self” as a parameter.
#[derive(Debug, Clone)]
struct Students {
    id: i32,
    name: String,
    course: String,
}

impl Students {
    fn get_student_details(self){
        println!("{}", "-".repeat(100));
        println!("{}", self.id);
        println!("{}", self.name);
        println!("{}", self.course);
        println!("{}", "-".repeat(100));
    }

    fn create_student(pid:i32,pname:String,pcourse:String) -> Students{
        Students{id:pid,name:pname,course:pcourse}
    }
}

fn main() {

    let s: Students = Students {
        id: 10,
        name: String::from("Rachel"),
        course: String::from("DB"),
    };

    let s1: Students = Students {
        id: 11,
        name: String::from("Monica"),
        course: String::from("DB"),
    };

    s.get_student_details();
    s1.get_student_details();

    // Creating Student using Associated Function and printing it via Method

    let s2 = Students::create_student(12,"Ross".to_string(),"C++".to_string());
    s2.get_student_details();
}
Mutable Implementation
// Using Mutable & Borrow operator

#[derive(Debug, Clone)]
struct Students {
    id: i32,
    name: String,
    course: String,
}

impl Students {
    fn get_student_details(&self){
        println!("{}", "-".repeat(50));
        println!("{}", self.id);
        println!("{}", self.name);
        println!("{}", self.course);
        println!("{}", "-".repeat(50));
    }

    fn create_student(pid:i32,pname:String,pcourse:String) -> Students{
        Students{id:pid,name:pname,course:pcourse}
    }

    fn change_student_details(&mut self, id:i32, new_name:String, new_course:String){
        self.name=new_name;
        self.course=new_course;
    }
}

fn main() {

    let s = Students {
        id: 10,
        name: String::from("Rachel"),
        course: String::from("DB"),
    };

    let s1 = Students {
        id: 11,
        name: String::from("Monica"),
        course: String::from("DB"),
    };

    s.get_student_details();
    s1.get_student_details();

    // Creating Student using Associated Function and printing it via Method

    let mut s2 = Students::create_student(12,"Ross".to_string(),"C++".to_string());
    s2.get_student_details();

    s2.change_student_details(12,"Ross Geller".to_string(),"CPP".to_string());
    s2.get_student_details();
}
- The struct instance must be declared mut
- The method must take &mut self
Tuple Struct
Tuple Structs - Similar to Classic but fields have no names.
// Tuple Struct

struct Coordinates(u32, u32);

fn main() {
    let xy = Coordinates(10, 20);
    //it behaves like Tuples
    println!("Value of the Tuple Struct xy {},{}", xy.0, xy.1);

    //Destructuring Tuple Struct

    let Coordinates(a,b) = xy;
    println!("Values of variables a & b {},{}", a, b);
}
- When meaning is positional
- When you want a distinct type but minimal syntax
- Often used for newtype pattern
Summary
- Structs group related data with named fields
- Stored on stack unless fields allocate on heap
- Move semantics apply unless Copy is implemented
- Use Clone for explicit duplication
- impl defines behavior
- Methods control ownership via self
- Tuple structs trade readability for compactness
#struct #customdatatype #tuple #impl
[Avg. reading time: 39 minutes]
Enums
Enumerators
An enum lets you define a type that can be one of a fixed set of variants.
Real-world data comes in messy forms. Example: “Tue”, “Tuesday”, “TUESDAY”, “t”.
If you store that as a String, your code becomes a bug factory: comparisons, validation, reporting, and branching all get fragile.
With an enum, you standardize the values at the type level.
Examples of “finite choices”:
- Days of the week
- Months of the year
- Traffic light colors
#[derive(Debug)]
enum TrafficLight{
    Red,
    Yellow,
    Green
}

fn main(){
    let my_light = TrafficLight::Red;
    println!("{:?}", my_light);
}
Importance of using derive(Debug) Trait.
In addition to simply representing one of several types, we can have additional data based on the value.
// Enum with additional data

#[derive(Debug)]
enum TrafficLight{
    Red (bool),
    Yellow (bool),
    Green (bool)
}

fn main(){
    let my_light = TrafficLight::Red(true);
    println!("{:?}", my_light);
}
Separate the value and enum result
#[derive(Debug)]
enum TrafficLight{
    Red (bool),
    Yellow (bool),
    Green (bool)
}

fn main(){
    let my_light = TrafficLight::Red(false);
    println!("{:?}", my_light);

    match my_light {
        TrafficLight::Red(is_active) => println!("Red: {}", is_active),
        TrafficLight::Yellow(is_active) => println!("Yellow: {}", is_active),
        TrafficLight::Green(is_active) => println!("Green: {}", is_active),
    }
}
Enums inside Enums
#[derive(Debug)]
enum TrafficLight {
    Red(bool),
    Yellow(bool),
    Green(bool),
}

#[derive(Debug)]
enum Vehicle {
    Stop,
    Drive(f64),
    CheckLight(TrafficLight),
}

fn main() {
    let my_light = TrafficLight::Red(true);
    let instruction = Vehicle::CheckLight(my_light);

    match instruction {
        Vehicle::Stop => println!("Stop"),
        Vehicle::Drive(speed) => println!("Drive at speed: {}", speed),
        Vehicle::CheckLight(light) => match light {
            TrafficLight::Red(is_active) => println!("Red light: {}", is_active),
            TrafficLight::Yellow(is_active) => println!("Yellow light: {}", is_active),
            TrafficLight::Green(is_active) => println!("Green light: {}", is_active),
        },
    }
}
#[derive(Debug)]
enum TrafficLight {
    Red(bool),
    Yellow(bool),
    Green(bool),
}

#[derive(Debug)]
enum Vehicle {
    Stop,
    Drive(f64),
    CheckLight(TrafficLight),
}

fn main() {
    let instructions = vec![
        Vehicle::Stop,
        Vehicle::CheckLight(TrafficLight::Red(true))
    ];

    for instruction in instructions {
        match instruction {
            Vehicle::Stop => println!("Stop"),
            Vehicle::Drive(speed) => println!("Drive at speed: {speed}"),
            Vehicle::CheckLight(light) => match light {
                TrafficLight::Red(is_active) => println!("Red light: {is_active}"),
                TrafficLight::Yellow(is_active) => println!("Yellow light: {is_active}"),
                TrafficLight::Green(is_active) => println!("Green light: {is_active}"),
            },
        }
    }
}
In Software world, commonly usages are
enum RightClick {
    Copy,
    Paste,
    Save,
    Quit
}

enum FileFormat {
    CSV,
    Parquet,
    Avro,
    JSON,
    XML,
}

enum LogLevel {
    Debug,
    Info,
    Warn,
    Error,
    Critical,
}

enum DataTier {
    Hot,
    Warm,
    Cold,
    Archived,
}
Enum Implements
Similar to Struct, you can implement an interface in Enum.
The Implement interface can be helpful when we need to implement some business logic tightly coupled with a discriminatory property of a given enum.
#[derive(Debug)]
enum Shape {
    Circle(f64), // radius
    Rectangle(f64, f64), // width, height
    Triangle(f64, f64, f64) // sides a, b, c
}

impl Shape {
    fn get_perimeter(&self) -> f64 {
        match *self {
            Shape::Circle(r) => r * 2.0 * std::f64::consts::PI,
            Shape::Rectangle(w, h) => (2.0 * w) + (2.0 * h),
            Shape::Triangle(a, b, c) => a + b + c
        }
    }
}

fn main() {
    let my_shape = Shape::Circle(1.2);
    println!("my_shape is {:?}", my_shape);

    let perimeter = my_shape.get_perimeter();
    println!("perimeter is {}", perimeter);

    let my_shape1 = Shape::Triangle(3.0,4.0,5.0);
    println!("my_shape is {:?}", my_shape1);

    let perimeter1 = my_shape1.get_perimeter();
    println!("perimeter is {}", perimeter1);


    let my_shape2 = Shape::Rectangle(4.0,5.0);
    println!("my_shape is {:?}", my_shape2);

    let perimeter2 = my_shape2.get_perimeter();
    println!("perimeter is {}", perimeter2);

}
Rust Standard Enums
Option
Many languages use NULL to indicate no value. Errors often occur when using a NULL. Rust does not have a traditional null value.
// Simple Division

fn try_division(dividend: i32, divisor: i32) -> i32 {
    dividend / divisor
}

fn main() {
    println!("{}",try_division(4, 2));
    //println!("{}",try_division(4, 0));
}
Sometimes it’s desirable to catch the failure of some parts of a program instead of calling panic!; this can be accomplished using the Option enum.
// Common Enum

enum Option <T>{
    Some(T),
    None
}
This achieves the same concept as a traditional null value, but implementing it in terms of an enum data type compiler can check to make sure you are handling it correctly.
It’s commonly used and included in the prelude. That means additional use statements are needed.
// Error Handling

// An integer division that doesn't `panic!`
fn try_division(dividend: i32, divisor: i32) -> Option<i32> {
    if divisor == 0 {
        // Failure is represented as the `None` variant
        None
    } else {
        // Result is wrapped in a `Some` variant
        Some(dividend / divisor)
    }
}


fn main() {
    let dividend = 4;
    let divisor = 0;
    match try_division(dividend, divisor) {
        None => println!("{} / {} failed!", dividend, divisor),
        Some(quotient) => {
            println!("{} / {} = {}", dividend, divisor, quotient)
        }
    }
}
Result Enum
enum Result<T, E>{
  Ok(T),
  Err(E)
}
Ok(T)
It contains the success value.
Err(E)
Contains the error value
// Simple Simple Interest Function fn si(p:f32,n:f32,r:f32) -> f32 { (p * n * r )/100 as f32 } fn main(){ let p:f32 = 10000.00; let n:f32 = 3.00; let r:f32 = 1.4; let si = si(p,n,r); println!("Simple Interest = {si}"); }
How to handle if the parameter is Zero?
// SI with conditions fn si(p:f32,n:f32,r:f32) -> f32 { if p <= 0. { println!("p cannot be zero"); } if n <= 0.{ println!("n cannot be zero"); } if r <= 0. { println!("r cannot be zero"); } (p * n * r )/100 as f32 } fn main(){ let p:f32 = 10000.00; let n:f32 = 3.00; let r:f32 = 0.0; let si = si(p,n,r); println!("Simple Interest = {si}"); }
Do you notice any issues with this?
Yes, the message is displayed, but still, the calculation takes place, and the Error message is only for informational purposes.
How does Result enum help in this case?
// using Result fn si(p: f32, n: f32, r: f32) -> Result<f32, String> { if p <= 0. { return Err("Principal cannot be less or equal to zero".to_string()); } if n <= 0. { return Err("Number of years cannot be less or equal to zero".to_string()); } if r <= 0. { return Err("Rate cannot be less or equal to zero".to_string()); } Ok((p * n * r) / 100.0) } fn main() { let p: f32 = 10000.0; let n: f32 = 3.0; let r: f32 = 1.4; match si(p, n, r) { Ok(result) => println!("si = {result}"), Err(e) => println!("error occured {:?}", e), } }
Err Demonstration
// using Result fn si(p: f32, n: f32, r: f32) -> Result<f32, String> { if p <= 0. { return Err("Principal cannot be less or equal to zero".to_string()); } if n <= 0. { return Err("Number of years cannot be less or equal to zero".to_string()); } if r <= 0. { return Err("Rate cannot be less or equal to zero".to_string()); } Ok((p * n * r) / 100.0) } fn main() { let p: f32 = 10000.0; let n: f32 = 3.0; let r: f32 = 0.0; match si(p, n, r) { Ok(result) => println!("si = {result}"), Err(e) => println!("error occured {:?}", e), } }
Difference when using Result and Option Example
// using Result fn si_using_result(p: f32, n: f32, r: f32) -> Result<f32, String> { if p <= 0. { return Err("Principal cannot be less or equal to zero".to_string()); } if n <= 0. { return Err("Number of years cannot be less or equal to zero".to_string()); } if r <= 0. { return Err("Rate cannot be less or equal to zero".to_string()); } Ok((p * n * r) / 100.0) } fn si_using_option(p: f32, n: f32, r: f32) -> Option<f32> { if p <= 0. { return None; } if n <= 0. { return None; } if r <= 0. { return None; } Some((p * n * r) / 100.0) } fn main() { let p: f32 = 10000.0; let n: f32 = 0.0; let r: f32 = 1.4; match si_using_result(p, n, r) { Ok(result) => println!("si = {result}"), Err(e) => println!("Result ENUM - Error occured {:?}", e), } match si_using_option(p, n, r) { Some(result) => println!("si = {result}"), None => println!("Option ENUM - Error occurred: one of the inputs is non-positive"), } }
The ? operator
? is used for Error Propogation
There is an even shorter way to deal with Result (and Option), shorter than a match and even shorter than if let. It is called the “question mark operator.”
After a function that returns a result, you can add ?. This will:
If its Ok, return the result If its Err, return the error
Before using ?
fn si_using_result(p: f32, n: f32, r: f32) -> Result<f32, String> { if p <= 0. { return Err("Principal cannot be less or equal to zero".to_string()); } if n <= 0. { return Err("Number of years cannot be less or equal to zero".to_string()); } if r <= 0. { return Err("Rate cannot be less or equal to zero".to_string()); } Ok((p * n * r) / 100.0) } fn main() { let p: f32 = 10000.0; let n: f32 = 0.0; let r: f32 = 1.4; match si_using_result(p, n, r) { Ok(result) => println!("si = {result}"), Err(e) => println!("Result ENUM - Error occured {:?}", e), } }
Now using ?
Returning Ok()
fn si_using_result(p: f32, n: f32, r: f32) -> Result<f32, String> { if p <= 0. { return Err("Principal cannot be less or equal to zero".to_string()); } if n <= 0. { return Err("Number of years cannot be less or equal to zero".to_string()); } if r <= 0. { return Err("Rate cannot be less or equal to zero".to_string()); } Ok((p * n * r) / 100.0) } fn main() -> Result<(), String> { let p: f32 = 10000.0; let n: f32 = 3.0; let r: f32 = 1.4; let result = si_using_result(p, n, r)?; println!("SI calc with {p},{n},{r} = {result}"); Ok(()) }
Returning Err
fn si_using_result(p: f32, n: f32, r: f32) -> Result<f32, String> { if p <= 0. { return Err("Principal cannot be less or equal to zero".to_string()); } if n <= 0. { return Err("Number of years cannot be less or equal to zero".to_string()); } if r <= 0. { return Err("Rate cannot be less or equal to zero".to_string()); } Ok((p * n * r) / 100.0) } fn main() -> Result<(), String> { let p: f32 = 10000.0; let n: f32 = 0.0; let r: f32 = 1.4; let result = si_using_result(p, n, r)?; println!("SI calc with {p},{n},{r} = {result}"); Ok(()) }
Another way to write using a intermediate function
fn calc_si(p: f32, n: f32, r: f32) -> Result<f32, String> { if p <= 0. { return Err("Principal cannot be less or equal to zero".to_string()); } if n <= 0. { return Err("Number of years cannot be less or equal to zero".to_string()); } if r <= 0. { return Err("Rate cannot be less or equal to zero".to_string()); } Ok((p * n * r) / 100.0) } fn print_si(p: f32, n: f32, r: f32) -> Result<f32, String>{ let result_si = calc_si(p,n,r)?; Ok(result_si) } fn main() { let p: f32 = 10000.0; let n: f32 = 3.; let r: f32 = 1.4; println!("{:?}",print_si(p,n,r)); }
Loop through and convert Integers and return Error message for others
// Simple Parse Example fn parse_str(input: &str) -> Result<i32, std::num::ParseIntError> { let parsed_number = input.parse::<i32>()?; Ok(parsed_number) } fn main() { let str_vec = vec!["Seven", "8", "9.0", "nice", "6060"]; for item in str_vec { let parsed = parse_str(item); println!("{:?}", parsed); } }
unwrap is a method available on Option and Result types that is used to extract the contained value. If the Option is Some or the Result is Ok, unwrap returns the contained value. However, if the Option is None or the Result is Err, unwrap will cause the program to panic and terminate execution.
Use unwrap sparingly and only when you are sure it won’t cause a panic. • Prefer expect with a meaningful message for clarity in cases where you are sure the operation won’t fail.
fn parse_str(input: &str) -> Result<i32, std::num::ParseIntError> { let parsed_number = input.parse::<i32>()?; Ok(parsed_number) } fn main() { let str_vec = vec!["8", "6060"]; let str_vec1 = str_vec.clone(); for item in str_vec { let parsed = parse_str(item); println!("As is: {:?}", parsed); } for item in str_vec1 { let parsed = parse_str(item); println!("Unwrapped : {}", parsed.unwrap()); } }
unwrap panics
fn parse_str(input: &str) -> Result<i32, std::num::ParseIntError> { let parsed_number = input.parse::<i32>()?; Ok(parsed_number) } fn main() { let str_vec = vec!["Seven", "8", "9.0", "nice", "6060"]; for item in str_vec { let parsed = parse_str(item).unwrap(); println!("{:?}", parsed); } }
unwrap_or_else
This can be used in production code.
fn parse_str(input: &str) -> Result<i32, std::num::ParseIntError> { let parsed_number = input.parse::<i32>()?; Ok(parsed_number) } fn main() { let str_vec = vec!["Seven", "8", "9.0", "nice", "6060"]; for item in str_vec { let parsed = parse_str(item).unwrap_or_else(|err| { println!("Error: failed to parse '{}'. Reason: {}", item, err); -1 // Provide a fallback value }); if parsed != -1 { println!("{}", parsed); } } }
[Avg. reading time: 11 minutes]
Hash Map
A HashMap is a data structure for storing key-value pairs with fast lookup by key. You use it when you want to map a unique key (like a name) to a value (like a phone number) and retrieve it efficiently.
- Stores data as Key : Value
- Keys are used to look up corresponding values
- Uses hashing to decide where each entry lives internally
- Dynamically resizes to maintain good performance as it grows
- Non-sequential: iteration order is not guaranteed
Real-World Example
Phone book
- Key: person’s name
- Value: phone number
A hash function helps the program find the phone number quickly.
Other languages call this:
- Map
- Dictionary
- Associative Array
Rules
- All keys must have the same data type.
- All values must have the same data type.
- Each key can have only one value at a time.
- No duplicate keys.
Hashing
Hashing transforms input data (like a string) into a fixed-size number called a hash value.
- Fixed-size output: input size doesn’t matter, output size stays the same
- Fast: designed to be efficient
- Collisions can happen: different inputs may produce the same hash value
Hasing Example
use std::collections::hash_map::DefaultHasher; use std::hash::{Hash, Hasher}; fn main() { let s = "hello world"; let mut hasher = DefaultHasher::new(); s.hash(&mut hasher); let hash_value = hasher.finish(); println!("Hash value for '{}': {}", s, hash_value); }
HashMap Example
use std::collections::HashMap; fn main() { let mut cities = HashMap::new(); cities.insert("Glassboro", 30000); cities.insert("Mullica Hill", 25000); cities.insert("Swedesboro", 28000); println!("cities: {:?}, {:?}", cities, cities.get("Glassboro")); }
Insert
use std::collections::HashMap; fn main() { let mut cities = HashMap::new(); cities.insert("Glassboro", 30000); cities.insert("Mullicahill", 25000); cities.insert("Swedesboro", 28000); println!("cities is {:?}", cities); //Insert Value cities.insert("Paulsboro", 11000); // Update Existing Value cities.insert("Glassboro", 31000); println!("cities is {:?}", cities); }
Insert/Update/Get
use std::collections::HashMap; fn main() { let mut cities = HashMap::new(); cities.insert("Glassboro", 30000); cities.insert("Mullica Hill", 25000); cities.insert("Swedesboro", 28000); // Option 1: overwrite existing value cities.insert("Glassboro", 31000); // Option 2: insert only if missing cities.entry("Deptford").or_insert(12000); // Option 3: update a value in-place let gpopulation = cities.entry("Glassboro").or_insert(0); *gpopulation += 1; println!("cities: {:?}", cities); match cities.get("Glassboro") { Some(pop) => println!("Glassboro population: {}", pop), None => println!("Glassboro population not available"), } }
Remove
use std::collections::HashMap; fn main() { let mut cities = HashMap::new(); cities.insert("Glassboro", 30000); cities.insert("Mullicahill", 25000); cities.insert("Swedesboro", 28000); // Remove an entry cities.remove("Mullicahill"); println!("After removal: {:?}", cities); }
Iterating Over the HashMap
use std::collections::HashMap; fn main() { let mut cities = HashMap::new(); cities.insert("Glassboro", 30000); cities.insert("Mullicahill", 25000); cities.insert("Swedesboro", 28000); // Iterating over the HashMap for (city, population) in &cities { println!("The population of {} is {}", city, population); } }
Check for Existence
use std::collections::HashMap; fn main() { let mut cities = HashMap::new(); cities.insert("Glassboro", 30000); cities.insert("Mullicahill", 25000); cities.insert("Swedesboro", 28000); // Checking if a key exists if cities.contains_key("Swedesboro") { println!("Swedesboro is in the HashMap"); } else { println!("Swedesboro is not in the HashMap"); } }
Merge
use std::collections::HashMap; fn main() { let mut cities1 = HashMap::new(); cities1.insert("Glassboro", 30000); cities1.insert("Mullicahill", 25000); let mut cities2 = HashMap::new(); cities2.insert("Swedesboro", 28000); cities2.insert("Depford", 12000); // Merging two HashMaps for (city, population) in cities2 { cities1.insert(city, population); } println!("Merged cities: {:?}", cities1); }
[Avg. reading time: 14 minutes]
Iterator in Rust
What is Iteration?
Iteration means traversing a collection of values one element at a time.
Examples of collections include:
- Arrays
- Vectors
- HashMaps
- Slices
In Rust, iteration can be done using:
- Traditional loops
- Iterators
Both approaches allow you to process elements in a collection, but they follow different programming styles.
Loops vs Iterators
Loops – Imperative Style
Loops follow an imperative programming style.
In this approach you explicitly control how the loop operates.
You must manage:
- Index position
- Loop bounds
- Increment logic
Example
fn main() { let ages = [27, 35, 40, 10, 19]; let mut index = 0; while index < ages.len() { let age = ages[index]; println!("Age = {:?}", age); index += 1; } }
Here you manually:
- Track the position
- Check the array length
- Increment the counter
The following code will panic because the loop goes out of bounds.
fn main() { let ages = [27, 35, 40, 10, 19]; let mut index = 0; while index <= ages.len() { let age = ages[index]; println!("Age = {:?}", age); index += 1; } }
Iterators – Declarative Style
Iterators follow a declarative programming style. Instead of describing how to loop, you describe what should happen to each element. Rust handles the iteration logic internally.
Benefits
- Cleaner code
- Safer iteration
- Less chance of index errors
- Encourages functional programming patterns
fn main() {
let ages = [27, 35, 40, 10, 19];
let ages_iterator = ages.iter();
for age in ages_iterator {
println!("Age = {:?}", age);
}
}
Developer doesnt have to manage the
- Index
- Length
- Counter increment
Rust abstracts that away.
Iterator Trait
In Rust, iterators are based on a trait called Iterator.
Every iterator must implement the next() method.
fn main() { let ages = [27, 35, 40, 10, 19]; let mut ages_iterator = ages.iter(); println!("{:?}", ages_iterator.next()); println!("{:?}", ages_iterator.next()); println!("{:?}", ages_iterator.next()); println!("{:?}", ages_iterator.next()); println!("{:?}", ages_iterator.next()); println!("{:?}", ages_iterator.next()); }
Each call to next() moves the iterator forward.
Iterating using while let
fn main() { let ages = [27, 35, 40, 10, 19]; let mut ages_iterator = ages.iter(); while let Some(age) = ages_iterator.next() { println!("{:?}", age); } }
Creating Iterators
Rust collections provide several ways to create iterators.
iter()
Returns an iterator over references.
fn main() { let ages = vec![27, 35, 40]; for age in ages.iter() { println!("{}", age); } }
iter_mut()
Returns mutable references allowing values to be modified.
fn main() { let mut ages = vec![27, 35, 40]; for age in ages.iter_mut() { *age += 1; } println!("{:?}", ages); }
into_iter()
Consumes the collection and moves the values.
fn main() { let ages = vec![27, 35, 40]; for age in ages.into_iter() { println!("{}", age); } // ages cannot be used here because ownership moved }
Iterator Adapters
Iterator adapters transform iterators into new iterators.
Common adapters include:
- map
- filter
- enumerate
- take
- skip
fn main() { let ages = [27, 35, 40, 10, 19]; let adults: Vec<i32> = ages .iter() .copied() .filter(|age| *age >= 18) .map(|age| age * 2) .collect(); println!("{:?}", adults); }
Collection
↓
Iterator
↓
Filter
↓
Map
↓
Collect
Iterator Consumers
Consumers produce a final result from an iterator.
Common consumers include:
- collect()
- sum()
- count()
- fold()
- for_each()
fn main() { let numbers = [1, 2, 3, 4, 5]; let total: i32 = numbers.iter().sum(); let total_length: usize = numbers.iter().count(); println!("{},{}", total, total_length); }
Lazy Evaluation
Rust iterators use lazy evaluation.
Operations do not run immediately.
fn main() { let ages = [27, 35, 40]; let result = ages .iter() .map(|age| { println!("Processing {}", age); age * 2 }); println!("Iterator created but not consumed"); }
Using collect()
Execution begins once a consumer is used.
fn main() { let ages = [27, 35, 40]; let result: Vec<_> = ages .iter() .map(|age| { println!("Processing {}", age); age * 2 }) .collect(); println!("{:?}", result); }
Collection
↓
Iterator
↓
map()
↓
collect()
↓
Execution happens
enumerate()
enumerate() adds an index to each element of an iterator.
fn main() { let ages = [27, 35, 40, 10]; for (index, age) in ages.iter().enumerate() { println!("Index: {}, Age: {}", index, age); } }
ages
↓
iter()
↓
Iterator
↓
enumerate()
↓
(index, value)
take()
take(n) returns only the first n elements from an iterator.
fn main() { let numbers = [10, 20, 30, 40, 50]; for value in numbers.iter().take(3) { println!("{}", value); } }
numbers.iter()
↓
take(3)
↓
iterator stops after 3 elements
skip()
skip(n) ignores the first n elements and starts iteration after that.
fn main() { let numbers = [10, 20, 30, 40, 50]; for value in numbers.iter().skip(2) { println!("{}", value); } }
Use Cases
Iterators are widely used in systems and data processing.
Common use cases include:
- Stream log processing
- Network packet processing
- ETL style pipelines
- CLI tools
- Data transformation pipelines
numbers.iter()
↓
skip(2)
↓
iteration begins at element 3
[Avg. reading time: 5 minutes]
Slices
Slices let you reference a contiguous sequence of elements in a collection rather than the whole collection. A slice is a kind of reference, so it does not have ownership.
A string slice is a reference to part of a String, and it looks like this:
- A slice is a borrowed view into data.
- It does not own the data.
- It prevents copying large data unnecessarily.
- Array slice → &[T]
- String slice → &str
Example 1
// String Slicing fn main() { //define an array of size 4 let arr:[i32;7] = [1, 2, 3, 4,5,6,7]; //define the slice let slice_array1 = &arr; let slice_array2 = &arr[0..4]; let slice_array3 = &arr[3..]; // print the slice of an array println!("Value of slice_array1: {:?}", slice_array1); println!("Value of slice_array2: {:?}", slice_array2); println!("Value of slice_array3: {:?}", slice_array3); }
start..end -> includes start, excludes end
..end -> from beginning to end
start.. > from start to end
.. -> whole collection
A slice is just a reference. The original array still owns the data.
Example 2
fn first_word(s: &str) -> &str { let bytes = s.as_bytes(); for (i, &b) in bytes.iter().enumerate() { if b == b' ' { return &s[..i]; } } &s[..] } fn main() { let s = String::from("hello world"); let word = first_word(&s); println!("{}", word); }
Why convert to bytes?
- Rust strings are UTF-8.
- Some characters take more than 1 byte.
- We search for a space ’ ’ which is a single byte.
- So we scan bytes safely.
- We are not slicing randomly.
- We slice exactly at the byte where the space exists.
If you try slicing in the middle of a multi-byte character, Rust will panic.
[Avg. reading time: 6 minutes]
Input from user
Reading User Input in Rust (std::io)
User input in Rust is handled through the standard library module std::io. Most input operations return a Result<T, E> because I/O can fail. You must decide:
- Crash on error -> expect() or unwrap()
- Handle gracefully -> match or ?
(Use VSCode for demo)
Example 1
cargo new input_demo
cd input_demo
// Input String
use std::io;
fn main() {
println!("Please enter your name:");
let mut name = String::new();
io::stdin()
.read_line(&mut name)
.expect("Failed to read input");
println!("Welcome {}", name.trim());
}
- String::new() creates an empty growable string on the heap.
- read_line(&mut name):
- Takes a mutable reference.
- Appends input (including newline).
- Returns Result<usize>.
- .expect("..."):
- If Err, program panics with the message.
- If Ok, continues execution.
- .trim() removes trailing newline.
- read_line() keeps \n. Without trim(), output formatting looks messy.
Example 2
// Accept two numbers
use std::io;
fn main() {
println!("Enter First Number:");
let mut s1 = String::new();
io::stdin().read_line(&mut s1).expect("Invalid input");
let n1: u32 = s1.trim().parse().expect("Not a valid number");
println!("Enter Second Number:");
let mut s2 = String::new();
io::stdin().read_line(&mut s2).expect("Invalid input");
let n2: u32 = s2.trim().parse().expect("Not a valid number");
let result = n1 + n2;
println!("Result: {result}");
}
Example 3 - Better Version
use std::io;
fn read_number(prompt: &str) -> u32 {
loop {
println!("{prompt}");
let mut input = String::new();
io::stdin().read_line(&mut input).expect("Read failed");
match input.trim().parse::<u32>() {
Ok(num) => return num,
Err(_) => println!("Please enter a valid number."),
}
}
}
fn main() {
let n1 = read_number("Enter First Number:");
let n2 = read_number("Enter Second Number:");
println!("Result: {}", n1 + n2);
}
- No panic
- Keeps asking until valid input
- Real-world pattern
[Avg. reading time: 3 minutes]
Vector - Struct - Input
Create a cargo project for testing this
cargo new vector_struct_demo
cd vector_struct_demo
cargo run
1 g c active
2 a b inactive
use std::io;
#[derive(Debug)]
struct User {
id: String,
first_name: String,
last_name: String,
status: String,
}
fn main() {
let mut users: Vec<User> = Vec::new();
loop {
println!("Enter 'id', 'first name', 'last name', 'status' seperated by SPACE");
let mut input = String::new();
io::stdin().read_line(&mut input).unwrap();
let parts: Vec<&str> = input.trim().split_whitespace().collect();
if parts.len() != 4 {
println!("Invalid input. Please enter 4 values.");
continue;
}
let new_user = User {
id: parts[0].to_string(),
first_name: parts[1].to_string(),
last_name: parts[2].to_string(),
status: parts[3].to_string(),
};
users.push(new_user);
println!("Do you want to add another user? (Yes/No/Y/N): ");
let mut continue_input = String::new();
io::stdin().read_line(&mut continue_input).unwrap();
if continue_input.trim().eq_ignore_ascii_case("n") || continue_input.trim().eq_ignore_ascii_case("no") {
break;
}
}
println!("\nAll users:");
for user in users {
println!("{},{},{},{}", user.id, user.first_name, user.last_name, user.status);
}
}
[Avg. reading time: 8 minutes]
Command Line Arguments
Command Line Arguments allow you to pass inputs to a Rust program when the program starts.
They are commonly used for:
- File paths
- Configuration values
- Flags and modes
- Runtime parameters
Many tools you use daily rely on command line arguments.
Example:
cargo --version
cargo : executable file
--version : argument passed to the program
Accessing Command Line Arguments
Rust provides the function:
std::env::args()
Characteristics:
- Returns an iterator of String values
- Each element represents one argument
- The first argument is always the executable path
Example: Printing All Arguments
use std::env;
fn main() {
for (index, argument) in env::args().enumerate() {
println!("{index} -> {argument}");
}
}
cargo run hello world 123 3.14
Getting a Specific Argument
Using nth()
You can access a specific argument using nth().
use std::env;
fn main() {
let second = env::args().nth(1);
println!("{:?}", second);
}
Important details:
- nth(1) returns Option
- The argument might not exist
- Rust forces you to handle missing values safely
Using skip() and next()
use std::env;
fn main() {
let name = env::args().skip(1).next();
println!("{:?}", name);
}
skip(1) ignores the executable path
next() returns the first remaining argument
Using Option
There is no guarantee users enter necessary arguments.
use std::env;
fn main() {
let name = env::args().skip(1).next();
match name {
Some(n) => println!("Hello {n}"),
None => {
println!("Missing argument");
std::process::exit(1);
}
}
}
This avoids panic!
CLI programs should:
- Fail gracefully
- Display useful messages
- Exit with a non-zero status code
Parsing Args
Command line inputs are always text and must be converted to Numbers or respective datatypes.
use std::env;
fn main() {
let age: u32 = env::args()
.nth(2)
.expect("Missing age")
.parse()
.expect("Age must be a number");
println!("Age: {}", age);
}
String -> parse() -> numeric type
Using Message Pattern
Good CLI program prints a usage message when arguments are missing
use std::env;
fn print_help(program: &str) {
println!("Usage: {} <name>", program);
println!();
println!("Arguments:");
println!(" <name> Name of the person to greet");
println!();
println!("Options:");
println!(" -h, --help Show this help message");
}
fn main() {
let mut args = env::args();
let program = args.next().unwrap();
let first = args.next();
match first.as_deref() {
Some("-h") | Some("--help") => {
print_help(&program);
}
Some(name) => {
println!("Hello {name}");
}
None => {
eprintln!("Missing argument\n");
print_help(&program);
std::process::exit(1);
}
}
}
cargo run -h
cargo run Rachel
Advance CLI Parser utilities
[Avg. reading time: 0 minutes]
Modules
[Avg. reading time: 7 minutes]
Rust Modules
As Rust programs grow larger, organizing code becomes important.
Rust provides a module system to organize code into logical groups.
A module is a container that groups related items together.
These items can include:
- Functions
- Structs
- Enums
- Constants
- Traits
- Other modules
Modules help with:
- Organizing large codebases
- Controlling visibility of code
- Avoiding name conflicts
- Making programs easier to maintain
Example Concept
In small programs everything may live inside one file. As the project grows, it becomes difficult to maintain. Instead of putting everything in one file, Rust allows code to be split into modules.
Example project structure:
project
├── main.rs
├── user.rs
├── database.rs
Each file can represent a logical part of the program.
For example:
user.rs: user related logicdatabase.rs: database operations
This makes the program easier to read and maintain.
Standard Library Modules
Rust includes a large Standard Library (std) which contains many commonly used modules.
These modules provide functionality such as:
- Input and Output
- File handling
- Networking
- Data structures
- Memory management
Example standard module: std::io
The std::io module contains functionality for reading and writing input/output.
Using a Module
To access items from a module, Rust uses the use keyword.
Example:
use std::fs::File; fn main() { let file = File::create("data.txt").unwrap(); }
std → Standard Library
fs → Filesystem module
File → Struct used for file operations
Module Paths
Rust accesses modules using a path, similar to directories in a file system.
Example path:
std::fs::File
This represents the hierarchy:
Standard Library → Filesystem Module → File Struct
Using module paths helps Rust locate items within the module system.
Example
use std::io;
fn main() {
println!("Enter your name:");
let mut name = String::new();
io::stdin()
.read_line(&mut name)
.expect("Failed to read input");
println!("Hello {}", name.trim());
}
Standard Library Documentation
Rust provides detailed documentation for all standard modules.
You can explore them here:
https://doc.rust-lang.org/std/
https://doc.rust-lang.org/std/io/index.html
These pages list all modules, functions, and structs available in the standard library.
[Avg. reading time: 13 minutes]
User Defined Modules
Rust allows developers to create their own modules to organize code.
A module groups related functionality together.
Modules can contain:
- Functions
- Structs
- Enums
- Constants
- Traits
- Other modules
This helps large programs remain organized and maintainable.
Default Visibility
Items inside a module are private by default.
To make a function accessible outside the module, use the pub keyword.
Simple Module Example
mod sales { pub fn meet_customer() { println!("meet customer"); } } fn main() { sales::meet_customer(); }
mod sales creates a module
pub fn makes the function visible outside the module
The function is accessed using the module path
sales::meet_customer()
Passing Parameters
Modules behave just like normal Rust functions.
They can receive parameters.
mod sales { pub fn meet_customer(num: i32) { println!("meet customer {num}"); } } fn main() { sales::meet_customer(1); }
Nested Modules
Large systems often require hierarchical structure.
Modules can contain other modules.
Example structure:
departments
└── sales
└── service
└── hr
mod departments { pub mod sales { pub fn meet_customer(num: i32) { println!("meet customer {num}"); } } } fn main() { departments::sales::meet_customer(1); }
crate
├─ main()
└─ departments
└─ sales
- main() and departments are in the same parent scope (crate root).
- So main() can see departments without pub.
- But sales is inside departments, so to expose it to the parent (crate root) it must be pub.
Exposing Limited Functionality
Modules allow internal helper functions to remain private.
Only selected functions are exposed publicly.
mod departments { pub mod sales { pub fn meet_customer(num: i32, requestedby: &str) { println!("meet customer {num}"); let phone_number = get_number(num, requestedby); println!("calling {:?}", phone_number); } fn get_number(num: i32, requestedby: &str) -> String { let phonenumber = match num { 1 => "123-456-7890".to_string(), 2 => "987-654-3210".to_string(), _ => "000-000-0000".to_string(), }; if requestedby == "Manager" { phonenumber } else if requestedby == "CustService" { phonenumber[8..].to_string() } else { "".to_string() } } } } fn main() { departments::sales::meet_customer(1, "Manager"); departments::sales::meet_customer(1, "CustService"); }
- meet_customer() is public
- get_number is private
- main() cannot call get_number()
- This is called encapsulation.
Using super
The super keyword refers to the parent module.
This allows child modules to access functions from their parent module.
mod departments { fn get_number(num: i32) -> String { match num { 1 => "123-456-7890".to_string(), 2 => "987-654-3210".to_string(), _ => "000-000-0000".to_string(), } } pub mod sales { pub fn meet_customer(num: i32) { println!("Sales : meet customer {num}"); let phone_number = super::get_number(num); println!("Sales calling {}", phone_number); } } pub mod service { pub fn meet_customer(num: i32) { println!("Service : meet customer {num}"); let phone_number = super::get_number(num); println!("Service calling {}", phone_number); } } } fn main() { departments::sales::meet_customer(1); departments::service::meet_customer(3); }
Both modules access the same helper function using super.
Using Self
Self usage is optional, added for better clarity. It is useful when calling functions within the same module.
mod departments { fn get_number(num: i32) -> String { match num { 1 => "123-456-7890".to_string(), 2 => "987-654-3210".to_string(), _ => "000-000-0000".to_string(), } } pub mod service { pub fn meet_customer(num: i32) { let phone_number = super::get_number(num); let ticket_number = self::get_service_ticket_number(num); println!( "Calling {phone_number} with ticket number {ticket_number}" ); } fn get_service_ticket_number(num: i32) -> i32 { match num { 1 => 2452423, 2 => 2341332, _ => 6868765, } } } } fn main() { departments::service::meet_customer(3); }
self::get_service_ticket_number()
means “call a function in the same module”.
Writing Tests Inside Modules
Rust allows unit tests to be written inside modules.
Test modules are compiled only when running tests.
cargo new demo_mod_test
mod departments {
fn get_number(num: i32) -> String {
match num {
1 => "123-456-7890".to_string(),
2 => "987-654-3210".to_string(),
_ => "000-000-0000".to_string(),
}
}
#[cfg(test)]
mod tests {
#[test]
fn test_customer_phone() {
assert_eq!(
"000-000-0000",
super::get_number(4)
);
}
}
}
cargo test
- #[cfg(test)] compiles the module only during testing
- #[test] marks a test function
- assert_eq! validates expected output
Summary
- Modules organize Rust code into logical units
- Items are private by default
- pub exposes functions outside the module
- Modules can be nested
- super accesses the parent module
- self refers to the current module
- Tests can be embedded inside modules
[Avg. reading time: 5 minutes]
Module Multiple files
Rust allows modules to be split across multiple files. This helps organize larger projects and keeps files manageable.
cargo new moddemo2
create files as given below
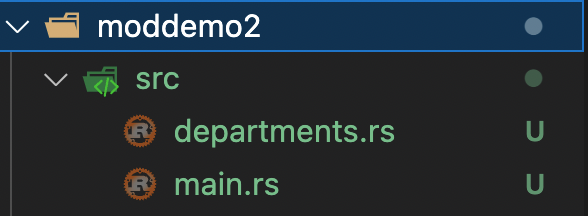
departments.rs
pub mod dept {
fn get_number(num: i32) -> String {
match num {
1 => return "123-456-7890".to_string(),
2 => return "987-654-3210".to_string(),
_ => return "000-000-0000".to_string(),
}
}
pub mod sales {
pub fn meet_customer(num: i32) {
println!("Sales : meet customer {num}");
let phone_number = super::get_number(num);
println!("Sales calling {}", phone_number);
}
}
pub mod service {
pub fn meet_customer(num: i32) {
println!("Service : meet customer {num}");
let phone_number = super::get_number(num);
let ticket_number = self::get_service_ticket_number(num);
println!("Calling {phone_number} with ticket number {ticket_number}");
}
fn get_service_ticket_number(num: i32) -> i32 {
match num {
1 => return 2452423,
2 => return 2341332,
_ => return 6868765,
}
}
}
#[cfg(test)] // Only compiles when running tests
mod tests {
use crate::get_standard_greetings;
#[test]
fn test_customerphone() {
assert_eq!("000-000-0000", super::get_number(4));
}
#[test]
fn test_standard_greeting() {
assert_eq!("Welcome to our store.", get_standard_greetings());
}
}
}
main.rs
// Refer the external file
mod departments;
// Import the module
use departments::dept;
fn main() {
println!("{:?}", get_standard_greetings());
dept::sales::meet_customer(1);
dept::service::meet_customer(3);
}
fn get_standard_greetings() -> String {
return "Welcome to our store.".to_string();
}
- mod departments; tells Rust to load the module from departments.rs
- use departments::dept; imports the module so we can reference it easily
- Functions inside the module can be accessed using the module path
main.rs
|
|-- mod departments
|
|-- departments.rs
|
|-- pub mod dept
Run the program
cargo run
Test the program
cargo test
[Avg. reading time: 6 minutes]
Module Subfolders
This is the production-style way to organize Rust modules.
A folder becomes a module when it contains a mod.rs file (or in newer style, when departments.rs exists and points to departments/ files, but mod.rs is still common in many codebases).
Key idea:
mod.rscontains the module root for that folder- Other
.rsfiles inside the folder become submodules when declared usingmod(orpub mod) - Items are private by default
- Use
pubto expose modules or functions to parent modules
cargo new moddemo3
create the following directory structure
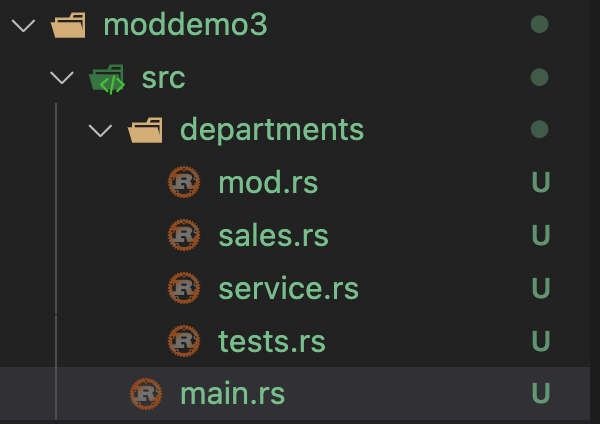
main.rs
mod departments; tells Rust to load src/departments/mod.rs.
mod departments;
fn main() {
println!("{:?}", get_standard_greetings());
departments::sales::meet_customer(1);
departments::service::meet_customer(3);
}
fn get_standard_greetings() -> String {
return "Welcome to our store.".to_string();
}
or
mod departments;
use crate::departments::{sales, service};
fn main() {
println!("{}", get_standard_greetings());
sales::meet_customer(1);
service::meet_customer(3);
}
fn get_standard_greetings() -> String {
"Welcome to our store.".to_string()
}
crate keyword refers to the root of the current program (crate)
departments > mod.rs
fn get_number(num: i32) -> String {
match num {
1 => return "123-456-7890".to_string(),
2 => return "987-654-3210".to_string(),
_ => return "000-000-0000".to_string(),
}
}
pub mod sales;
pub mod service;
#[cfg(test)]
mod tests; // Only compiles when running tests
departments > sales.rs
pub fn meet_customer(num: i32) {
println!("Sales : meet customer {num}");
let phone_number = super::get_number(num);
println!("Sales calling {}", phone_number);
}
departments > service.rs
pub fn meet_customer(num: i32) {
println!("Service : meet customer {num}");
let phone_number = super::get_number(num);
let ticket_number = self::get_service_ticket_number(num);
println!("Calling {phone_number} with ticket number {ticket_number}");
}
fn get_service_ticket_number(num: i32) -> i32 {
match num {
1 => return 2452423,
2 => return 2341332,
_ => return 6868765,
}
}
departments > tests.rs
use crate::get_standard_greetings;
#[test]
fn test_customerphone() {
assert_eq!("000-000-0000", super::get_number(4));
}
#[test]
fn test_standard_greeting() {
assert_eq!("Welcome to our store.", get_standard_greetings());
}
cargo run
cargo test
[Avg. reading time: 7 minutes]
Creating a Library Crate
So far you built binary crates (executables) using main.rs.
Rust also supports library crates, which are reusable packages that expose functions, structs, and modules for other projects to use.
- A binary crate starts at
src/main.rs - A library crate starts at
src/lib.rs
When you create a library crate, Cargo builds a .rlib (and other artifacts) that other crates can depend on.
Part 1: Create a Department library
To create a new library include –lib when creating a new cargo package
cargo new newlib --lib
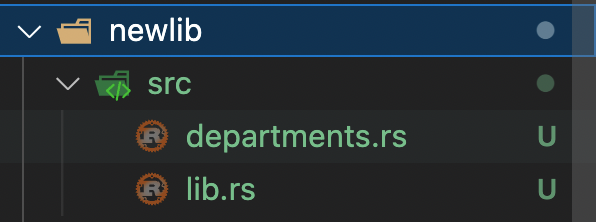
departments.rs
pub mod dept {
fn get_number(num: i32) -> String {
match num {
1 => return "123-456-7890".to_string(),
2 => return "987-654-3210".to_string(),
_ => return "000-000-0000".to_string(),
}
}
pub mod sales {
pub fn meet_customer(num: i32) {
println!("Sales : meet customer {num}");
let phone_number = super::get_number(num);
println!("Sales calling {}", phone_number);
}
}
pub mod service {
pub fn meet_customer(num: i32) {
println!("Service : meet customer {num}");
let phone_number = super::get_number(num);
let ticket_number = self::get_service_ticket_number(num);
println!("Calling {phone_number} with ticket number {ticket_number}");
}
fn get_service_ticket_number(num: i32) -> i32 {
match num {
1 => return 2452423,
2 => return 2341332,
_ => return 6868765,
}
}
}
}
lib.rs
- lib.rs is the entry point for your library crate.
- It defines what modules are exposed to downstream crates.
pub mod departments;
Build the library
cargo build
this gives you:
- A compiled library crate named newlib
- Other projects can now import it using use newlib::…
Part 2: Use the above library
cargo new newlib-test
cargo.toml
[dependencies]
newlib = {path = "../newlib"}
or
cargo add newlib --path ../newlib
If its common library across team (Private)
cargo add newlib --git https://github.com/user/newlib
main.rs
use newlib::departments::dept;
fn main() {
dept::sales::meet_customer(1);
dept::service::meet_customer(3);
}
cargo run
Summary
- lib.rs defines the public API surface of a library crate
- A library crate is imported using the crate name (newlib::…)
- pub mod departments; in lib.rs exposes departments.rs
- Inside modules, helpers stay private unless you mark them pub
[Avg. reading time: 5 minutes]
Commonly Used Rust Attributes
In Rust, attributes provide metadata about code to the compiler.
They are written using the #[] syntax and can modify compilation behavior, enable conditional code, or automatically generate implementations.
Attributes can be applied to:
- Structs
- Enums
- Functions
- Modules
- Traits
- Crates
Trait Derivation
The #[derive(…)] attribute automatically implements common traits for a struct or enum.
#[derive(Debug, Clone, PartialEq)]
struct Point {
x: i32,
y: i32,
}
Commonly derived traits include:
- Debug
- Clone
- Copy
- PartialEq
- Eq
- Default
Example:
#[derive(Debug, Default)]
struct Config {
retries: u32,
}
Conditional Compilation
The #[cfg(…)] attribute allows code to be compiled only when specific conditions are met.
Example: compile code only during testing.
#[cfg(test)]
mod tests {
#[test]
fn it_works() {
assert_eq!(2 + 2, 4);
}
}
Example: enable code when a feature flag is enabled.
#[cfg(feature = "serde")]
use serde::Serialize;
Test Functions
The #[test] attribute marks a function as a unit test. These tests are executed when running:
cargo test
Example:
#[test]
fn test_addition() {
assert_eq!(2 + 2, 4);
}
Compiler Warning Control
Rust provides attributes to control compiler warnings.
#[allow(…)] suppresses specific warnings.
#[allow(dead_code)]
fn unused_function() {}
#[deny(…)] converts warnings into compilation errors.
#[deny(missing_docs)]
pub fn important_function() {}
Deprecating Code
The #[deprecated] attribute marks a function or item as deprecated.
#[deprecated(note = "use new_function instead")]
fn old_function() {}
When used, the compiler generates a warning suggesting the replacement.
Must Use Return Value
The #[must_use] attribute tells the compiler to warn if the return value of a function is ignored.
#[must_use]
fn compute() -> i32 {
42
}
compute(); // compiler will warn that result is unused
This is often used in APIs where ignoring the result may indicate a bug.
[Avg. reading time: 0 minutes]
Chapter 5
[Avg. reading time: 9 minutes]
File Handling
fs module is not part of the Rust prelude You must explicitly import it using
use std::fs
Rust Prelude
- Prelude = things Rust imports automatically
- Kept intentionally small
- Focuses on commonly used traits and types
- File handling is not included, so you import it manually
The Data file should be in the same level src folder.
data.txt should be at the same level src folder
Read Entire File
let contents = fs::read_to_string("data.txt").unwrap();
- Reads full file into a String
- Assumes file is UTF-8 encoded
- unwrap() will crash if file is missing or invalid
Read Entire File but processes it Line by Line
let contents = fs::read_to_string("data.txt").unwrap();
for line in contents.lines(){
println!("{}",line);
}
- Still loads the entire file into memory first
- .lines() gives an iterator over each line
- Cleaner for processing structured text
- Good for small to medium files
Buffer Read (large files)
let file = File::open("data.txt").unwrap();
let reader = BufReader::new(file);
for _line in reader.lines() {
// simulate processing
}
- Reads file incrementally (streaming)
- Avoids loading entire file into memory
- Suitable for large files and data pipelines
Read non UTF-8 or Binary files
let contents = fs::read("data.txt").unwrap();
- Returns Vec
(raw bytes) - Does not assume encoding
- Works for:
- Images (PNG, JPEG)
- Parquet, Avro, ORC
- Compressed files (ZIP, GZIP)
- Non-UTF-8 text files
Read large Binary file
Combine Buffer and read :)
let file = File::open("big_file.parquet").unwrap();
let mut reader = BufReader::new(file);
let mut buffer = [0u8; 8192];
loop {
let n = reader.read(&mut buffer).unwrap();
if n == 0 {
break;
}
Read Metadata about file
let meta = fs::metadata("data.txt").unwrap();
println!("Size: {} bytes", meta.len());
println!("Is file: {}", meta.is_file());
println!("Is dir: {}", meta.is_dir());
Summary
- Small text files > read_to_string()
- Large text files > BufReader
- Binary / unknown encoding > read()
git clone https://github.com/gchandra10/rust_readfile_demo
Write File
let mut text = String::new();
text.push_str("Rust is strong and statically typed language.");
text.push_str("Rust is super strict.");
fs::write("newfile.txt",text);
Points to remember
- Simple to use
- Will replace the contents of an existing file
- Writes entire contents of the file.
Append to File
#![allow(unused)] fn main() { let mut text = String::new(); let mut file = fs::OpenOptions::new() .append(true) .open("newfile.txt") .unwrap(); file.write(b"Rust is awesome"); } }
Write fn doesn’t care about datatype. It thinks data is a series of bytes and it expects the value to be an array of u8 values.
git clone https://github.com/gchandra10/rust_writefile_demo.git
Simple Find Command Line simulator
git clone https://github.com/gchandra10/rust_find_demo.git
cargo run --bin simple_find friends.txt Ross
cargo run --bin word_find friends2.txt Your
cargo run --bin word_find friends2.txt Your -i
Good resource if you want to recreate standard Linux commands using RUST
https://doc.rust-lang.org/rust-by-example/std_misc/fs.html
[Avg. reading time: 5 minutes]
JSON
JSON (JavaScript Object Notation) is a text-based format used to store and exchange structured data.
It is widely used across APIs, files, and data pipelines.
Simplest JSON format
{"id": "1","name":"Rachel"}
Properties
- Language-independent
- Human-readable when keys are well named
- Lightweight and easy to parse
- Widely supported across systems and tools
Basic Rules
- Curly braces { } represent an object
- Data is represented as key-value pairs
- Keys and string values must use double quotes
- Pairs are separated by commas
- Square brackets [ ] represent an array
JSON Values
String {"name":"Rachel"}
Number {"id":101}
Boolean {"result":true, "status":false} (lowercase)
Object {
"character":{"fname":"Rachel","lname":"Green"}
}
Array {
"characters":["Rachel","Ross","Joey","Chanlder"]
}
NULL {"id":null}
Sample JSON Document
{
"characters": [
{
"id" : 1,
"fName":"Rachel",
"lName":"Green",
"status":true
},
{
"id" : 2,
"fName":"Ross",
"lName":"Geller",
"status":true
},
{
"id" : 3,
"fName":"Chandler",
"lName":"Bing",
"status":true
},
{
"id" : 4,
"fName":"Phebe",
"lName":"Buffay",
"status":false
}
]
}
JSON Best Practices
Avoid hyphens in keys
{"first-name":"Rachel","last-name":"Green"}
- Valid JSON
- But awkward to access in many programming languages
snake_case
{"first_name":"Rachel","last_name":"Green"}
Lowercase
{"firstname":"Rachel","lastname":"Green"}
Camelcase (Common in APIs)
{"firstName":"Rachel","lastName":"Green"}
Pick one style and stay consistent
JSON & RUST
- The Deserialize trait is required to parse (that is, read) JSON strings into this Struct.
- The Serialize trait is required to format (that is, write) this Struct into a JSON string.
- The Debug trait is for printing a Struct on a debug trace.
git clone https://github.com/gchandra10/rust_json_serialize_deserialize.git
[Avg. reading time: 11 minutes]
Macros
Rust macros enable metaprogramming. They generate code at compile time instead of executing at runtime.
Macros look like functions but end with !. Instead of calling code, they expand into code before compilation.
Why Macros?
- Reduce repetitive code
- Enable flexible APIs (like println!, vec!)
- Work with variable number of arguments
- Operate at compile time
Defining Macros
Macros are defined using macro_rules!
macro_rules! macro_name {
(pattern) => {
expansion
};
}
- pattern : matches input
- expansion : generated code
Designators (Matchers)
These define what kind of input the macro accepts:
expr : expressions (1 + 2, variables, function calls)
ty : types (i32, String)
ident : identifiers (variable/function names)
Macro with No Arguments
macro_rules! print_hello { () => { println!("Hello World"); }; } fn main() { print_hello!(); }
Returning Values
macro_rules! ten { () => { 5 + 5 }; } fn main() { println!("{}", ten!()); }
macro_rules! si { ($p:expr, $n:expr, $r:expr) => { ($p * $n * $r) / 100 }; } fn main() { println!("{}", si!(1000, 1, 10)); }
$p:expr, $n:expr, $r:expr : not variables, :expr ensures its Rust Expression
Macro with String argument
using expr designator
macro_rules! hi { ($name:expr) => { println!("Hi {} How are you?",$name); }; } fn main() { hi!("Rachel"); }
Simple addition macro
// Takes two arguments macro_rules! add{ ($a:expr,$b:expr)=>{ { $a+$b } } } fn main(){ let c = add!(1,2); println!("{c}"); }
Demo Stringify
// Stringify //In Rust, stringify! is a macro that takes a Rust expression //and converts it into a string literal fn main() { println!("{},{}",1+1,stringify!("1+1")); }
Macro with Expressions
macro_rules! print_result { ($expression:expr) => { println!("{:?} = {:?}", stringify!($expression), $expression); }; } fn main() { print_result!(1 + 1); print_result!({ let x = 10; x * x + 2 * x - 1 }); }
using expr and ty designators
// multiple designators // variables with different datatypes can be added using this macro macro_rules! add_using{ // using a ty token type for matching datatypes passed to the macro ($x:expr,$y:expr,$typ:ty)=>{ $x as $typ + $y as $typ } } fn main(){ let i:u8 = 5; let j:i32 = 10; println!("{}",add_using!(i,j,i32)); }
Repeat / Dynamic Arguments
($($v:expr),) - Here the star () will repeat the patterns inside $() And comma is the separator.
// Repeat / Dynamic number of arguments macro_rules! hi { ($($name:expr),*) => { { //let mut n = Vec::new(); $( println!("Hi {}!",$name); )* } }; } fn main() { hi!("Rachel","Ross","Monica"); }
Remember vec! Macro?
Let’s try to create our equivalent of it.
// Creating vec! equivalent macro_rules! my_vec { ( $( $name:expr ), * ) => { { let mut n = Vec::new(); $( n.push($name); )* n } }; } fn main() { println!("{:?}",my_vec!("Rachel","Ross","Monica")); }
Repeat - with Numeric arguments
macro_rules! add_all{ ($($a:expr) , *) => { // initial value of the expression 0 // block to be repeated $(+$a)* } } //The * in $(+$a)* is a repetition operator, meaning //"repeat +$a for each $a matched". fn main(){ println!("{}",add_all!(1,2,3,4)); //println!("{}",add_all!()); }
Compile time Assertions
macro_rules! assert_equal_len { ($a:expr, $b:expr) => { assert!($a.len() == $b.len(), "Arrays must have the same length"); }; } fn main() { let a1 = [1, 2, 3]; let a2 = [4, 5, 6]; assert_equal_len!(a1, a2); // Compiles fine //let a3 = [7, 8]; //assert_equal_len!(a1, a3); // This will fail to compile }
Macro Overloading
Overload to accept different combinations of arguments
// `check!` will compare `$left` and `$right` // in different ways depending on how you invoke it: macro_rules! check { ($left:expr; and $right:expr) => { println!("{:?} and {:?} is {:?}", stringify!($left), stringify!($right), $left && $right) }; ($left:expr; or $right:expr) => { println!("{:?} or {:?} is {:?}", stringify!($left), stringify!($right), $left || $right) }; } fn main() { check!(1i32 + 1 == 2i32; and 2i32 * 2 == 4i32); check!(true; or false); }
Summary
- Macros match patterns -> generate code
- They run at compile time, not runtime
- Use macros when:
- You need repetition elimination
- You need flexible syntax
- Avoid macros when:
- A function or generic can solve it
- Readability suffers
[Avg. reading time: 8 minutes]
Generics
Generics allow you to write flexible, reusable code that works across multiple data types without duplication.
At compile time, Rust uses Monomorphization to replace generic placeholders with concrete types.
Monomorphization
- Compiler generates type-specific versions of generic code
- Happens at compile time, not runtime
- Ensures no performance overhead
Why Generics?
- Avoid code duplication
- Improve readability and maintainability
- Provide zero-cost abstraction
- No runtime penalty
Key Concepts
- T, U are generic type parameters
- Trait bounds like Debug, Display, Add, Sub restrict what operations are allowed
- Add<Output = T> ensures the result type matches input type
- Multiple generic types allow flexibility across different inputs
Example
use std::fmt::Debug; use std::fmt::Display; use std::ops::*; fn main() { //i32 let n1: i32 = 10; let n2: i32 = 20; print_this(n1, n2); println!("Adding i32 ( {} + {} ) = {}", n1,n2, add_values(n1, n2)); println!("Subtracting i32 ( {} from {} ) = {}", n1,n2,sub_values(n1, n2)); println!("-----------------------------------"); // F64 let t1 = 23.45; let t2 = 34.56; print_this(t1, t2); println!("Adding f64 ( {} + {} ) = {}", t1,t2, add_values(t1, t2)); println!("Subtracting f64 ( {} from {} ) = {}", t1,t2,sub_values(t1, t2)); println!("-----------------------------------"); // &str let r1 = "Rachel"; let r2 = "Green"; print_this(r1, r2); println!("----------------"); // String Object let s1 = String::from("Rachel"); let s2 = String::from("Green"); print_this(s1, s2); println!("----------------"); //printing diff datatypes print_another(t1,n1); } fn print_this<T: Debug + Display>(p1: T, p2: T) -> () { println!("Printing - {:?},{}", p1, p2) } fn add_values<T: Add<Output = T>>(p1: T, p2: T) -> T { // ://doc.rust-lang.org/std/ops/index.html p1 + p2 } fn sub_values<T: Sub<Output = T>>(p1: T, p2: T) -> T { p1 - p2 } fn print_another<T: Debug + Display, U:Debug + Display>(p1: T, p2: U) -> () { println!("Printing Diff Datatypes - {:?},{}", p1, p2) }
- T: Add, T: Sub - The generic datatype T should support + and -
Generics with Struct
// Generics with Struct struct Sample<T, U, V> { a: T, b: U, c: V } fn main() { let var1 = Sample{ a: 43.10, b: 2, c:"Hello" }; println!("A: {}", var1.a); println!("B: {}", var1.b); println!("C: {}", var1.c); println!("----------------"); let var2 = Sample{ a: "Hello", b: "World", c:34.6 }; println!("A: {}", var2.a); println!("B: {}", var2.b); println!("C: {}", var2.c); }
Summary
- Generics are resolved at compile time
- No runtime cost compared to dynamic typing
- Trait bounds are mandatory when operations require them
- Overuse without bounds can lead to confusing compiler errors
[Avg. reading time: 15 minutes]
Traits
A trait defines shared behavior that multiple types can implement.
Think of it as an interface. It specifies what a type can do, not how it does it. Any type implementing a trait must provide the required methods.
Rust also allows creating custom traits in addition to built-in ones like Debug and Display.
Without Traits
#[derive(Debug)] struct Show { name: String, total_seasons: u8 } #[derive(Debug)] struct Season { season_name: String, season_id: u8, year: u16 } fn main(){ let friends = Show { name:String::from("Friends"), total_seasons:10 }; let currseason = Season { season_name:String::from("Last Season"), season_id:10, year:2004 }; println!("{:?}", friends); println!("{:?}", currseason); }
Using Traits
struct Show { name: String, total_seasons: u8 } struct Season { season_name: String, season_id: u8, year: u16 } trait Info { fn detail(&self) -> String; } impl Info for Show{ fn detail(&self) -> String{ format!("{} contains {} seasons", self.name, self.total_seasons) } } impl Info for Season{ fn detail(&self) -> String{ format!("Watching {} (Season {}) released in {}", self.season_name, self.season_id, self.year) } } fn main(){ let friends = Show { name:String::from("Friends"), total_seasons:10 }; let currseason = Season { season_name:String::from("Last Season"), season_id:10, year:2004 }; println!("{}", friends.detail()); println!("{}", currseason.detail()); }
Why Traits are important
- Shared Behavior: Define common functionality across types
- Abstraction: Write generic, reusable code
- Polymorphism: Same function works for multiple types
- Extensibility: Add behavior without modifying original structs
Polymorphism & Generics
struct Show { name: String, total_seasons: u8 } struct Season { season_name: String, season_id: u8, year: u16 } //We will list the method signature for all the methods that a type // implementing the Info trait will need to have. trait Info { // Any datatype that implements this "detail" trait will return a string. fn detail(&self) -> String; } impl Info for Show{ fn detail(&self) -> String{ format!("{} contains {} seasons",self.name,self.total_seasons) } } impl Info for Season{ fn detail(&self) -> String{ format!("you are watching {} ({}) telecasted in {}", self.season_name, self.season_id, self.year) } } // A generic function that works with any type that implements the Describe trait fn print_description<T: Info>(item: T) { println!("{}", item.detail()); } fn main(){ let friends = Show { name:String::from("Friends"), total_seasons:10 }; let currseason = Season { season_name:String::from("Last Season"), season_id:10, year:2004 }; print_description(friends); print_description(currseason); }
Default Implementation
In some cases, it’s useful to have a default implementation for one or more of the methods in a trait.
Especially when you have a trait with many methods, you can implement only some of them for every datatype.
// Default Trait struct Show { name: String, total_seasons: u8 } struct Season { season_name: String, season_id: u8, year: u16 } trait Info { fn detail(&self) -> String; fn description(&self) -> String { String::from("No description available") } } impl Info for Show{ fn detail(&self) -> String{ format!("{} contains {} seasons",self.name,self.total_seasons) } } impl Info for Season{ fn detail(&self) -> String{ format!("you are watching {} ({}) telecasted in {}", self.season_name, self.season_id, self.year) } fn description(&self) -> String{ format!("Its the series finale episode.") } } fn main(){ let friends = Show { name:String::from("Friends"), total_seasons:10 }; let currseason = Season { season_name:String::from("Last Season"), season_id:10, year:2004 }; println!("Friends - Detail : {}", friends.detail()); println!("Current Season - Detail {}", currseason.detail()); println!("---------------------"); println!("Printing Default Description : {}", friends.description()); println!("Printing specific Description : {}", currseason.description()); }
Derivable Traits
Provide default implementations for several common traits
The compiler will generate default code for the required methods when you derive traits.
If you need something specific, you’ll need to implement the methods yourself.
List of commonly used derivable traits
- Eq
- PartialEq
- Ord
- PartialOrd
- Clone
- Copy
- Hash
- Default
- Debug
// Comparison #[derive(PartialEq,PartialOrd)] struct Show { name: String, total_seasons: u8 } fn main(){ let friends = Show { name:String::from("Friends"), total_seasons:10 }; let bbt = Show { name:String::from("BBT"), total_seasons:12 }; println!("{}", friends == bbt); println!("{}", friends > bbt); }
What if we need to have custom comparison on specific items
// Custom Comparison #[allow(dead_code)] struct Show { name: String, total_seasons: u8, } // self = self: Self and &self = self: &Self trait Comparison { fn eq(&self, obj1:&Self) -> bool; } impl Comparison for Show { fn eq(&self, obj1: &Self) -> bool { if self.total_seasons == obj1.total_seasons { true } else { false } } } fn main() { let friends = Show { name: String::from("Friends"), total_seasons: 10, }; let bbt = Show { name: String::from("BBT"), total_seasons: 12, }; println!("Custom Comparison {}", friends.eq(&bbt)); }
Another Example with Numerical values
//declare a structure struct Circle { radius: f32, } struct Rectangle { width: f32, height: f32, } struct Square { width: f32, } //declare a trait trait Area { fn shape_area(&self) -> f32; } //implement the trait impl Area for Square { fn shape_area(&self) -> f32 { self.width * self.width } } impl Area for Circle { fn shape_area(&self) -> f32 { 3.14 * self.radius * self.radius } } impl Area for Rectangle { fn shape_area(&self) -> f32 { self.width * self.height } } fn main() { //create an instance of the structure let c = Circle { radius: 2.0 }; let r = Rectangle { width: 2.0, height: 2.0, }; let s = Square { width: 5.0 }; println!("Area of Circle: {}", c.shape_area()); println!("Area of Rectangle:{}", r.shape_area()); println!("Area of Rectangle:{}", s.shape_area()); }
[Avg. reading time: 15 minutes]
Smart Pointers
Box
What is Box?
Box<T> is a smart pointer that stores data on the heap while keeping a fixed-size pointer on the stack.
- Stack → pointer (fixed size)
- Heap → actual data
One reason why using a Box might be beneficial is that it can help you avoid stack overflows. The stack is a fixed-size data structure, so if you try to store a large data structure on the stack, it can overflow and cause your program to crash.
Why Box Exists
Rust must know the size of every type at compile time.
Some types cannot have a known size, such as:
- Recursive types
- Trait objects
- Very large nested structures
Box<T> solves this by introducing indirection:
- Instead of storing the value directly
- Store a pointer to the value

Stack - You, Heap - Storage, Box - Label pointing to where the item is stored.
Boxes don’t have performance overhead other than storing their data on the heap instead of on the stack.
This is recursive so will not work without BOX
struct Node {
value: i32,
next: Option<Node>,
}
Convert it to Box
struct Node {
value: i32,
next: Option<Box<Node>>,
}
use std::mem; fn main() { let x = 10; let b = Box::new(x); println!("Value: {}", b); println!("Size of x: {} bytes", mem::size_of_val(&x)); println!("Size of Box pointer: {} bytes", mem::size_of_val(&b)); }
b is stored on stack. value 10 is stored on the heap.
fn main() { let large_array: [i32; 5] = [1, 2, 3, 4, 5]; let large_array1: Box<[i32; 5]> = Box::new([1, 2, 3, 4, 5]); println!("large_array variable address : {:p}", &large_array); println!("large_array first element address : {:p}", large_array.as_ptr()); println!("large_array1 Box variable address : {:p}", &large_array1); println!("large_array1 heap first element addr : {:p}", large_array1.as_ptr()); }
large_array - both variable and value are in stack. large_array1 - variable is in stack, and value is in heap
Better Example
use std::mem; #[derive(Debug)] struct Class { id: i32, fname: String, lname: String, } fn main() { let c = Class { id: 34, fname: String::from("Rachel"), lname: String::from("Green"), }; println!("\nBefore boxing\n"); println!("Address of c (local variable) : {:p}", &c); println!("Size of Class value : {} bytes", mem::size_of_val(&c)); println!("Address of c.id : {:p}", &c.id); println!("Address of c.fname String object : {:p}", &c.fname); println!("Heap buffer of c.fname : {:p}", c.fname.as_ptr()); println!("Address of c.lname String object : {:p}", &c.lname); println!("Heap buffer of c.lname : {:p}", c.lname.as_ptr()); println!("Value of c : {:?}", c); let boxed_class = Box::new(c); println!("\nAfter boxing\n"); println!("Address of boxed_class variable : {:p}", &boxed_class); println!("Size of Box pointer : {} bytes", mem::size_of_val(&boxed_class)); println!("Address of boxed Class value : {:p}", &*boxed_class); println!("Size of boxed Class value : {} bytes", mem::size_of_val(&*boxed_class)); println!("Address of boxed_class.id : {:p}", &boxed_class.id); println!("Address of boxed_class.fname String object : {:p}", &boxed_class.fname); println!("Heap buffer of boxed_class.fname : {:p}", boxed_class.fname.as_ptr()); println!("Address of boxed_class.lname String object : {:p}", &boxed_class.lname); println!("Heap buffer of boxed_class.lname : {:p}", boxed_class.lname.as_ptr()); println!("Value of boxed_class : {:?}", boxed_class); let unboxed_class: Class = *boxed_class; println!("\nAfter unboxing\n"); println!("Address of unboxed_class : {:p}", &unboxed_class); println!("Size of unboxed Class value : {} bytes", mem::size_of_val(&unboxed_class)); println!("Address of unboxed_class.fname String obj : {:p}", &unboxed_class.fname); println!("Heap buffer of unboxed_class.fname : {:p}", unboxed_class.fname.as_ptr()); println!("Address of unboxed_class.lname String obj : {:p}", &unboxed_class.lname); println!("Heap buffer of unboxed_class.lname : {:p}", unboxed_class.lname.as_ptr()); println!("Value of unboxed_class : {:?}", unboxed_class); }
mem::size_of_val(&value) gives the size of the value itself.
It does not include extra heap memory owned by fields like String.
In this example:
Classcontainsid,fname, andlnamefnameandlnameareStringvalues- each
Stringstores its text in a separate heap buffer
So boxing Class moves the outer struct to the heap, but the string contents were already heap allocated.
Linked List Example
#![allow(unused)] fn main() { // Linked List Here is an example of a linked list that could be stored on the stack in Rust: struct Node { value: i32, next: Option<Box<Node>>, } struct LinkedList { head: Option<Box<Node>>, } }
In this example, the Node struct represents a single node in the linked list, and the LinkedList struct represents the entire linked list. The head field of the LinkedList struct contains a reference to the first node in the list, and each Node struct has a next field that contains a reference to the next node in the list.
Because this data structure is relatively small, it can be stored on the stack without problems. However, if the linked list became very large, it could cause a stack overflow, in which case it would be better to store it on the heap using a Box type.
Visual DSA Tool (https://csvistool.com/)
#smartpointers #box #linkedlist
[Avg. reading time: 5 minutes]
Log4J
Logging is the process of recording events that happen inside your application while it runs.
Instead of printing random println! statements, logging gives you:
structured output control over verbosity ability to route logs to files, systems, or dashboards
In production systems, logs are not optional. They are your only visibility into system behavior.
In real systems:
- pipelines fail at 2 AM
- APIs timeout
- data gets corrupted silently
Without logs, you’re gone.
Logging helps you:
- trace failures
- debug issues
- audit data movement
- monitor system health
Example:
ETL job fails -> logs show which partition failed Streaming job lags -> logs show processing delay API ingestion fails -> logs show error response
log4rs is inspired by Java framework log4j. Same idea in a different ecosystem.
Tools
https://github.com/sevdokimov/log-viewer
https://github.com/Better-Player/log4j-rs
LogViewPlus https://www.logviewplus.com/log-viewer.html
Another one https://www.xplg.com/log4j-viewer-analyzer/
Apart from this, there are a lot of Big Data Real-time log viewers, such as
- Splunk
- Logstash
Log Levels
| Level | Purpose |
|---|---|
| ERROR | Something failed |
| WARN | Something unexpected |
| INFO | General events |
| DEBUG | Debugging info |
| TRACE | Very detailed debugging |
supported by the macros
info! warn! error! debug! trace!
log4rs implementation
| Concept | Meaning |
|---|---|
| Appender | Where logs go (console, file) |
| Encoder | Format of logs (text, JSON) |
| Logger | Rules for filtering logs |
| Root | Default logging behavior |
git clone https://github.com/gchandra10/rust_log4rs_demo
[Avg. reading time: 5 minutes]
Closures
Closures in Rust are anonymous functions that you can store in variables, pass as arguments, and return from other functions.
Think of them as inline, lightweight functions with memory of their environment.
|args| -> return_type { body }
// Simple Closure Example fn main() { let example = |num| -> i32 { num + 1 }; println!("{}", example(5)); }
Function vs. Closure
// Function vs Closure fn add_one_fn(x: i32) -> i32 { 1 + x } fn main() { //let y = 6; let add_one_cl = |x: i32| -> i32 { 1 + x}; println!("Closure : {}", add_one_cl(3)); println!("Function : {}", add_one_fn(3)); }
- Functions are named and reusable
- Closures are inline and flexible
- Closures can capture variables from scope. Functions cannot
// Closure returns a value fn main() { let s = String::from("Hello"); let closure = |name: String| -> String { format!("{}, {}!", s, name) }; let result = closure(String::from("Rachel")); println!("The result is: {}", result); }
- s is not passed as a parameter
- Closure captures it automatically
- This is where closures become powerful
// Mutable Values inside Closure fn main() { let plus_two = |x| { let mut result: i32 = x; result += 1; result += 1; result }; println!("{}", plus_two(2)); }
Use Cases
- Pass logic into functions (map, filter, fold)
- Customize behavior without creating new functions
- Inline transformations in data pipelines
- Event handling / callbacks
- Building higher-order functions
Overall, closures are a very useful tool in Rust, and they can be used to solve a wide range of problems in your code.
[Avg. reading time: 3 minutes]
Map and Collect
Map: The map function is used to transform elements of an iterator. It takes a closure and applies this closure to each element of the iterator, producing a new iterator with the transformed elements.
- Takes a closure
- Applies transformation lazily
- Returns another iterator
Collect: The collect function is used to transform an iterator into a collection, such as a Vec, HashMap, or HashSet. It consumes the iterator and returns the new collection.
- Consumes iterator
- Produces concrete collection
fn main() { let numbers = vec![1, 2, 3, 4, 5]; let doubled: Vec<i32> = numbers.iter().map(|x| x * 2).collect(); println!("{:?}", doubled); }
- map() does NOT execute immediately
- It returns a lazy iterator
- Nothing happens until you consume it
fn main() { let names = vec!["rachel", "ross", "joey"]; let upper: Vec<String> = names .iter() .map(|name| name.to_uppercase()) .collect(); println!("{:?}", upper); }
Map + Filter
fn main() { let numbers = vec![1, 2, 3, 4, 5]; let result: Vec<i32> = numbers .iter() .map(|x| x * 2) .filter(|x| *x > 5) .collect(); println!("{:?}", result); }
[Avg. reading time: 14 minutes]
Database
Rust is a strong choice for database-related development because it gives you low-level control, good performance, and memory safety without a garbage collector.
It works well for:
- database clients and applications
- ETL and data engineering tools
- backend services that talk to databases
- custom storage engines or query systems
- high-performance concurrent systems
Key Features
- Safety
- Performance
- Concurrency
- Ecosystem Support
- Good for System-Level tools
Free Cloud-based Databases (MySQL, PostgreSQL, CouchDB, RabbitMQ)
https://www.alwaysdata.com/en/register/?d
Read Environment Variables
SET Environment Variables
Mac/Linux/Windows (GitBash)
export MY_POSTGRESQL_USERID=value
fn main() {
println!("{}",std::env::var("MY_POSTGRESQL_USERID").unwrap());
}
cargo.toml
postgres="0.19.13"
Create Table
use postgres::{Client, Error, NoTls};
fn main() -> Result<(), Error> {
// clearscreen::clear().expect("failed to clear screen");
let postgresql_userid = std::env::var("MY_POSTGRESQL_USERID").unwrap();
let postgresql_pwd = std::env::var("MY_POSTGRESQL_PWD").unwrap();
let conn_str = format!("postgresql://{postgresql_userid}:{postgresql_pwd}@postgresql-dbworldgc.alwaysdata.net:5432/dbworldgc_pg");
let mut client = Client::connect(&conn_str, NoTls)?;
client.batch_execute(
"
CREATE TABLE if not exists sitcoms (
id SERIAL PRIMARY KEY,
name TEXT NOT NULL,
genre TEXT NULL
)
",
)?;
Ok(())
}
NoTls is a type provided by the postgres crate in Rust, which specifies that the connection to the PostgreSQL database should not use TLS (Transport Layer Security) encryption. Essentially, it indicates that the connection should be made without any encryption.
Unencrypted Connection: Non prod or Used in Trusted environment. Performance: Faster due to absence of encryption overhead.
use postgres::{Client, Error, NoTls};
fn main() -> Result<(), Error> {
clearscreen::clear().expect("failed to clear screen");
let postgresql_userid = std::env::var("MY_POSTGRESQL_USERID").unwrap();
let postgresql_pwd = std::env::var("MY_POSTGRESQL_PWD").unwrap();
let conn_str = format!("postgresql://{postgresql_userid}:{postgresql_pwd}@postgresql-dbworldgc.alwaysdata.net:5432/dbworldgc_pg");
let mut client = Client::connect(&conn_str, NoTls)?;
//INSERT
let name = "Friends";
let genre = "RomCom";
client.execute(
"INSERT INTO sitcoms (name, genre) VALUES ($1, $2)", &[&name, &genre],
)?;
//UPDATE
let genre = "Comedy";
let id = 2;
client.execute(
"UPDATE sitcoms SET genre = $2 WHERE id = $1", &[&id, &genre],
)?;
//DELETE
let id = 1;
client.execute(
"DELETE FROM sitcoms WHERE id = $1", &[&id],
)?;
// Multiple Rows Insert
let tup_arr = [("Seinfeld","Standup"),("Charmed","Drama")];
for row in tup_arr{
client.execute(
"INSERT INTO sitcoms (name, genre) VALUES ($1, $2)", &[&row.0, &row.1],
)?;
println!("Inserting --- {},{}",row.0,row.1);
}
// Read the Value
for row in client.query("SELECT id, name, genre FROM sitcoms", &[])? {
let id: i32 = row.get(0);
let name: &str = row.get(1);
let genre: &str = row.get(2);
println!("---------------------------------");
println!("{} | {} | {:?}", id, name, genre);
}
#[derive(Debug)]
struct Sitcom {
id: i32,
name: String,
genre: Option<String>, // Use Option for nullable fields
}
// Read the Value and store in a vector
let mut sitcoms: Vec<Sitcom> = vec![];
for row in client.query("SELECT id, name, genre FROM sitcoms", &[])? {
let sitcom = Sitcom {
id: row.get(0),
name: row.get(1),
genre: row.get(2),
};
sitcoms.push(sitcom);
}
// // Print the sitcoms vector
for sitcom in sitcoms {
println!("{:?}", sitcom);
}
Ok(())
}
Transactions
use postgres::{Client, Error, NoTls, Transaction};
fn main() -> Result<(), Error> {
let postgresql_userid = std::env::var("MY_POSTGRESQL_USERID").unwrap();
let postgresql_pwd = std::env::var("MY_POSTGRESQL_PWD").unwrap();
let conn_str = format!("postgresql://{postgresql_userid}:{postgresql_pwd}@postgresql-dbworldgc.alwaysdata.net:5432/dbworldgc_pg");
let mut client = Client::connect(&conn_str, NoTls)?;
// Create table
client.batch_execute(
"
CREATE TABLE IF NOT EXISTS public.sitcoms_tran (
id SERIAL PRIMARY KEY,
name TEXT UNIQUE NOT NULL,
genre TEXT NULL
)
",
)?;
// Start a transaction
let mut transaction = client.transaction()?;
// Insert rows within the transaction
match insert_sitcoms(&mut transaction) {
Ok(_) => {
// If no error, commit the transaction
transaction.commit()?;
println!("Transaction committed.");
},
Err(e) => {
// If there is an error, rollback the transaction
transaction.rollback()?;
eprintln!("Transaction rolled back due to error: {}", e);
}
}
Ok(())
}
fn insert_sitcoms(transaction: &mut Transaction) -> Result<(), Error> {
transaction.execute("INSERT INTO sitcoms_tran (name, genre) VALUES ($1, $2)", &[&"Seinfeld", &"RomCom"])?;
Ok(())
}
Error Handling
use postgres::{Client, Error, NoTls};
fn main() -> Result<(), Error> {
let postgresql_userid = std::env::var("MY_POSTGRESQL_USERID").unwrap();
let postgresql_pwd = std::env::var("MY_POSTGRESQL_PWD").unwrap();
let conn_str = format!("postgresql://{postgresql_userid}:{postgresql_pwd}@postgresql-dbworldgc.alwaysdata.net:5432/dbworldgc_pg");
let mut client = Client::connect(&conn_str, NoTls)?;
client.batch_execute(
"
CREATE TABLE IF NOT EXISTS public.sitcoms (
id SERIAL PRIMARY KEY,
name TEXT NOT NULL,
genre TEXT NULL
)
",
)?;
let result = client.execute("INSERT INTO sitcoms (name, genre) VALUES ($1, $2)", &[&"Friends", &"RomCom"]);
match result {
Ok(rows) => println!("Inserted {} row(s)", rows),
Err(err) => eprintln!("Error inserting row: {}", err),
}
Ok(())
}
[Avg. reading time: 2 minutes]
Chapter 6
- Data Engineering
- HTTP
- Monolithic Architecture
- Statefulness
- Microservices
- Statelessness
- Idempotency
- REST API
- API Performance
- Concurrency & Parallelism
[Avg. reading time: 2 minutes]
Introduction to Data Engineering
Data Engineering is not about dashboards or ML hype. It’s about building systems that move and shape data reliably at scale.
At its core, data engineering answers three questions:
- How does data enter the system
- How does it change as it moves
- How do we trust it when it’s used
Everything else is implementation detail.
Data comes from multiple sources:
- APIs
- Files (CSV, JSON, Parquet)
- Databases
- Streams
The real challenge is not loading data. It’s handling reality:
- Millions of records
- Partial failures
- Schema changes
- Late-arriving data
- Duplicate data
[Avg. reading time: 15 minutes]
Storage Format
| Account number | Last name | First name | Purchase (in dollars) |
|---|---|---|---|
| 1001 | Green | Rachel | 20.12 |
| 1002 | Geller | Ross | 12.25 |
| 1003 | Bing | Chandler | 45.25 |
Row Oriented Storage
In a row-oriented DBMS, the data would be stored as
1001,Green,Rachel,20.12;
1002,Geller,Ross,12.25;
1003,Bing,Chandler,45.25
Best suited for OLTP - Transaction data.
Columnar Oriented Storage
1001,1002,1003; Green,Geller,Bing; Rachel,Ross,Chandler; 20.12,12.25,45.25
Best suited for OLAP - Analytical data.
Compression: Since the data in a column tends to be of the same type (e.g., all integers, all strings), and often similar values, it can be compressed much more effectively than row-based data.
Query Performance: Queries that only access a subset of columns can read just the data they need, reducing disk I/O and significantly speeding up query execution.
Analytic Processing: Columnar storage is well-suited for analytical queries and data warehousing, which often involve complex calculations over large amounts of data. Since these queries often only affect a subset of the columns in a table, columnar storage can lead to significant performance improvements.
CSV/TSV/Parquet
- Comma Separated Values
- Tab Separated Values
Pros
- Tabular Row storage.
- Human-readable is easy to edit manually.
- Simple schema.
- Easy to implement and parse the file(s).
Cons
- There is no standard way to present binary data.
- No complex data types.
- Large in size.
Parquet
Parquet is a columnar storage file format optimized for use with Apache Hadoop and related big data processing frameworks. Twitter and Cloudera developed it to provide a compact and efficient way of storing large, flat datasets.
Best for WORM (Write Once Read Many)
The key features of Parquet are:
Columnar Storage: Parquet is optimized for columnar storage, unlike row-based files like CSV or TSV. This allows it to compress and encode data efficiently, making it a good fit for storing data frames.
Schema Evolution: Parquet supports complex nested data structures, and the schema can be modified over time. This provides much flexibility when dealing with data that may evolve.
Compression and Encoding: Parquet allows for highly efficient compression and encoding schemes. This is because columnar storage makes better compression and encoding schemes possible, which can lead to significant storage savings.
Language Agnostic: Parquet is built from the ground up for use in many languages. Official libraries are available for reading and writing Parquet files in many languages, including Java, C++, Python, and more.
Integration: Parquet is designed to integrate well with various big data frameworks. It has deep support in Apache Hadoop, Apache Spark, and Apache Hive and works well with other data processing frameworks.
In short, Parquet is a powerful tool in the big data ecosystem due to its efficiency, flexibility, and compatibility with a wide range of tools and languages.
CSV vs Parquet
| Metric | CSV | Parquet |
|---|---|---|
| File Size | ~1 GB | 100-300 MB |
| Read Speed | Slower | Faster for columnar ops |
| Write Speed | Faster | Slower due to compression |
| Schema Support | None | Strong with metadata |
| Data Types | Basic | Wide range |
| Query Performance | Slower | Faster |
| Compatibility | Universal | Requires specific tools |
| Use Cases | Simple data exchange | Large-scale data processing |
These metrics highlight the advantages of using Parquet for efficiency and performance, especially in big data scenarios, while CSV remains useful for simplicity and compatibility.
Apache Arrow
Apache Arrow is an in-memory columnar data format designed for fast data exchange and analytics.
- Parquet is for disk
- Arrow is for memory
Arrow allows different systems to share data without copying or converting it.
Why Arrow Exists
Traditional formats focus on storage:
- CSV, JSON : human-readable, slow
- Parquet : compressed, efficient on disk
But once data is loaded into memory:
- Engines still spend time converting data
- Python, JVM, C++, R all use different memory layouts
Arrow solves this by providing a common in-memory columnar layout.
What Arrow Is Good At
- Fast in-memory analytics
- Zero-copy data sharing
- Cross-language interoperability
- Vectorized processing
Arrow is not a replacement for Parquet.
They work together.
| Feature | Apache Arrow | Apache Parquet |
|---|---|---|
| Purpose | In-memory analytics | On-disk storage |
| Location | RAM | Disk |
| Performance | Very fast, interactive | Optimized for scans |
| Compression | Minimal | Heavy compression |
| Use Case | Data exchange, compute | Data lakes, warehousing |
1: https://mariadb.com/resources/blog/why-is-columnstore-important/
[Avg. reading time: 7 minutes]
Rust in Data Engineering
Why Rust when we already have Spark, Hadoop, BigQuery?
Data engineering fits into multiple layers:
Layer 0: Storage/Format
- Parquet/Avro/Delta/Iceberg
- S3/ADLS/GCS/HDFS
Layer 1: Programming Language
- Rust
- Java / Scala
- C++
Used to build engines and systems
Layer 2: Planner Layer
- Spark Catalyst Optimizer
- DataFusion logical/physical planner
Responsible for:
- Query optimization
- Execution planning
Layer 3: Execution Engine
- Spark execution engine (Scala)
- Photon (C++)
- DataFusion (Rust)
- DuckDB (C++)
Responsible for:
- Joins
- Aggregations
- Query execution
- Memory handling
Layer 4: Distributed Platform
- Apache Spark (Planner + Engine + Distributed system)
- Ray (distributed compute framework)
- Databricks / BigQuery / Snowflake (managed platforms)
Responsible for:
- Cluster management
- Scaling
- Fault tolerance
- Distributed execution of workloads
In short
- Language builds the system
- Planner decides how to execute
- Engine executes the plan
- Platform distributes and scales
Modern systems are separating planner and execution.
Problems With Traditional Engines
Spark originally handled both planning and execution, but modern systems are separating these concerns to optimize performance.
Most popular systems (like Spark) are JVM-based.
Limitations
- Garbage collection overhead
- Serialization costs
- Poor CPU cache utilization
- Not SIMD-friendly
What Modern Engines Aim For
- Columnar data processing
- Vectorized execution
- CPU-level optimization
This is where performance gains come from.
Where Rust Fits in?
Rust does NOT replace Spark. Rust is being used to build similar high-performance engines.
Rust is used to:
- Build faster execution engines
- Optimize data processing at CPU level
Examples
- Apache Arrow : columnar memory format
- DataFusion : query engine
- Ballista : distributed query execution
- Polars : fast dataframe library
Rust works better because
- No garbage collector : predictable latency
- Fine-grained memory control : better cache efficiency
- Safe concurrency : fewer runtime failures
Rust gives near C++ performance without unsafe chaos.
| Layer | Role | Examples |
|---|---|---|
| Platform | Distributed system | Apache Spark, Databricks, BigQuery |
| Planner | Query optimization | Catalyst, DataFusion planner |
| Engine | Executes queries | Spark engine, Photon, DataFusion |
| Language | Builds engines | Scala, C++, Rust |
The stack is evolving toward:
- Planner layer (Spark-like)
- Execution layer (C++ / Rust)
- Columnar memory (Arrow)
- Vectorized compute (SIMD)
| Legacy | Nextgen |
|---|---|
| JVM-based | Native (Rust/C++) |
| Row-based | Columnar |
| GC-heavy | Memory controlled |
| Slower CPU usage | SIMD optimized |
Rust Adds Value
- Building high-performance data tools
- Optimizing bottlenecks
- Working on next-gen data platforms
- Understanding how engines actually work
[Avg. reading time: 5 minutes]
Batch - Streaming - Microbatch
Batch Processing
Batch means collect first, process later.
- Works on large chunks of accumulated data
- High throughput, cheaper, simpler
- Results are not real-time
- Typically minutes, hours, or days delayed
Examples:
- Daily or weekly sales reports
- End-of-day stock portfolio reconciliation
- Monthly billing cycles
- ETL pipelines that refresh a data warehouse
Use cases
- Immediate action is not required
- Delay is acceptable
- Working with large historical datasets
Stream Processing
Streaming means process events the moment they arrive.
- Low-latency (milliseconds to seconds)
- Continuous, event-by-event processing
- Ideal for real-time analytics and alerting
- Stateful systems maintain event history or running context
Examples:
- Stock price updates
- Fraud detection for credit cards
- Real-time gaming leaderboards
- IoT sensor monitoring
Use cases
- You need instant reactions
- Delays cause risk, loss, or bad UX
Micro Batch
Micro-batching = small batches processed very frequently.
- Latency: ~0.5 to a few seconds
- Not true real-time, but close
- Simpler than full streaming
- Common in systems like Spark Structured Streaming
batch pretending to be streaming
Examples
Fraud Detection (Streaming)
- Decision must be immediate
- Millisecond latency required
- Delay = financial loss
Payment Posting (Micro-Batch)
- Small delay is acceptable
- Updates can lag slightly
- No immediate risk
Monthly Statements (Batch)
- No urgency
- Process large volumes at once
- Cost-efficient
STREAMING > Event > Process > Output (ms latency)
MICRO-BATCH > Small windows > Process (seconds)
BATCH > Accumulate > Process (minutes+)
#batch #streaming #kafka #realtime
[Avg. reading time: 10 minutes]
Medallion Architecture
This is also called as Multi-Hop architecture.
Bronze Layer (Raw Data)
- Append-only ingestion
- No business logic
- Schema minimally enforced
- Supports replay / backfill
Silver Layer (Cleansed and Conformed Data)
- Deduplication
- Joins / normalization
- Schema enforcement
- Basic data quality checks
Gold Layer (Curated Business-level tables)
- Business logic
- Aggregations
- KPI tables
- Semantic-ready datasets
Polars (DataFrame Library)
Polars is a high-performance DataFrame library designed for Rust and Python, aiming to provide fast data manipulation capabilities similar to those found in libraries like Pandas for Python.
-
Performance: Polars is built for speed, leveraging Rust’s performance capabilities.
-
Lazy Execution: Polars supports lazy execution, allowing you to build complex query plans that are only executed when needed. This can optimize performance by minimizing unnecessary computations.
-
Expressive API: Polars offers an expressive and flexible API for data manipulation, including support for operations like filtering, aggregation, joining, and more.
-
Interoperability: While Polars is native to Rust, it also has a Python API, making it accessible to a broader range of developers.
DataFusion (Query Engine)
-
Rust query engine on top of Arrow.
-
Gives you SQL, DataFrame APIs, logical plans, physical plans, and an optimizer.
-
Best choice when you want to build an actual engine-like pipeline layer, not just do DataFrame scripting
| Category | Polars | DataFusion |
|---|---|---|
| Type | DataFrame library | Query engine |
| Primary API | DataFrame / LazyFrame | SQL + DataFrame |
| Execution model | Eager + Lazy | Always lazy (planned execution) |
| Focus | Transformations | Query planning + execution |
| Optimizer | Built-in (lazy optimizer) | Explicit rule-based optimizer |
| Control | Limited control over planning | Full control over plans |
| SQL support | Limited | Strong |
| Extensibility | Medium | Very high (custom rules, UDFs) |
| Use case | Data wrangling | Engine building / query layer |
| Parallelism | Automatic | Engine-controlled |
| Distributed | No | Via Ballista |
Demo
git clone https://github.com/gchandra10/rust-polars-csv-dataframe-demo
#medallion #bronze #silver #gold
[Avg. reading time: 0 minutes]
Data Quality Checks
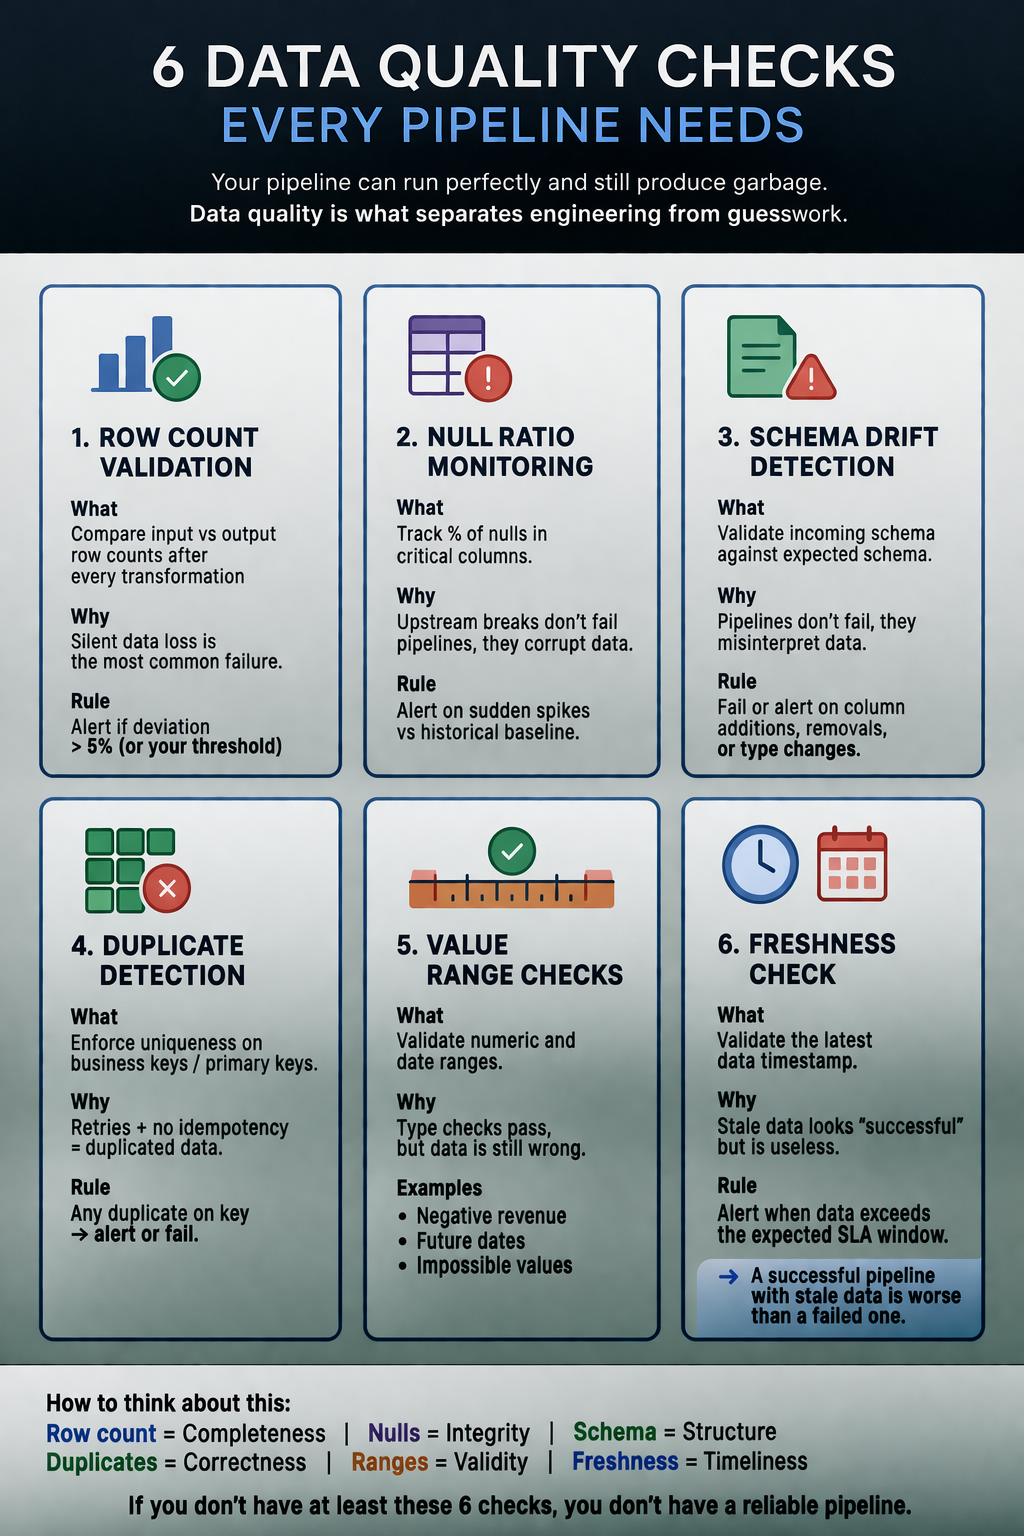
#dataquality #validation #schemadrift
[Avg. reading time: 3 minutes]
Data Engineering Model
1. Sequence Model
Source > Process > Sink
This is the simplest and most common pattern.
- Data flows in a straight line
- Each step transforms the data
- Typically implemented as Bronze > Silver > Gold
Where it fits
- ETL pipelines
- Batch processing
- Data cleaning and enrichment
Example
Raw logs > cleaned logs > aggregated reports
Funnel Model
Multiple Sources > Process > Single Sink
Here, multiple inputs are combined into one destination.
- Data from different systems is merged
- Requires schema alignment and joins
- Often introduces data quality challenges
Where it fits
- Data warehouse ingestion
- Building unified datasets
- Customer 360 views
Example
CRM + Transactions + Web logs → Unified customer table
Fan-Out (Star) Model
Single Source > Process > Multiple Sinks
One dataset feeds multiple downstream consumers.
- Same data used in different ways
- Different outputs for different use cases
- Requires careful data contracts
Where it fits
- Serving layer
- Analytics + ML + APIs from same data
- Reverse ETL
Example
Gold table > BI dashboards + ML models + APIs
[Avg. reading time: 3 minutes]
Data Governance
Data governance is not a document.
It’s control.
Who owns data, who can use it, and how it’s protected.
What it includes
- Policies : rules for storing and sharing data
- Ownership : someone accountable (data stewards)
- Security : who can access what
- Compliance : laws you cannot ignore
- Metadata : context (where data came from, how to use it)
Laws you can’t ignore
You don’t need to memorize all of them.
Just understand the pattern: protect user data or pay heavily.
- GDPR (EU) : strictest, global impact
- CCPA (California) : consumer rights
- HIPAA (US) : healthcare data
GDPR (the one everyone cares about)
- Consent : you must ask clearly
- Access : users can see their data
- Delete : users can ask to remove it
- Portability : users can take their data
- Breach reporting : within 72 hours
- Fines : up to 4% of global revenue
Summary
- Data Quality = Is the data good?
- Data Governance = Are we allowed to use it?
[Avg. reading time: 2 minutes]
HTTP
Basics
HTTP (HyperText Transfer Protocol) is the foundation of data communication on the web, used to transfer data (such as HTML files and images).
GET - Navigate to a URL or click a link in real life.
POST - Submit a form on a website, like a username and password.
Popular HTTP Status Codes
200 Series (Success): 200 OK, 201 Created.
300 Series (Redirection): 301 Moved Permanently, 302 Found.
400 Series (Client Error): 400 Bad Request, 401 Unauthorized, 404 Not Found.
500 Series (Server Error): 500 Internal Server Error, 503 Service Unavailable.
#http #get #put #post #statuscodes
[Avg. reading time: 3 minutes]
Monolithic Architecture
Definition: A monolithic architecture is a software design pattern in which an application is built as a unified unit. All application components (user interface, business logic, and data access layers) are tightly coupled and run as a single service.
Characteristics: This architecture is simple to develop, test, deploy, and scale vertically. However, it can become complex and unwieldy as the application grows.

Examples
- Traditional Banking Systems.
- Enterprise Resource Planning (SAP ERP) Systems.
- Content Management Systems like WordPress.
- Legacy Government Systems. (Tax filing, public records management, etc.)
Advantages and Disadvantages
Advantages: Simplicity in development and deployment, straightforward horizontal scaling, and often more accessible debugging since all components are in one place. Reduced Latency in the case of Amazon Prime.
Disadvantages: Scaling challenges, difficulty implementing changes or updates (especially in large systems), and potential for more extended downtime during maintenance.
#monolithic #banking #amazonprime tightlycoupled
[Avg. reading time: 8 minutes]
Statefulness
The server stores information about the client’s current session in a stateful system. This is common in traditional web applications. Here’s what characterizes a stateful system:
Session Memory: The server remembers past interactions and may store session data like user authentication, preferences, and other activities.
Server Dependency: Since the server holds session data, the same server usually handles subsequent requests from the same client. This is important for consistency.
Resource Intensive: Maintaining state can be resource-intensive, as the server needs to manage and store session data for each client.
Example: A web application where a user logs in, and the server keeps track of their authentication status and interactions until they log out.
In this diagram:
Initial Request: The client sends the initial request to the load balancer.
Load Balancer to Server 1: The load balancer forwards the request to Server 1.
Response with Session ID: Server 1 responds to the client with a session ID, establishing a sticky session.
Subsequent Requests: The client sends subsequent requests with the session ID.
Load Balancer Routes to Server 1: The load balancer forwards these requests to Server 1 based on the session ID, maintaining the sticky session.
Server 1 Processes Requests: Server 1 continues to handle requests from this client.
Server 2 Unused: Server 2 remains unused for this particular client due to the stickiness of the session with Server 1.
Stickiness (Sticky Sessions)
Stickiness or sticky sessions are used in stateful systems, particularly in load-balanced environments. It ensures that requests from a particular client are directed to the same server instance. This is important when:
Session Data: The server needs to maintain session data (like login status), and it’s stored locally on a specific server instance.
Load Balancers: In a load-balanced environment, without stickiness, a client’s requests could be routed to different servers, which might not have the client’s session data.
Trade-off: While it helps maintain session continuity, it can reduce the load balancing efficiency and might lead to uneven server load.
Methods of Implementing Stickiness
Cookie-Based Stickiness: The most common method, where the load balancer uses a special cookie to track the server assigned to a client.
IP-Based Stickiness: The load balancer routes requests based on the client’s IP address, sending requests from the same IP to the same server.
Custom Header or Parameter: Some load balancers can use custom headers or URL parameters to track and maintain session stickiness.
#stateful #stickiness #loadbalancer
[Avg. reading time: 9 minutes]
Microservices
Microservices architecture is a method of developing software applications as a suite of small, independently deployable services. Each service in a microservices architecture is focused on a specific business capability, runs in its process, and communicates with other services through well-defined APIs. This approach stands in contrast to the traditional monolithic architecture, where all components of an application are tightly coupled and run as a single service.
Characteristics:
Modularity: The application is divided into smaller, manageable pieces (services), each responsible for a specific function or business capability.
Independence: Each microservice is independently deployable, scalable, and updatable. This allows for faster development cycles and easier maintenance.
Decentralized Control: Microservices promote decentralized data management and governance. Each service manages its data and logic.
Technology Diversity: Teams can choose the best technology stack for their microservice, leading to a heterogeneous technology environment.
Resilience: Failure in one microservice doesn’t necessarily bring down the entire application, enhancing the system’s overall resilience.
Scalability: Microservices can be scaled independently, allowing for more efficient resource utilization based on demand for specific application functions.
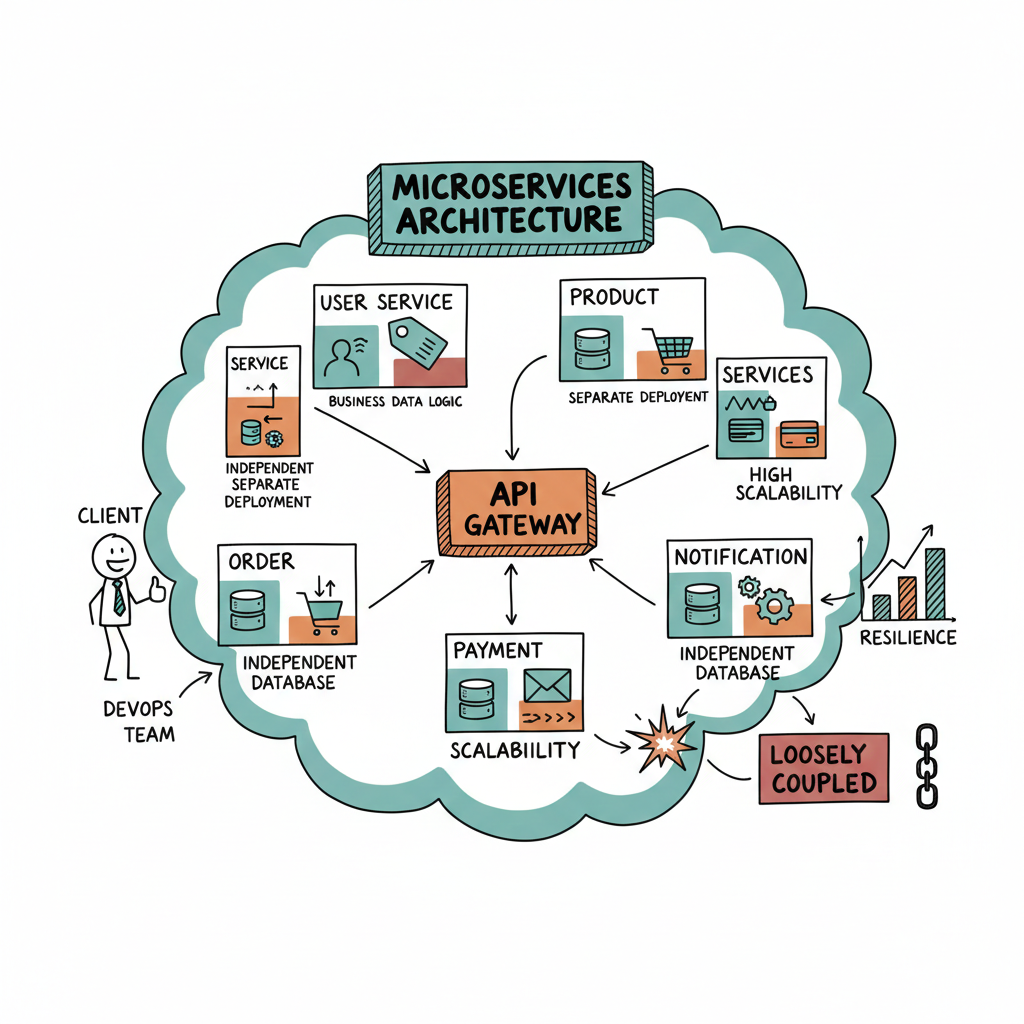
Data Ingestion Microservices: Collect and process data from multiple sources.
Data Storage: Stores processed weather data and other relevant information.
User Authentication Microservice: Manages user authentication and communicates with the User Database for validation.
User Database: Stores user account information and preferences.
API Gateway: Central entry point for API requests, routes requests to appropriate microservices, and handles user authentication.
User Interface Microservice: Handles the logic for the user interface, serving web and mobile applications.
Data Retrieval Microservice: Fetches weather data from the Data Storage and provides it to the frontends.
Web Frontend: The web interface for end-users, making requests through the API Gateway.
Mobile App Backend: Backend services for the mobile application, also making requests through the API Gateway.
Advantages:
Agility and Speed: Smaller codebases and independent deployment cycles lead to quicker development and faster time-to-market.
Scalability: It is easier to scale specific application parts that require more resources.
Resilience: Isolated services reduce the risk of system-wide failures.
Flexibility in Technology Choices: Microservices can use different programming languages, databases, and software environments.
Disadvantages:
Complexity: Managing a system of many different services can be complex, especially regarding network communication, data consistency, and service discovery.
Overhead: Each microservice might need its own database and transaction management, leading to duplication and increased resource usage.
Testing Challenges: Testing inter-service interactions can be more complex compared to a monolithic architecture.
Deployment Challenges: Requires robust DevOps practices, including continuous integration and continuous deployment (CI/CD) pipelines.
[Avg. reading time: 6 minutes]
Statelessness
In a stateless system, each request from the client must contain all the information the server needs to fulfill that request. The server does not store any state of the client’s session. This is a crucial principle of RESTful APIs. Characteristics include:
No Session Memory: The server remembers nothing about the user once the transaction ends. Each request is independent.
Scalability: Stateless systems are generally more scalable because the server doesn’t need to maintain session information. Any server can handle any request.
Simplicity and Reliability: The stateless nature makes the system simpler and more reliable, as there’s less information to manage and synchronize across systems.
Example: An API where each request contains an authentication token and all necessary data, allowing any server instance to handle any request.
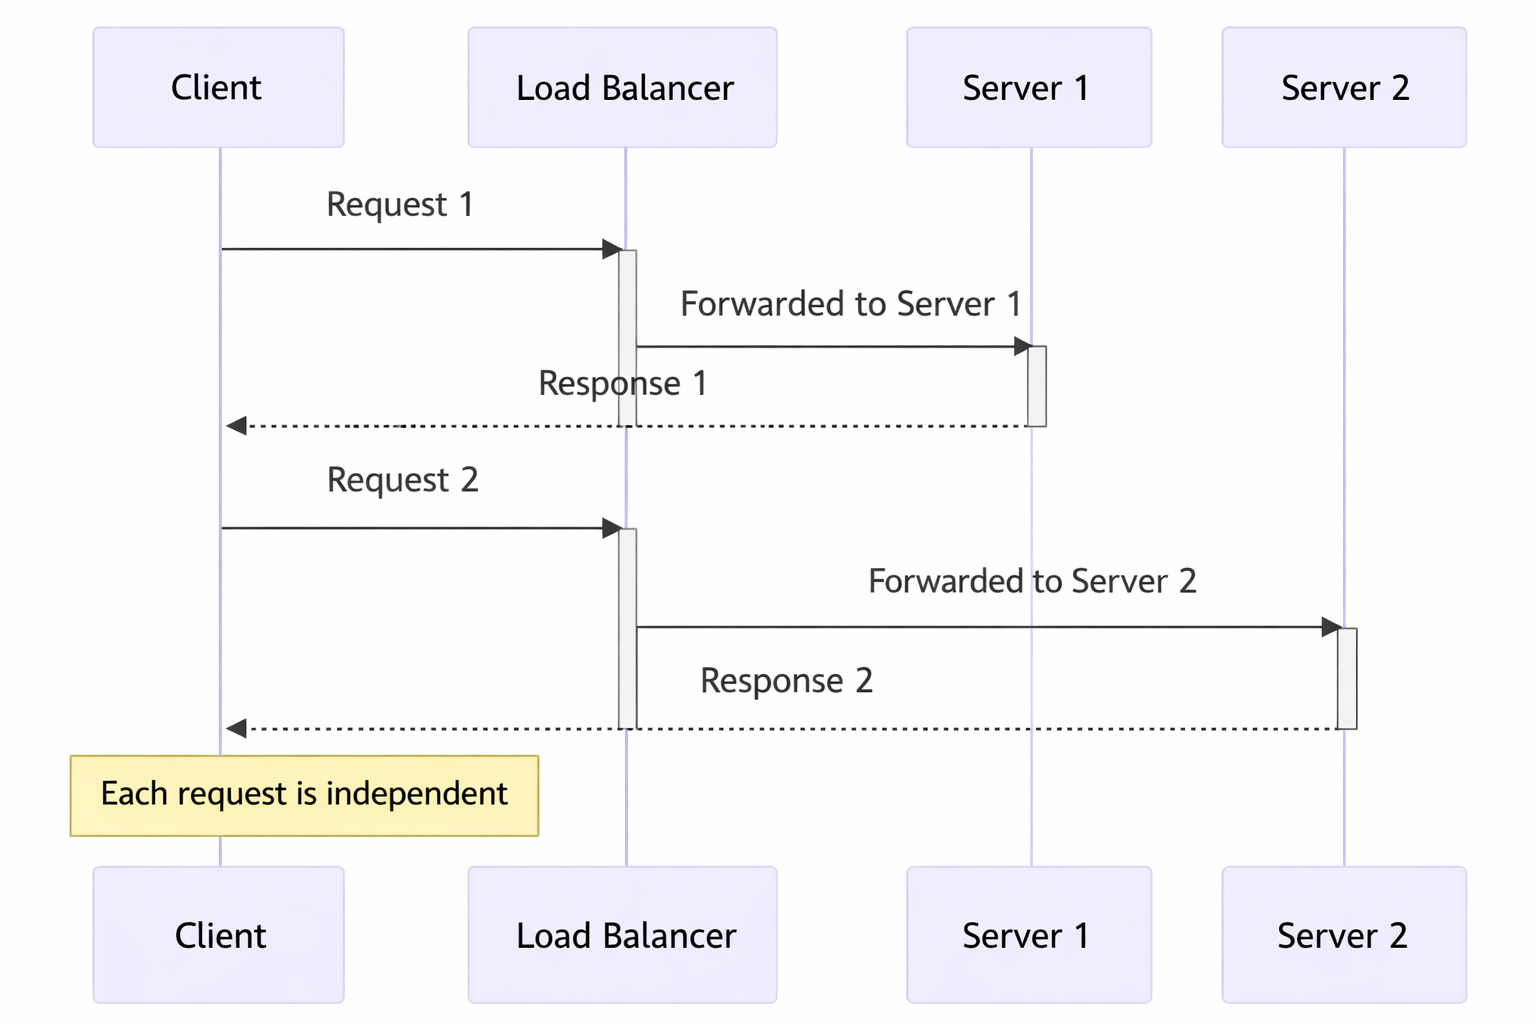
In this diagram:
Request 1: The client sends a request to the load balancer.
Load Balancer to Server 1: The load balancer forwards Request 1 to Server 1.
Response from Server 1: Server 1 processes the request and sends a response back to the client.
Request 2: The client sends another request to the load balancer.
Load Balancer to Server 2: This time, the load balancer forwards Request 2 to Server 2.
Response from Server 2: Server 2 processes the request and responds to the client.
Statelessness: Each request is independent and does not rely on previous interactions. Different servers can handle other requests without needing a shared session state.
Token-Based Authentication
Common in stateless architectures, this method involves passing a token for authentication with each request instead of relying on server-stored session data. JWT (JSON Web Tokens) is a popular example.
[Avg. reading time: 2 minutes]
Idempotency
In simple terms, idempotency is the property where an operation can be applied multiple times without changing the result beyond the initial application.
Think of an elevator button: whether you press it once or mash it ten times, the elevator is still only called once to your floor. The first press changed the state; the subsequent ones are “no-ops.”
In technology, this is the “secret sauce” for reliability. If a network glitch occurs and a request is retried, idempotency ensures you don’t end up with duplicate orders, double payments, or corrupted data.
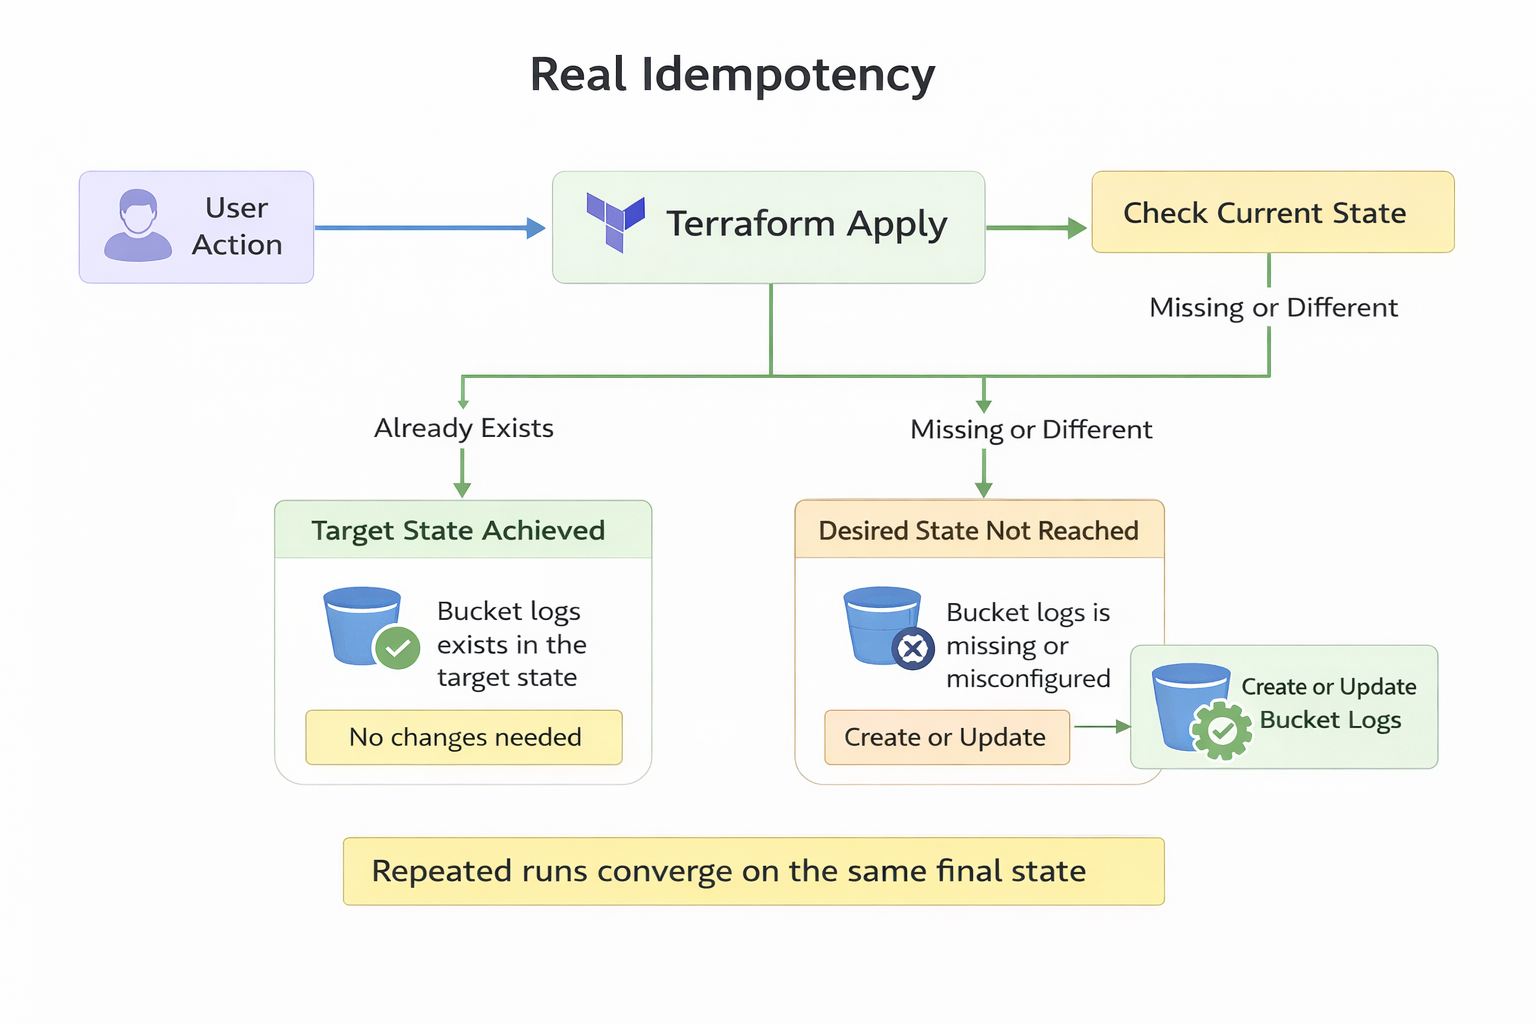
Popular Examples
- The MERGE (Upsert) Operation
- ABS(-5)
- Using Terraform to deploy server
#idempotent #merge #upsert #teraform #abs
[Avg. reading time: 4 minutes]
REST API
REpresentational State Transfer is a software architectural style developers apply to web APIs.
REST APIs provide simple, uniform interfaces because they can be used to make data, content, algorithms, media, and other digital resources available through web URLs. Essentially, REST APIs are the most common APIs used across the web today.
Use of a uniform interface (UI)
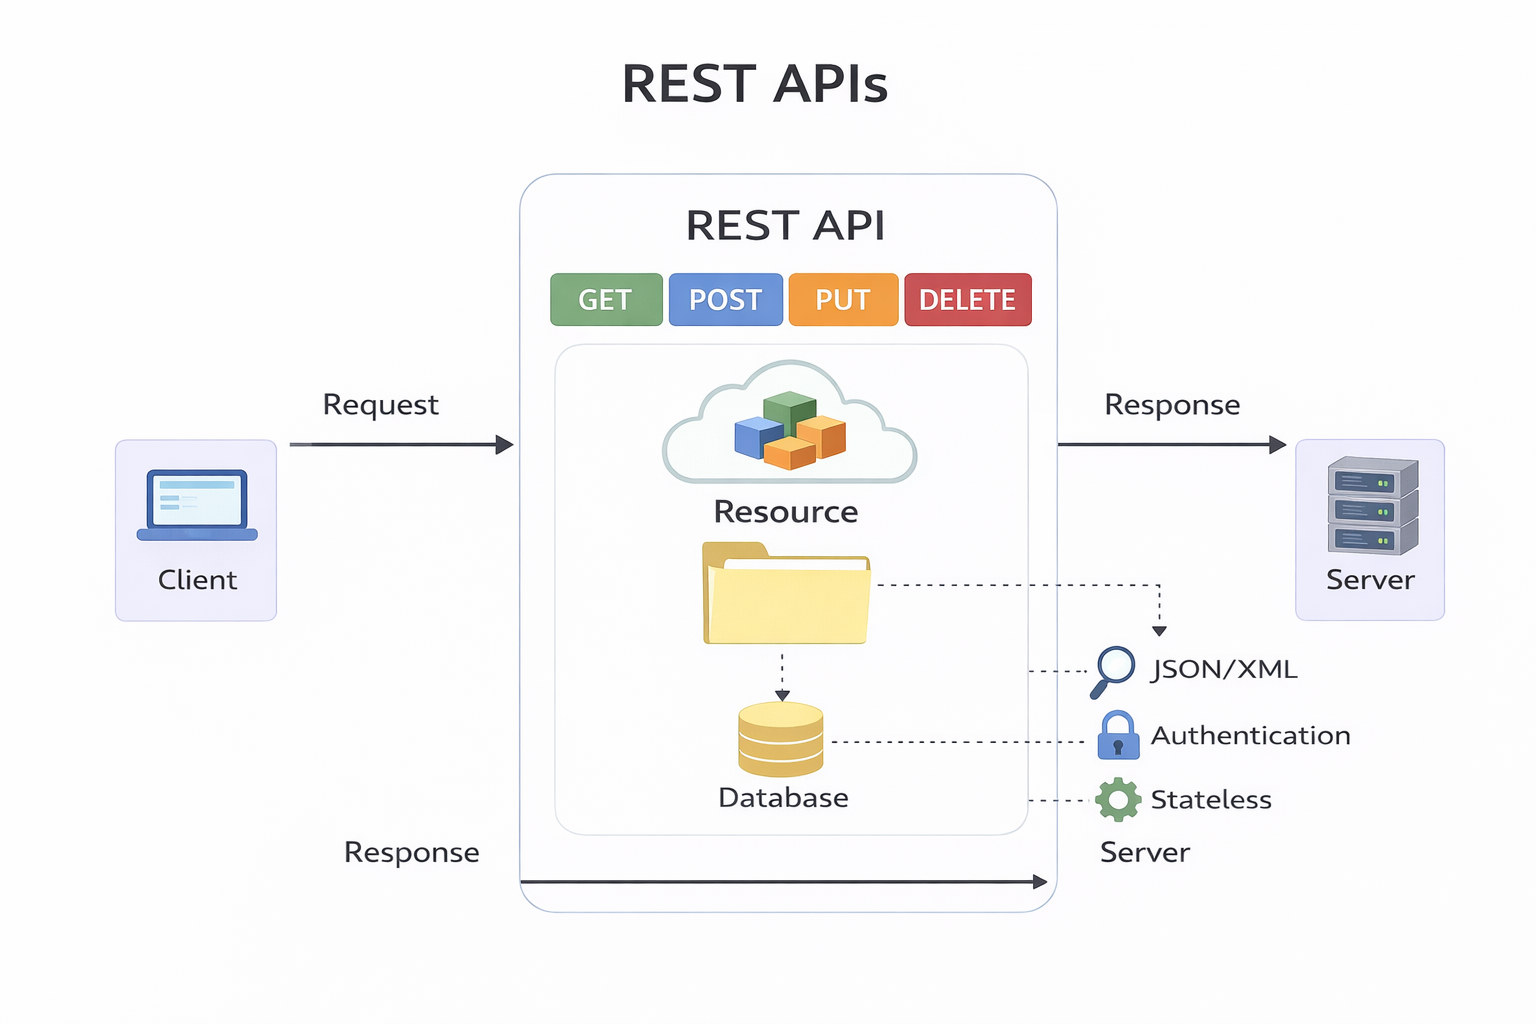
HTTP Methods
GET: This method allows the server to find the data you requested and send it back to you.
POST: This method permits the server to create a new entry in the database.
PUT: If you perform the ‘PUT’ request, the server will update an entry in the database.
DELETE: This method allows the server to delete an entry in the database.
Sample REST API URI
https://api.zippopotam.us/us/08028
http://api.tvmaze.com/search/shows?q=friends
https://jsonplaceholder.typicode.com/posts
https://jsonplaceholder.typicode.com/posts/1
https://jsonplaceholder.typicode.com/posts/1/comments
Usage
curl https://api.zippopotam.us/us/08028
curl https://api.zippopotam.us/us/08028 -o zipdata.json
Browser based
VS Code based
git clone https://github.com/gchandra10/rust-rest-api-demo
#restapi #REST #curl #requests
[Avg. reading time: 6 minutes]
API Performance
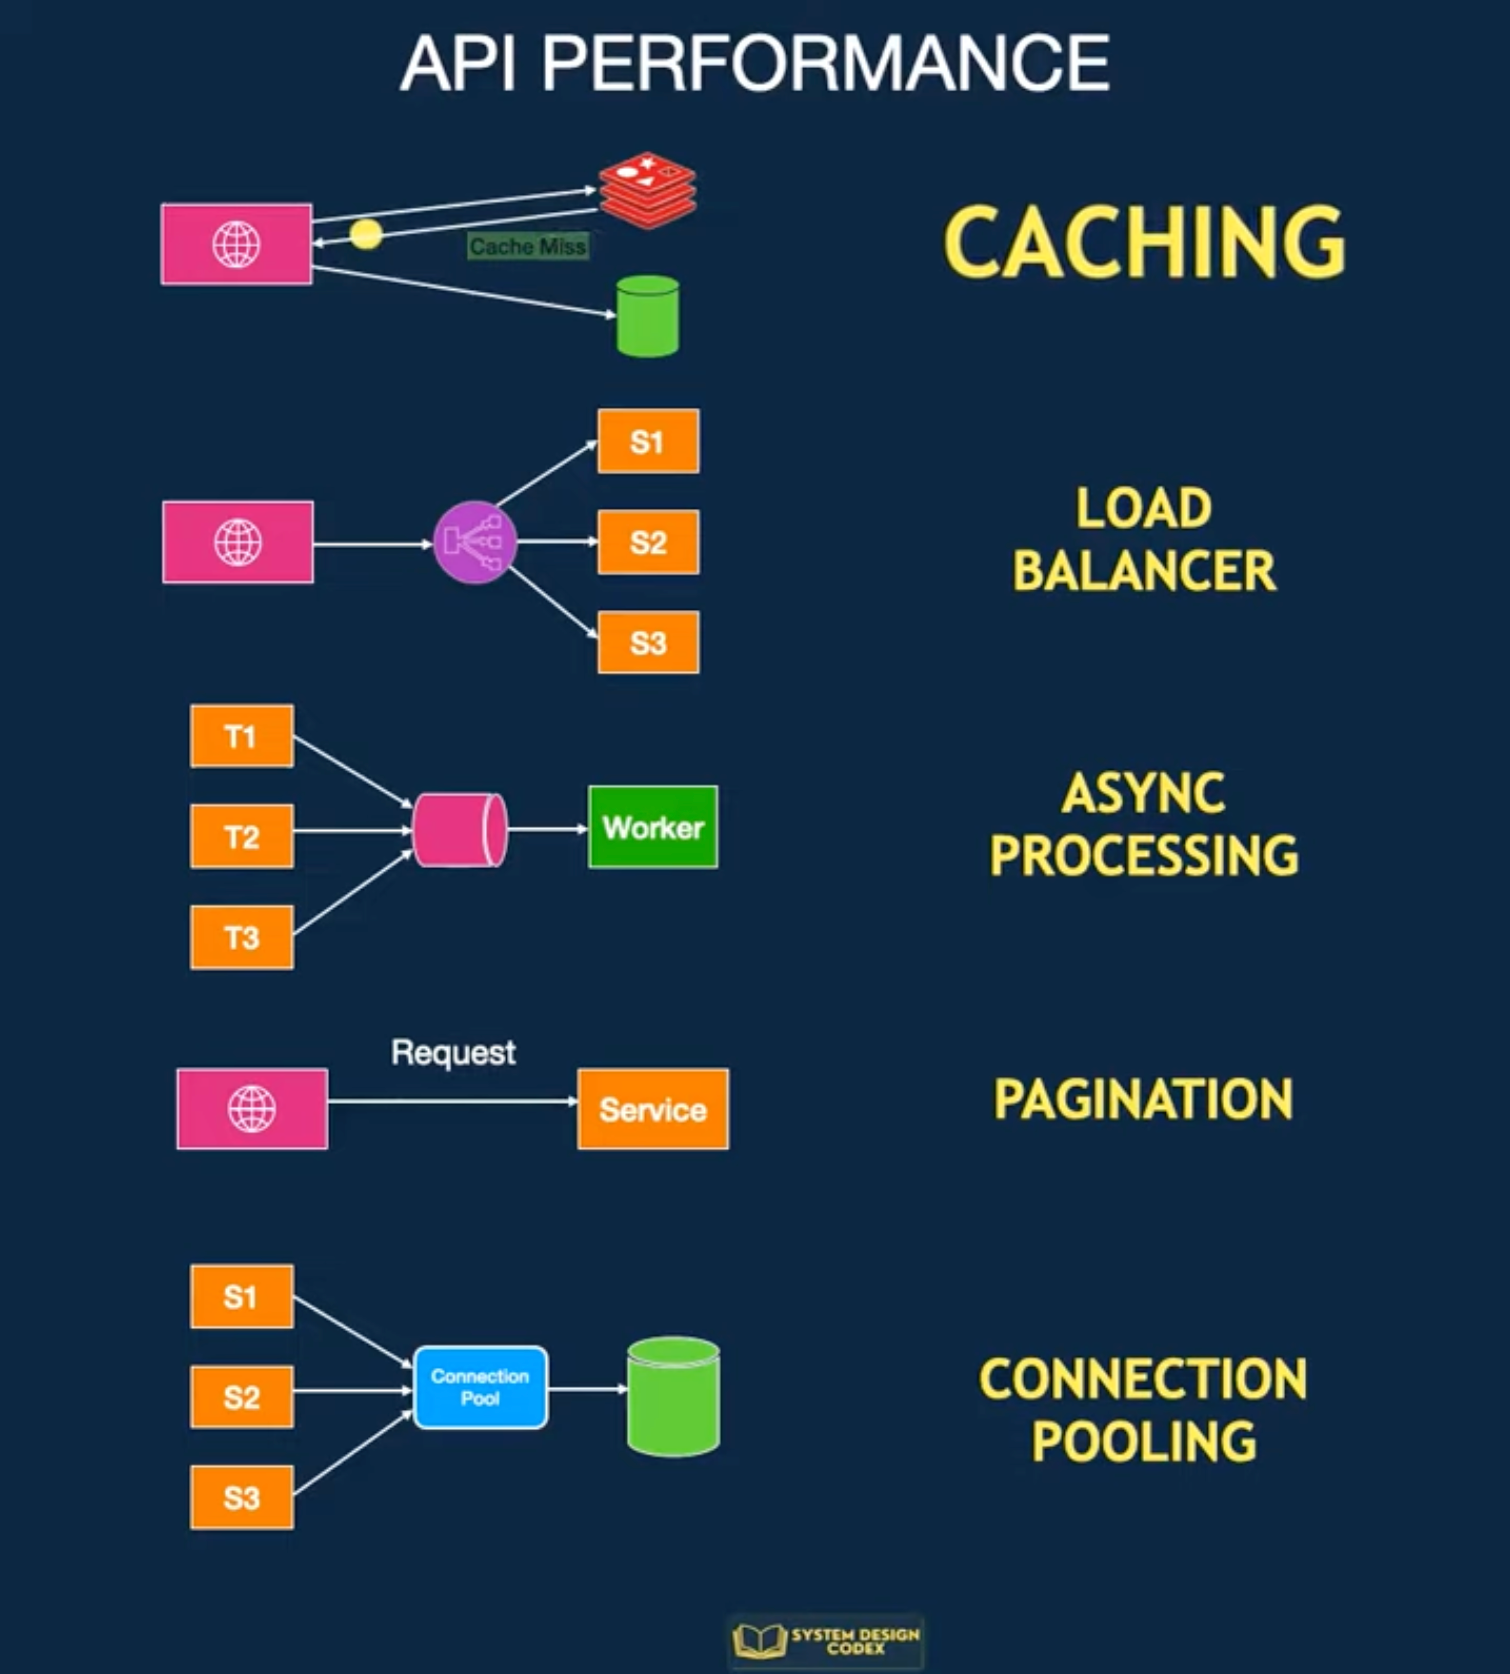
Techniques
Caching = speed Load balancing = scale Async = responsiveness Pagination = control data volume Pooling = efficiency
Load balancer + caching + connection pooling + pagination
Caching
Store frequently accessed data in a cache so you can access it faster.
If there’s a cache miss, fetch the data from the database.
It’s pretty effective, but it can be challenging to invalidate and decide on the caching strategy.
Scale-out with Load Balancing
You can consider scaling your API to multiple servers if one server instance isn’t enough. Horizontal scaling is the way to achieve this.
The challenge will be to find a way to distribute requests between these multiple instances.
Load Balancing
It not only helps with performance but also makes your application more reliable.
However, load balancers work best when your application is stateless and easy to scale horizontally.
Pagination
If your API returns many records, you need to explore Pagination.
You limit the number of records per request.
This improves the response time of your API for the consumer.
Async Processing
With async processing, you can let the clients know that their requests are registered and under process.
Then, you process the requests individually and communicate the results to the client later.
This allows your application server to take a breather and give its best performance.
But of course, async processing may not be possible for every requirement.
Connection Pooling
An API often needs to connect to the database to fetch some data.
Creating a new connection for each request can degrade performance.
It’s a good idea to use connection pooling to set up a pool of database connections that can be reused across requests.
This is a subtle aspect, but connection pooling can dramatically impact performance in highly concurrent systems.
#api #performance #loadbalancing #pagination #connectionpool
[Avg. reading time: 12 minutes]
Concurrency & Parallelism
Process
Definition
A process is an independent program in execution.
- Has its own memory space
- Is isolated from other processes
- Managed by the operating system
Examples
- Chrome browser
- VS Code
- Python script running
Each of these runs as a separate process. Processes do NOT share memory by default.
Thread
Definition
A thread is a unit of execution inside a process.
- Multiple threads can exist inside one process
- Threads share the same memory
- Managed by the OS
Key Idea
Threads are like workers inside a process.
- Faster than processes
- Can run in parallel
- But shared memory = risk (data races)
Example
A single application can have:
- UI thread
- Network thread
- Worker thread
Threads are not CPU Cores. But they use Cores
Task
Definition
A task is a piece of work to be executed.
- It is NOT tied to threads or processes
- It is an abstraction
Key Idea
A task is WHAT to do
A thread is WHERE it runs
Examples
- “Read this file”
- “Process these 1M rows”
- “Call this API”
Differences
Process
├── Thread
├── Executes Tasks
- Process : container
- Thread : worker
- Task : actual work
| Concept | What it is | Memory | Cost |
|---|---|---|---|
| Process | Independent program | Separate | High |
| Thread | Worker inside process | Shared | Medium |
| Task | Unit of work | N/A | Lightweight |
Concurrency and parallelism are both about handling multiple tasks at the same time, > but they approach the problem differently.
Concurrency
Definition
-
Multiple tasks are in progress at the same time
-
Not necessarily running simultaneously
-
Focus: coordination and efficient waiting
-
One CPU core
-
Task switching
-
Avoid idle time
Data Engineering Example
- Reading from Kafka
- Calling APIs
- Writing to databases
This is IO-bound work.
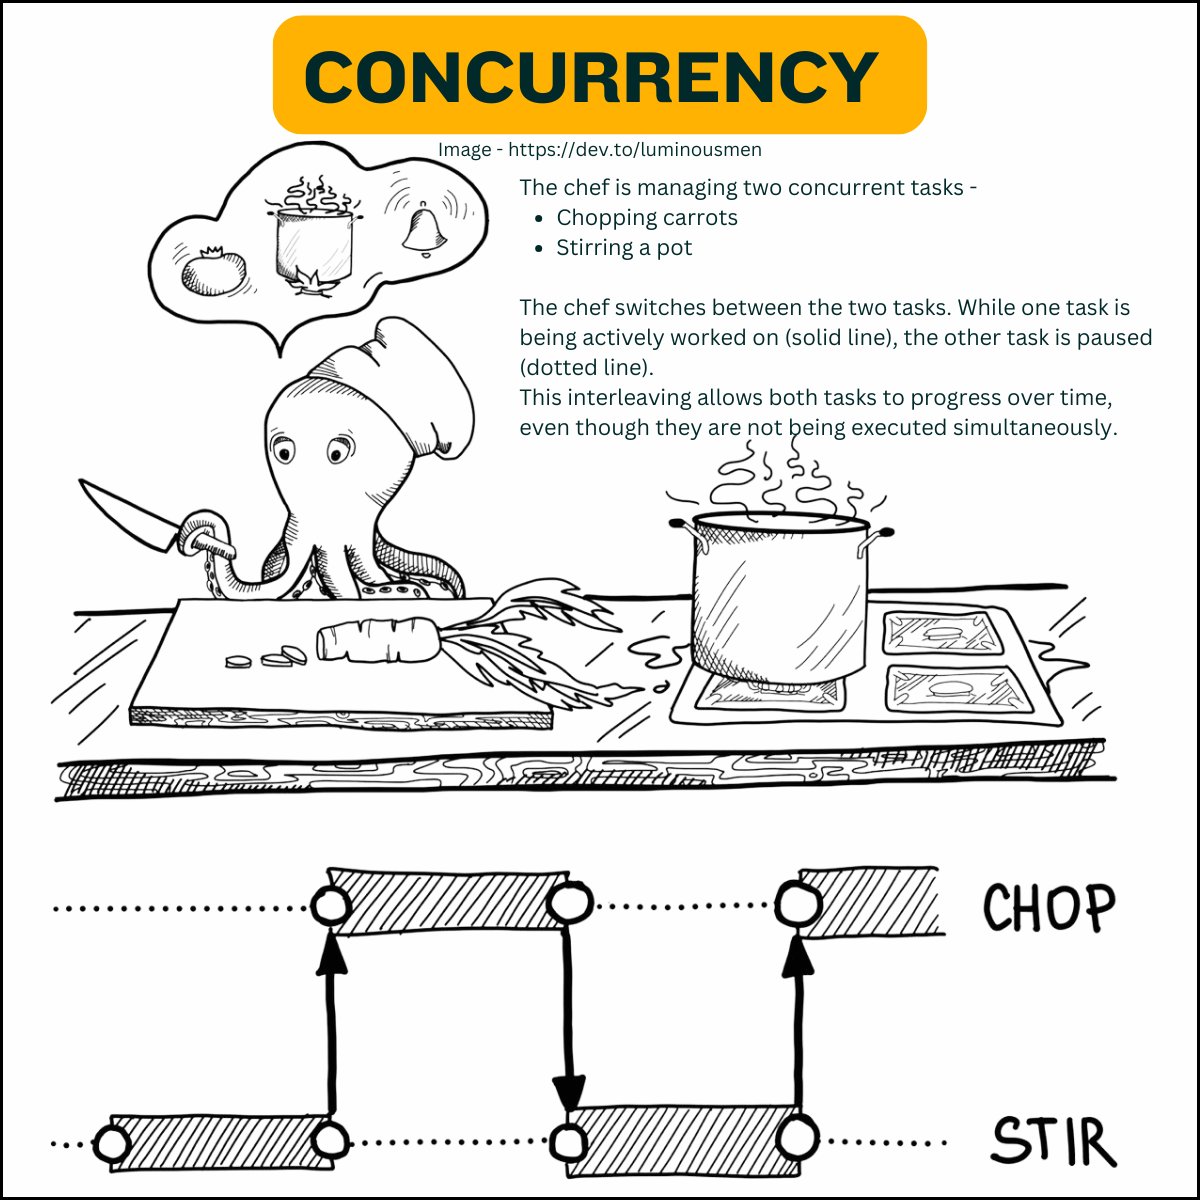
Parallelism
Definition
-
Multiple tasks executed at the same time
-
Uses multiple CPU cores
-
Focus: speed through computation
-
Many CPU cores
-
Same operation applied across data
Data Engineering Example
- Aggregations
- Filtering large datasets
- Feature engineering
This is CPU-bound work.
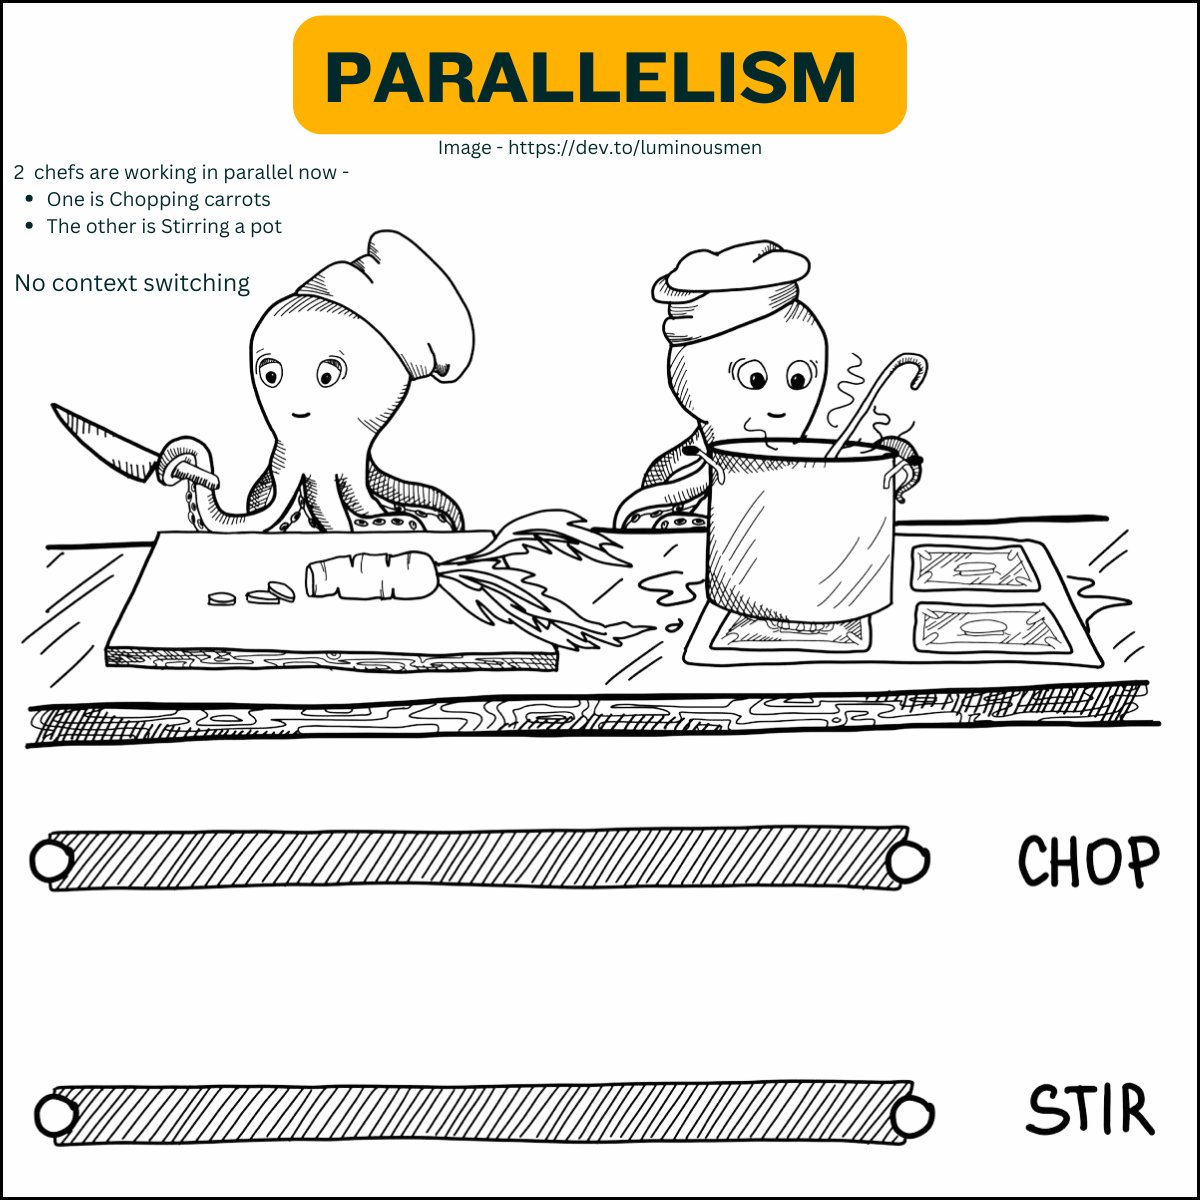

Key Difference
- Concurrency solves waiting problems
- Parallelism solves compute problems
Rust Implementation
Concurrency in Rust
Rust achieves concurrency through threads and async/await.
Threads: Rust’s standard library provides native support for threads, which are the basic unit of concurrency.
- True parallel execution (multi-core)
- Low-level control
use std::thread; fn main() { let handle = thread::spawn(|| { // This is the code that will run in a new thread. for i in 1..10 { println!("Hello from the spawned thread! {}", i); } }); // Meanwhile, the main thread continues. for i in 1..5 { println!("Hello from the main thread! {}", i); } // Wait for the spawned thread to finish. handle.join().unwrap(); }
Async/Await: Rust’s async/await syntax allows you to write asynchronous code that looks like synchronous code.
- Efficient for IO-bound tasks
- Non-blocking execution
use tokio; // Using the Tokio async runtime #[tokio::main] async fn main() { let future1 = async_task(); let future2 = async_task(); // `join!` runs multiple futures concurrently tokio::join!(future1, future2); } async fn async_task() { // Some asynchronous work println!("Doing async work"); }
Parallelism in Rust
Rust achieves parallelism primarily through the Rayon library, which provides data parallelism through easy-to-use abstractions.
Rayon: Rayon makes it easy to parallelize data processing tasks.
Key Points
Safety: Rust ensures thread safety and data race prevention through its ownership and borrowing system.
Ease of Use: Libraries like Rayon and Tokio make it easier to work with concurrency and parallelism without delving too deep into low-level details.
- Automatic parallel execution
- Ideal for data processing
use rayon::prelude::*; fn main() { let data = vec![1,2,3,4,5,6,7,8]; let result: Vec<i32> = data .par_iter() .map(|x| x * 2) .collect(); println!("{:?}", result); }
Demo
git clone https://github.com/gchandra10/rust-concurrency-parallelism.git
[Avg. reading time: 2 minutes]
Nice to Know
[Avg. reading time: 15 minutes]
CICD
A CI/CD pipeline is a development practice focused on one core goal:
Ship high-quality features to production faster and more reliably.
Without CI/CD, every step in the software lifecycle is manual: building code, running tests, and deploying changes. This slows teams down and introduces human error.

What Happens Without CI/CD?
- Developers manually trigger builds
- Testing is inconsistent or delayed
- Deployments are error-prone
- Releases take longer and break more often
CI/CD fixes this by automating the entire flow.
Continuous Integration (CI)
- Automatically builds and tests code whenever changes are pushed to a shared repository
- Detects issues early before they reach production
- Ensures new code doesn’t break existing functionality
Keep the codebase stable at all times
Continuous Delivery (CD)
- Automatically deploys validated code to staging or testing environments
- Production deployment is still a manual decision
Always be ready to release.
Continuous Deployment
- Extends Continuous Delivery
- Every successful change is automatically deployed to production
Remove manual steps and release continuously.
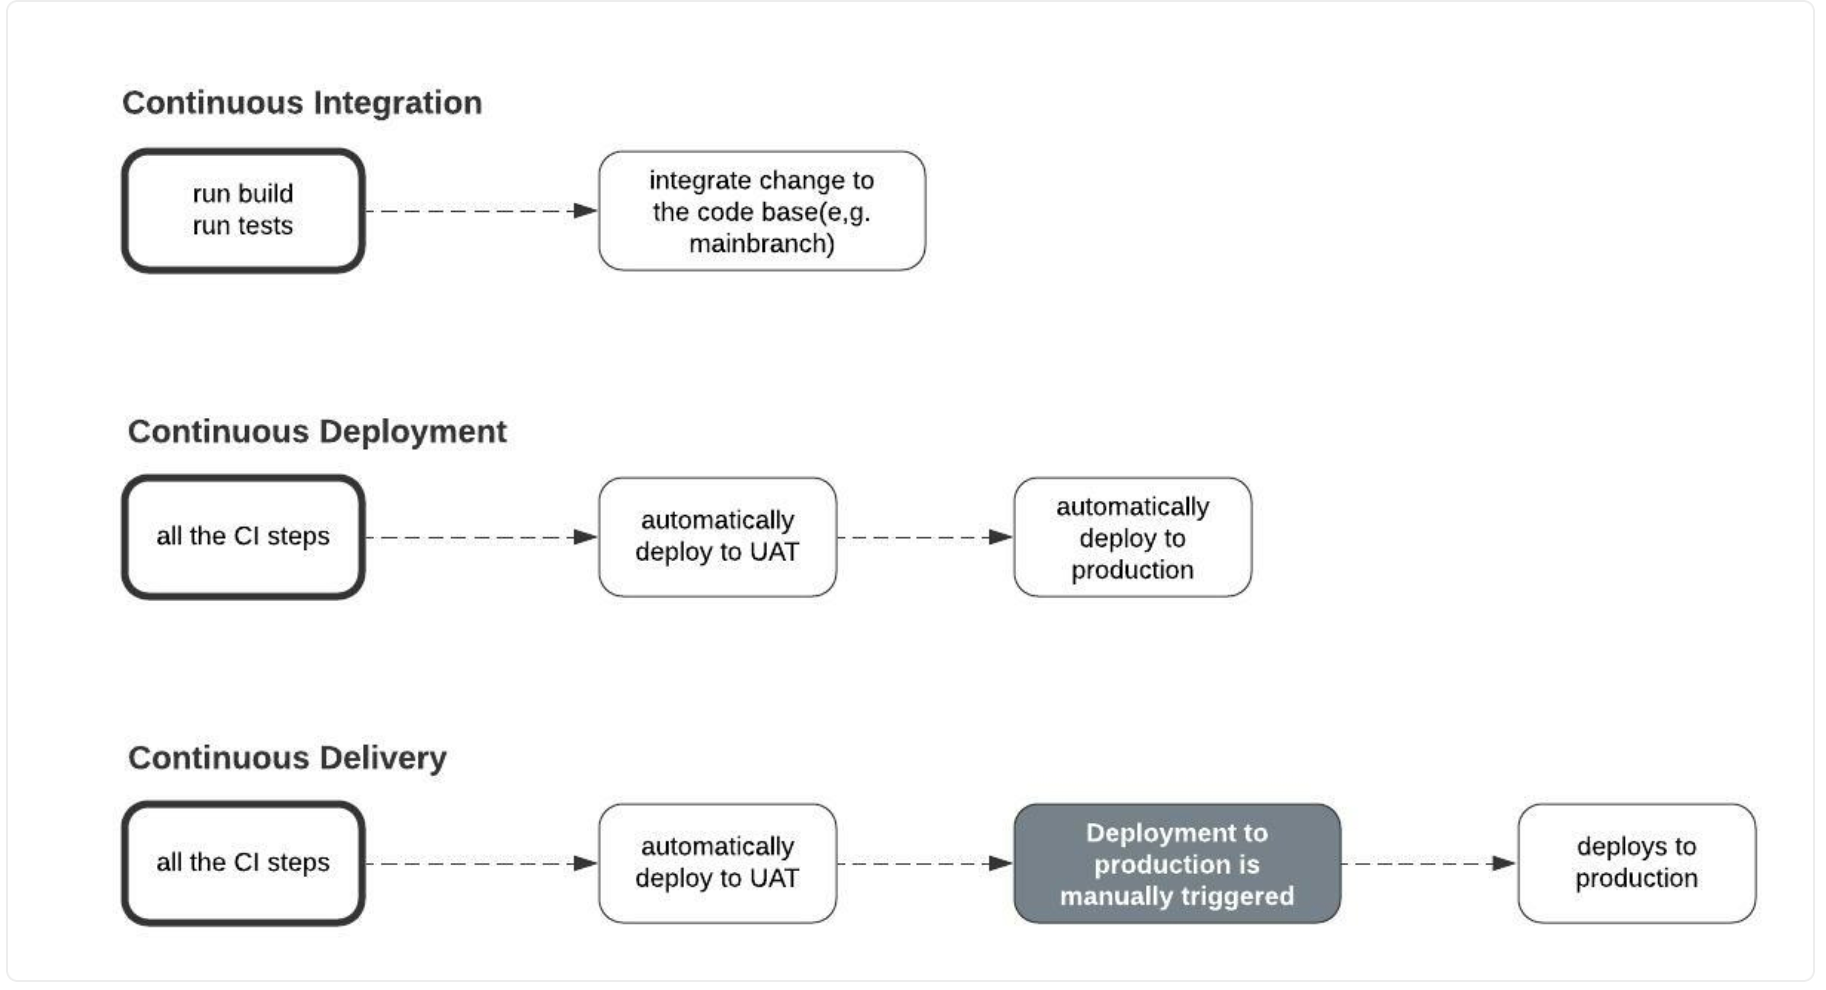
There are many CI/CD tools available. They differ mainly in hosting model and integration ecosystem.
Categories of CI/CD Tools
Self-Hosted / On-Prem
-
Jenkins
-
CircleCI (can be self-hosted, though mostly SaaS now)
-
You need full control
-
Strict security/compliance
-
Custom infrastructure
SaaS / Web-Based
-
GitHub Actions
-
GitLab CI/CD
-
You want quick setup
-
Tight integration with source control
Cloud-Native Tools
-
AWS CodeBuild / CodePipeline
-
Azure DevOps
-
Google Cloud Build
-
You’re already in that cloud
-
Need deep integration with cloud services
GitHub Actions
One of the most widely used CI/CD tools today.
- Native integration with GitHub
- Free tier available
- Huge marketplace of reusable actions
Core Five Concepts
Workflows
- Define the automation pipeline
- Stored as YAML files in .github/workflows/
- Think: entire pipeline definition
Jobs
- A workflow is made up of one or more jobs
- Jobs run independently (can be parallel)
- Each job contains multiple steps
Steps
- Individual tasks inside a job
- Example: install dependencies, run tests
Events (Triggers)
Trigger the execution of the job.
- on push / pull
- on schedule
- on workflow_dispatch (Manual Trigger)
Actions
Reusable building blocks.
Example:
- checkout repo
- setup Python
- deploy apps
https://github.com/features/actions
Runners
Remote computer that GitHub Actions uses to execute the jobs.
Github-Hosted Runners
- ubuntu-latest
- windows-latest
- macos-latest
Self-Hosted Runners
- Specific OS that Github does not offer.
- Connection to a private network/environment.
- To save costs for projects with high usage. (Enterprise plans are expensive)
YAML (Yet Another Markup Language)
- Human-readable
- Key-value structure
- Indentation matters
https://learnxinyminutes.com/docs/yaml/
DEMO
Multiple Runners Demo
https://github.com/gchandra10/github-actions-multiple-runners-demo
Rust DEMO
git clone https://github.com/gchandra10/rust-ci-demo
Sample
name: Rust
on:
push:
branches: [ main ]
pull_request:
branches: [ main ]
jobs:
build_step:
runs-on: ubuntu-latest
steps:
- name: Discord - Process started
env:
DISCORD_WEBHOOK: ${{ secrets.DISCORD_WEBHOOK }}
uses: Ilshidur/action-discord@master
with:
args: ' :information_source: The Calculator App {{ EVENT_PAYLOAD.repository.full_name }} workflow (${{ github.run_id }}) was triggered by ${{ github.actor }}'
- uses: actions/checkout@v2
- name: Install Rust
uses: actions-rs/toolchain@v1
with:
toolchain: stable
override: true
- name: Build
uses: actions-rs/cargo@v1
with:
command: build
args: --release
- name: Run tests
uses: actions-rs/cargo@v1
with:
command: test
# - name: Format the Code
# uses: actions-rs/cargo@v1
# with:
# command: fmt
- name: Send Discord Failure Notification
# https://github.com/marketplace/actions/actions-for-discord
if: failure()
env:
DISCORD_WEBHOOK: ${{ secrets.DISCORD_WEBHOOK }}
uses: Ilshidur/action-discord@master
with:
args: '@here :x: The Calculator App integration {{ EVENT_PAYLOAD.repository.full_name }} test failed. Check the Run id ${{ github.run_id }} on Github for details.'
- name: Send Discord Success Notification
# https://github.com/marketplace/actions/actions-for-discord
if: success()
env:
DISCORD_WEBHOOK: ${{ secrets.DISCORD_WEBHOOK }}
uses: Ilshidur/action-discord@master
with:
args: ' :white_check_mark: The Calculator App {{ EVENT_PAYLOAD.repository.full_name }} - ${{ github.run_id }} successfully integrated and tested.'
# - name: Generate Documentation
# uses: actions-rs/cargo@v1
# with:
# command: doc
## Not that popular these days.
# - name: Send Email Notification on Failure
# if: failure()
# uses: dawidd6/action-send-mail@v2
# with:
# server_address: ${{ secrets.EMAIL_SERVER }}
# server_port: ${{ secrets.EMAIL_PORT }}
# username: ${{ secrets.EMAIL_USERNAME }}
# password: ${{ secrets.EMAIL_PASSWORD }}
# subject: CI Failure in ${{ github.repository }}
# to: chandr34@rowan.edu
# from: chandr34@rowan.edu
# body: The Rust CI test failed. Check the details on GitHub.
1: www.freecodecamp.org/
[Avg. reading time: 7 minutes]
Rhai
Rhai is an embedded scripting engine for Rust.
It allows you to run user-defined scripts inside a Rust application without recompiling the code.
- Rust builds the system
- Rhai controls behavior at runtime
Execution Flow
Rhai scripts are written in a simple, easy-to-learn syntax. When you execute a Rhai script, it goes through several stages:
Parsing: The script is parsed into an Abstract Syntax Tree (AST). When this script is parsed by Rhai, it gets converted into an AST. The AST is a tree-like structure that represents the syntactic structure of the script.
Compilation: The AST is compiled into an internal representation.
Execution: The compiled script is executed by the Rhai engine.
Script → Parse → AST → Compile → Execute
use rhai::{Engine, Scope};
use std::fs;
fn main() {
let engine = Engine::new();
let script = fs::read_to_string("rule1.rhai").unwrap();
let mut scope = Scope::new();
scope.push("amount", 1000.0);
let result: f64 = engine.eval_with_scope(&mut scope, &script).unwrap();
println!("Final Amount: {}", result);
}
rust1.rhai
// 10% discount
if amount > 500 {
amount * 0.9
} else {
amount
}
rule1.rhai
// 20% discount
if amount > 500 {
amount * 0.8
} else {
amount
}
Consolidated Example
git clone https://github.com/gchandra10/rust_rhai_demo
Data Engineering Use Case
Dynamic transformation rules
Example:
-
Users define filters: “drop rows where amount < 0”
-
Users define derived columns: “total = price * quantity”
Instead of hardcoding logic, you run Rhai scripts on data rows
Why NOT Use Rhai
-
Slower than native Rust Not suitable for heavy compute loops
-
Not for data processing at scale Don’t run Rhai over 100M rows
-
Limited language features No full Rust-level abstractions
-
Debugging is harder Runtime errors instead of compile-time safety
-
Not for core system logic Only for configurable behavior
Use Cases
Game Development: Embedding Rhai to script game logic, AI behavior, or user interfaces.
Configuration: Allowing users to define configuration scripts that can modify the behavior of an application at runtime.
Automation: Providing a scripting interface for automating tasks or extending the functionality of an application.
Prototyping: Quickly testing and iterating on new features without recompiling the entire Rust application.
RHAI Its not as fast native Rust. Doesn’t support Classes/Traits/Closures/Tuples
[Avg. reading time: 2 minutes]
Cargo Publish
Note: Once you publish a crate, there is no removal.
Visit https://crates.io/
- Login with GitHub
- Verify the email address
- Goto Account > API Settings and Generate a new token.
Sample Libraries
// Cargo Commands
cargo login <token>
cargo publish --dry-run
// git commands
git add Cargo.toml
git add README.md
git add src/lib.rs
git add .gitignore
git commit -m "Demo Crate"
// Publish
cargo publish
[Avg. reading time: 1 minute]
Cargo Watch
This enables dynamic compilation as soon as the project is saved. This helps to save compilation time.
Goto command prompt or terminal and
// How to install Cargo Watch
cargo install cargo-watch
Goto respective project
Dynamic Build
cargo watch -x check
Dynamic Build and Run
cargo watch -x check -x run
Dynamic Build, Run and Test
cargo watch -x check -x run -x test
[Avg. reading time: 1 minute]
Cargo Audit
Goto command prompt or terminal
// How to install Cargo audit
cargo install cargo-audit
Go to the project you want to audit
cargo audit
Check the Vulnerable crates and fix as suggested.
Example:
Goto osinfo project
Change the dependency to 0.1.0
Run the cargo audit
Check the error messages.
[Avg. reading time: 1 minute]
How to use Multiple .rs files
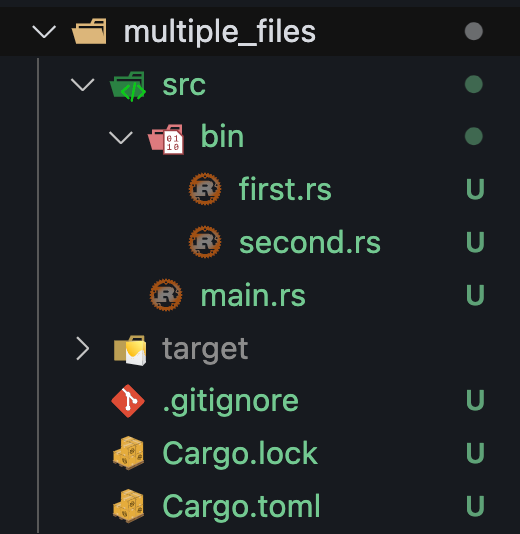
first.rs
fn first(){
println!("{}","From first function");
}
fn main() {
println!("Hello from first main file!");
first();
}
second.rs
fn second(){
println!("{}","From second function");
}
fn main() {
println!("Hello from second main file!");
second();
}
cargo run --bin first
cargo run --bin second
[Avg. reading time: 3 minutes]
References
Use Cases
Additional Learning
Interesting Tools
Rust Dump Analyzer
https://github.com/luishsr/rust-dump-analyzer
Mem Viewer
https://docs.rs/mem_viewer/latest/mem_viewer/
Tokio
https://tokio.rs/tokio/tutorial
ETL
https://supabase.github.io/etl/
Apache Datafusion
https://datafusion.apache.org/
Apache Ballista
https://datafusion.apache.org/ballista/
Tags
abs
/Chapter 6/Idempotency
alias
/Chapter 4/Complex Datatypes/Type Alias
alignment
/Chapter 3/Memory Management/Memory Layout
amazonprime
/Chapter 6/Monolithic Architecture
api
/Chapter 6/API Performance
array
/Chapter 4/Complex Datatypes/Vectors
arrays
/Chapter 2/Data Types/Arrays
attributes
/Chapter 4/Commonly used Attributes
audit
/Nice to know/Cargo Audit
banking
/Chapter 6/Monolithic Architecture
batch
/Chapter 6/Data Engineering/Batch - Streaming
binary
/Chapter 2/Operators/Binary Operators
bitwise
/Chapter 2/Operators/Binary Operators
block
/Chapter 1/Starter Crates/Comments
boolean
/Chapter 2/Data Types/Boolean
borrow
/Chapter 2/Operators/Unary Operators
/Chapter 3/Memory Management/Borrowing
borrower
/Chapter 3/Memory Management/Owner Borrower - Demo
borrowing
/Chapter 3/Memory Management/Borrowing References
box
/Chapter 5/Smart Pointers
bronze
/Chapter 6/Data Engineering/Medallion Architecture
bytecode
/Chapter 1/Programming Basics/Compiler vs Interpreter
c++
/Chapter 1/Programming Basics/GPL
calculator
/Chapter 2/Automated Tests/Calculator
callbyreference
/Chapter 2/Functions
callbyvalue
/Chapter 2/Functions
cargo
/Chapter 1/Rust Overview/Cargo
/Chapter 1/Rust Overview/Cargo Dependency Versions
/Chapter 1/Rust Overview/Cargo Example
/Nice to know/Cargo Publish
/Nice to know/Cargo Watch
cargoexample
/Chapter 1/Rust Overview/Cargo Example
char
/Chapter 2/Data Types/Char & Strings
cicd
/Chapter 6/Microservices
/Nice to know/CI-CD
cli
/Chapter 4/Commandline Args
clone
/Chapter 3/Memory Management/Borrowing
closures
/Chapter 5/Closures
collect
/Chapter 5/Map & Collect
commandlineargs
/Chapter 4/Commandline Args
comments
/Chapter 1/Starter Crates/Comments
compiler
/Chapter 1/Programming Basics/Compiler vs Interpreter
/Chapter 4/Commonly used Attributes
concurrency
/Chapter 6/Concurrency & Parallelism
connectionpool
/Chapter 6/API Performance
constants
/Chapter 2/Data Types/Constants
crates
/Chapter 2/Data Types/String based crates
/Nice to know/Cargo Publish
curl
/Chapter 6/REST API
customdatatype
/Chapter 4/Complex Datatypes/Structs
dangling
/Chapter 3/Memory Management/Dangling References
database
/Chapter 5/Database
dataengine
/Chapter 6/Data Engineering/Rust In DE
dataengineering
/Chapter 6/Data Engineering
dataquality
/Chapter 6/Data Engineering/Data Quality Checks
datatype
/Chapter 2/Data Types/Arrays
/Chapter 2/Data Types/Boolean
/Chapter 2/Data Types/Floating-point
/Chapter 2/Data Types/Unit-type
datatypes
/Chapter 2/Data Types/Overview
debug
/Chapter 1/Starter Crates/Basic Programs
declarative
/Chapter 4/Iterator
dereference
/Chapter 2/Operators/Unary Operators
/Chapter 2/Reference - Dereference
docs
/Chapter 1/Starter Crates/Comments
dsl
/Chapter 1/Programming Basics/DSL
dynamic
/Chapter 1/Programming Basics/Programming Matrix
/Chapter 1/Programming Basics/Static vs Dynamic
/Chapter 4/Complex Datatypes/Vectors
else
/Chapter 2/Flow of control/If Else
enum
/Chapter 4/Complex Datatypes/Enums
escape
/Chapter 1/Starter Crates/Escape Printing
escapeprint
/Chapter 1/Starter Crates/Escape Printing
examples
/Chapter 1/Starter Crates/Simple Rust Programs
explicit
/Chapter 2/Data Types/Overview
expression
/Chapter 2/Expressions
externalfile
/Chapter 4/Modules/Module Multiple files
file
/Chapter 5/File Handling
float
/Chapter 2/Data Types/Floating-point
for
/Chapter 2/Flow of control/Loops
frontend
/Chapter 1/Rust Overview/Rust Used For
functions
/Chapter 2/Functions
funnel
/Chapter 6/Data Engineering/Data Eng Model
gdpr
/Chapter 6/Data Engineering/Data Governance
generics
/Chapter 5/Generics
get
/Chapter 6/HTTP
github
/Nice to know/CI-CD
gold
/Chapter 6/Data Engineering/Medallion Architecture
governance
/Chapter 6/Data Engineering/Data Governance
gpl
/Chapter 1/Programming Basics/GPL
hashmap
/Chapter 4/Complex Datatypes/Hash Maps
heap
/Chapter 3/Memory Management/Owner Borrower - Demo
/Chapter 3/Memory Management/Stack & Heap
/Chapter 4/Complex Datatypes/Vectors
html
/Chapter 1/Programming Basics/DSL
http
/Chapter 6/HTTP
i8
/Chapter 2/Data Types/Integer
idempotent
/Chapter 6/Idempotency
if
/Chapter 2/Flow of control/If Else
impl
/Chapter 4/Complex Datatypes/Structs
implements
/Chapter 5/Traits
implicit
/Chapter 2/Data Types/Overview
inference
/Chapter 2/Data Types/Integer
inline
/Chapter 5/Closures
input
/Chapter 4/User Input
/Chapter 4/Vector Struct Input
integer
/Chapter 2/Data Types/Integer
interpreter
/Chapter 1/Programming Basics/Compiler vs Interpreter
iterator
/Chapter 4/Iterator
java
/Chapter 1/Programming Basics/Compiler vs Interpreter
javascript
/Chapter 1/Programming Basics/Strongly vs Weakly Typed
json
/Chapter 5/JSON
jwt
/Chapter 6/Statelessness
kafka
/Chapter 6/Data Engineering/Batch - Streaming
learning
/Chapter 1/Programming Basics/Overview
lib
/Chapter 4/Modules/Creating a Library
library
/Chapter 4/Modules/Creating a Library
linkedlist
/Chapter 5/Smart Pointers
loadbalancer
/Chapter 6/Statefulness
loadbalancing
/Chapter 6/API Performance
log4j
/Chapter 5/Log4j
logging
/Chapter 5/Log4j
loop
/Chapter 2/Flow of control/Loops
loops
/Chapter 4/Iterator
macro
/Chapter 1/Starter Crates/Basic Programs
macros
/Chapter 5/Macros
map
/Chapter 5/Map & Collect
masking
/Chapter 1/Starter Crates/Variables
match
/Chapter 2/Flow of control/Match
medallion
/Chapter 6/Data Engineering/Medallion Architecture
memory
/Chapter 3/Memory Management/Memory Layout
/Chapter 3/Memory Management/Stack & Heap
merge
/Chapter 6/Idempotency
microservices
/Chapter 6/Microservices
ml
/Chapter 1/Rust Overview/Rust Used For
module
/Chapter 4/Modules/Module Multiple files
/Chapter 4/Modules/Module Sub Folders
/Chapter 4/Modules/Overview
/Chapter 4/Modules/Userdefined Modules
monolithic
/Chapter 6/Monolithic Architecture
monomorphization
/Chapter 5/Generics
multi-paradigms
/Chapter 1/Programming Basics/Programming Paradigms
mutable
/Chapter 2/Data Types/Tuples
online
/Chapter 1/Rust Overview/Rust Playground
operators
/Chapter 2/Operators/Binary Operators
option
/Chapter 4/Complex Datatypes/Enums
osinfo
/Chapter 1/Rust Overview/Cargo Example
overloading
/Chapter 5/Macros
overview
/Chapter 1/Rust Overview/Overview
owner
/Chapter 3/Memory Management/Owner Borrower - Demo
/Chapter 3/Memory Management/Ownership
ownership
/Chapter 3/Memory Management/Ownership
packagemanager
/Chapter 1/Rust Overview/Cargo
padding
/Chapter 3/Memory Management/Memory Layout
pagination
/Chapter 6/API Performance
panic
/Chapter 4/User Input
paradigms
/Chapter 1/Programming Basics/Programming Paradigms
parallelism
/Chapter 6/Concurrency & Parallelism
parquet
/Chapter 6/Data Engineering/Storage Formats
path
/Chapter 4/Modules/Overview
performance
/Chapter 6/API Performance
pipeline
/Chapter 6/Data Engineering
placeholder
/Chapter 1/Starter Crates/Basic Programs
playground
/Chapter 1/Rust Overview/Rust Playground
post
/Chapter 6/HTTP
postgresql
/Chapter 5/Database
prettyprint
/Chapter 1/Starter Crates/Advance Print
print
/Chapter 1/Starter Crates/Advance Print
println
/Chapter 1/Starter Crates/Basic Programs
private
/Chapter 4/Modules/Userdefined Modules
programming
/Chapter 1/Programming Basics/Overview
programmingmatrix
/Chapter 1/Programming Basics/Programming Matrix
put
/Chapter 6/HTTP
python
/Chapter 1/Programming Basics/Static vs Dynamic
/Chapter 1/Programming Basics/Strongly vs Weakly Typed
read
/Chapter 5/File Handling
realtime
/Chapter 6/Data Engineering/Batch - Streaming
reference
/Chapter 2/Operators/Unary Operators
/Chapter 2/Reference - Dereference
references
/Chapter 3/Memory Management/Borrowing References
/Chapter 3/Memory Management/Dangling References
requests
/Chapter 6/REST API
rest
/Chapter 6/REST API
/Chapter 6/Statelessness
restapi
/Chapter 6/Microservices
/Chapter 6/REST API
result
/Chapter 4/Complex Datatypes/Enums
rhai
/Nice to know/RHAI
rust
/Chapter 1/Programming Basics/Compiler vs Interpreter
/Chapter 1/Programming Basics/GPL
/Chapter 1/Programming Basics/Static vs Dynamic
/Chapter 1/Rust Overview/Overview
/Chapter 1/Rust Overview/Rust Playground
/Chapter 6/Data Engineering/Rust In DE
rust-testing
/Chapter 2/Automated Tests/Overview
rustfiles
/Nice to know/Multiple Rust Files
sample
/Chapter 1/Starter Crates/Simple Rust Programs
schemadrift
/Chapter 6/Data Engineering/Data Quality Checks
scripting
/Nice to know/RHAI
self
/Chapter 4/Modules/Userdefined Modules
semantic
/Chapter 4/Complex Datatypes/Type Alias
semicolon
/Chapter 2/Expressions
sequence
/Chapter 6/Data Engineering/Data Eng Model
serde
/Chapter 5/JSON
shadowing
/Chapter 1/Starter Crates/Variables
silver
/Chapter 6/Data Engineering/Medallion Architecture
slices
/Chapter 4/Slices
smartpointers
/Chapter 5/Smart Pointers
sql
/Chapter 1/Programming Basics/DSL
stack
/Chapter 3/Memory Management/Owner Borrower - Demo
/Chapter 3/Memory Management/Stack & Heap
starmodel
/Chapter 6/Data Engineering/Data Eng Model
stateful
/Chapter 6/Statefulness
statelessness
/Chapter 6/Statelessness
static
/Chapter 1/Programming Basics/Programming Matrix
/Chapter 1/Programming Basics/Static vs Dynamic
statuscodes
/Chapter 6/HTTP
stdio
/Chapter 4/Modules/Overview
/Chapter 4/User Input
stickiness
/Chapter 6/Statefulness
storage
/Chapter 6/Data Engineering/Storage Formats
streaming
/Chapter 6/Data Engineering/Batch - Streaming
string
/Chapter 2/Data Types/Char & Strings
/Chapter 2/Data Types/String based crates
strongly
/Chapter 1/Programming Basics/Strongly vs Weakly Typed
struct
/Chapter 4/Complex Datatypes/Structs
/Chapter 4/Vector Struct Input
structs
/Chapter 5/Traits
subfolders
/Chapter 4/Modules/Module Sub Folders
super
/Chapter 4/Modules/Userdefined Modules
teraform
/Chapter 6/Idempotency
testing
/Chapter 2/Automated Tests/Overview
trait
/Chapter 1/Starter Crates/Basic Programs
/Chapter 5/Traits
tuple
/Chapter 2/Flow of control/Match
/Chapter 4/Complex Datatypes/Structs
tuples
/Chapter 2/Data Types/Tuples
typealias
/Chapter 4/Complex Datatypes/Type Alias
unary
/Chapter 2/Operators/Binary Operators
/Chapter 2/Operators/Unary Operators
unittest
/Chapter 2/Automated Tests/Calculator
/Chapter 2/Automated Tests/Overview
unittype
/Chapter 2/Data Types/Unit-type
unrwap
/Chapter 4/Complex Datatypes/Enums
upsert
/Chapter 6/Idempotency
usecase
/Chapter 1/Rust Overview/Overview
usecases
/Chapter 1/Rust Overview/Rust Used For
validation
/Chapter 6/Data Engineering/Data Quality Checks
variables
/Chapter 1/Starter Crates/Variables
vector
/Chapter 4/Complex Datatypes/Vectors
/Chapter 4/Vector Struct Input
version
/Chapter 1/Rust Overview/Cargo Dependency Versions
weakly
/Chapter 1/Programming Basics/Strongly vs Weakly Typed
while
/Chapter 2/Flow of control/Loops
write
/Chapter 5/File Handling